Adding Expenses
Think of the Expenses section as your financial diary — every bill, every payment, every little detail neatly logged. It’s the place where you turn day-to-day spending into clear, trackable records.
No more scattered receipts or forgotten entries. Here, every expense is captured in real time —organized, accurate, and easy to revisit whenever you need.
How to Add an Expense
Navigate to Bills and Expenses
From the sidebar, click Client and select the project you want to manage.
Choose the Client
Open the workspace for that client and head straight to Bills and Expenses.
Add Expense
Enter the details—amount, category, date, and any notes—then save. Done in seconds.
Pro tip: Add expenses as soon as they occur. The sooner they’re logged, the clearer your project’s financial picture will be.

Create a New Expense – Quick and Simple
- When it’s time to log a new cost, just hit Create and choose Expenses from the menu. In a few clicks, your expense is ready to be recorded, keeping your financial records clean and up to date.
- You can create an expense either manually or by uploading it in bulk using the Excel upload option.
Pro tip: Use the Create New shortcut whenever possible—it saves time and ensures no expense slips through the cracks.

Enter Expense Details
Once you select Expenses, a pop up Get started with your Expenses appears on screen.You have two options Start from Scratch and Upload Template.
When you choose Start from Scratch and click Proceed an off-canvas form slides into view. This is your workspace to log every detail. Fill in the essentials: Date, Name, Amount and Mode of Payment (MOP) are mandatory fields.
You can also select “Upload Template” to upload all your expenses using the provided CSV template, then click “Proceed” A pop up with the list of Expenses and upload status will be displayed and this will be added to the expense. It now appears right under Bills and Expenses for that client - organized, visible, and ready whenever you need to review it.
Pro tip: Add notes or tags while saving an expense. Those small details make tracking and reporting effortless later on.

Add Expenses Form
The off-canvas form is your checklist for accurate, transparent financial records. Each field ensures nothing slips through the cracks - whether it’s the basics or the finer details.
What You’ll Fill In
- Name – Enter the name linked to the expense (required).
- Date – Pick the date the expense was incurred using the calendar (required).
- Amount – Record the exact financial value (required).
- Payment Mode – Select how it was paid (card, cash, etc.).
- Payment Status - Paid/Unpaid
- Receiver Name – The vendor or user linked to the expense for accurate cost tracking.
- Expense Type – Select the category based on Receiver Name:
- Vendor → Purchase Order or Work Order (then select the respective PO/WO).
- User → Petty Cash or Site Expense.
- Work Category – Assign the expense to the right category of work.
- Tag – Add tags for smarter organization and easier filtering later.
- Description – Note down any extra details or context.
- File Upload – Attach up to 4 files (images or PDFs) as proof or supporting documents.
Pro tip: Always upload receipts or bills when possible - having documents attached makes reviews and audits effortless.
Action Buttons
Save – Finalize the expense and record it instantly under Bills and Expenses. One click, and your entry is secure and ready to track.
Pro tip: Double-check details before hitting Save. A few extra seconds here ensures clean, error-free records later.
Upload Expense (Bulk Upload via Excel)
You can upload multiple expenses at once using the template given.

Steps to Upload:
Click on Upload Expense.
Download the provided Template (includes sample data and instructions).
Fill in your expense data according to the template format.
Drag & drop your file or upload it from your computer.
Click on Proceed and check the expense summary displayed .
Important Instructions
- Upload a CSV file only according to the provided template.
The Date must be entered in MM/DD/YYYY format.
Do not include the currency symbol in the Amount field. Enter numeric values only.
Date, Name, Amount, and Mode of Payment (MOP) are mandatory fields.
All expenses uploaded through this method will have the Source set as Manually Added.
View Expenses
Clicking on a bill or expense brings you to the View Expenses page - a focused, read-only view designed to show every detail behind your costs. It’s your quick insight into what was spent, when it happened, and how it was paid - without the risk of unintentional edits.
What You Can Do Here
Locate the Expense
- In the Bills & Expenses list, find the expense you want to review. Each entry shows the name, amount, payment mode, and status at a glance.Click the Expense Name and select the expense.

Review Expense Details
- View all essential information at a glance—expense name, date, amount, payment mode, work category, tags, and description.
Verify Payment Status
- Check whether an expense has been marked as paid or remains pending, ensuring you always have a clear financial picture.
Track Spending Accurately
- Understand where each cost fits in your budget with structured categories and tags that make reporting easier and more organized.

Edit Access
- Need to make changes? Editing isn’t available directly from the View Expenses page—but you can switch to the Edit Expense option for authorized updates. This separation keeps your financial data safe, accurate, and traceable.
Editing Expenses – Permission-Based Access Control
Clicking the Edit Pen Icon beside an expense allows authorized users to update or manage expense details. The edit functionality depends on the user’s access level — All Access, Write Only, or Read Only.
All Access
Users with All Access have complete control over expense management.
They can:
- Click the Edit Pen Icon next to any expense.
- Instantly navigate to the Edit Expense Page.
- Modify or delete any record across the system
 .
.
Once on the Edit Expense page, users can update the following fields (Applicable for Source: Manually Added, Work Order, Purchase Order, Petty Cash, and Site Expenses):
- Name – The name linked to the expense (required).
- Date – The date the expense occurred (required).
- Amount – The total expense value (required).
- Payment Mode – Choose from available payment options (cash, cheque, etc.).
- Payment Status – Paid / Unpaid.
- Receiver (Flow) – The vendor or user linked to the expense for accurate cost tracking.
- Work Category – Assign the expense to the correct category.
- Tag – Add custom tags for tracking and sorting.
- Description – Include relevant notes or context.
- File Upload – Attach up to 4 documents (images or PDFs).
Note:
For expenses with the Source set to Inventory, Wages, or Time Sheet, the following fields cannot be edited:- Date
- Amount
- Payment Status
After making all necessary changes, click the Update button to apply and save your modifications instantly.
Important : All Access users can also delete expenses when necessary to maintain clean, accurate records.
Pro Tip:
All Access users handle critical financial data. Always double-check the accuracy of edits and deletions, as they directly affect company-wide reports.
Write Only Access
Users with Write Only Access can edit only the expenses they have personally created.
If a Write Only user attempts to click the edit icon for an expense created by another user, an Access Denied message will appear, indicating restricted permissions.
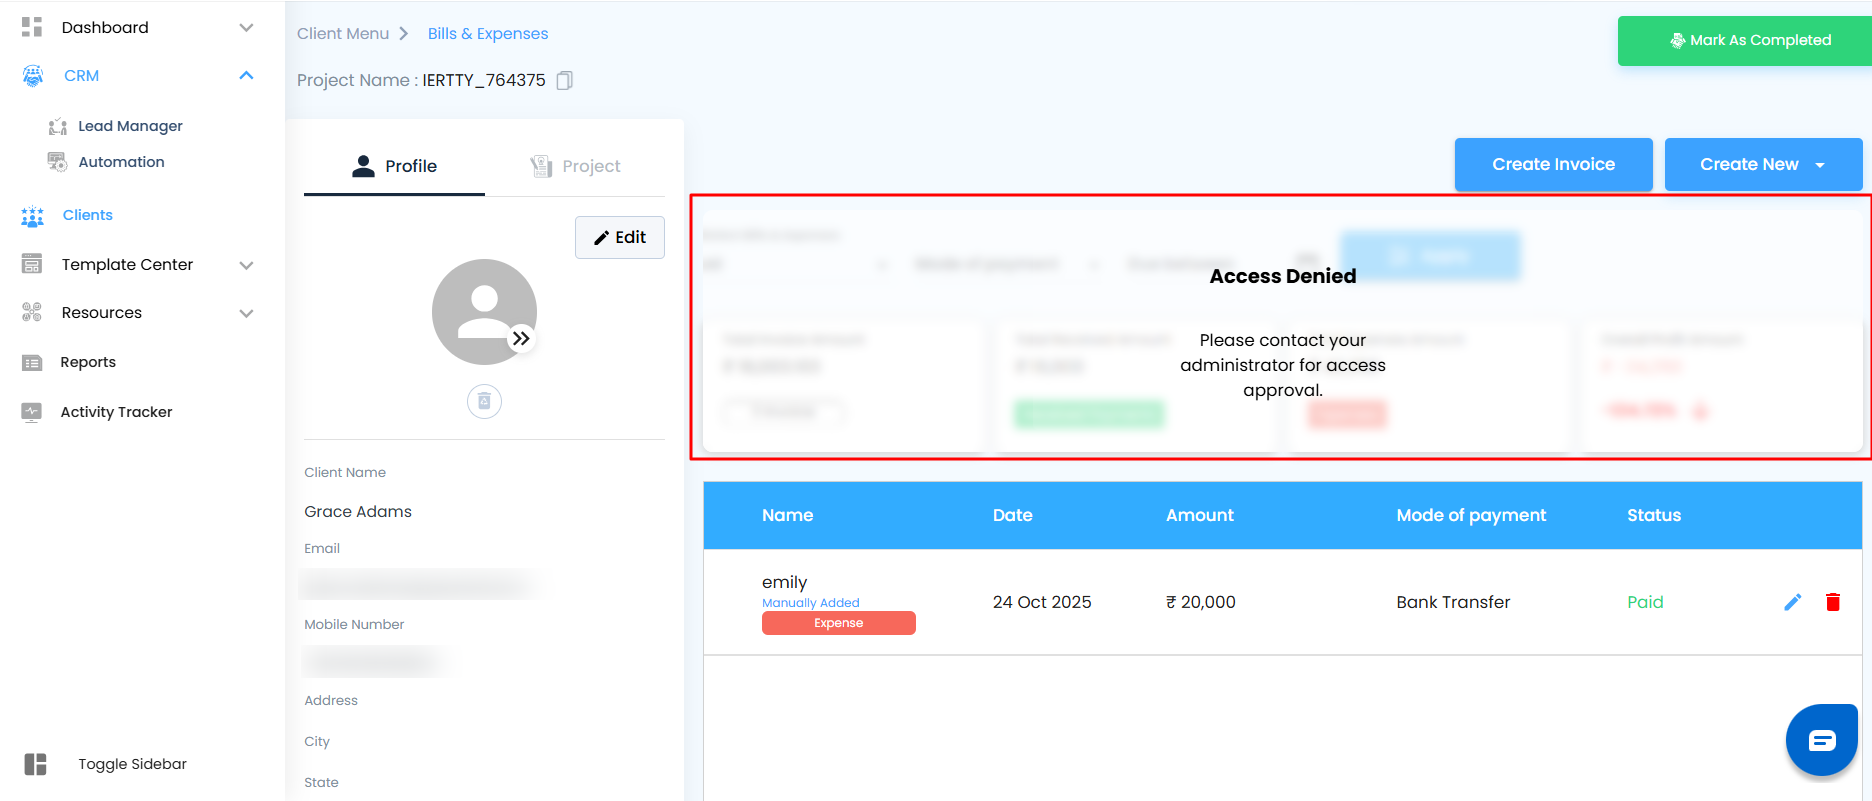
Navigation Steps:
- Locate the expense you created in the list.
- Click the Edit Pen Icon beside it.
- You will be redirected to the Edit Expense Page.

- Update the allowed fields — Name, Date, Amount, Payment Mode, Work Category, Tag, Description, and File Upload — as needed.
- Save the changes to update your record.
Pro Tip:
When updating your own expenses, ensure all payment details and attached proofs are correct. This helps streamline approvals and reporting accuracy.
Read Only Access
- Users with Read Only Access can view all expense information but cannot make changes.
- The Edit and Delete icons will not appear for them.
- They can open the expense list to review amounts, dates, and statuses — but not modify any records.

Pro Tip:
Assign Read Only access to roles that require financial visibility without modification rights. This keeps data secure while maintaining transparency.
Seamless Integration
The moment you save, the expense is automatically added to the Bills and Expenses section -keeping every financial detail organized, accessible, and ready whenever you need it.
Pro Tip: Review your expense list regularly. A quick glance ensures nothing is missed and your records stay perfectly up to date.
Delete Expenses
- Locate the expense you created in the Expenses List and navigate to the Delete Icon beside it.
- After clicking the Delete Icon, a confirmation popup appears:
“Are you sure you want to delete this expense?” - Select Yes to confirm or No to cancel the action.
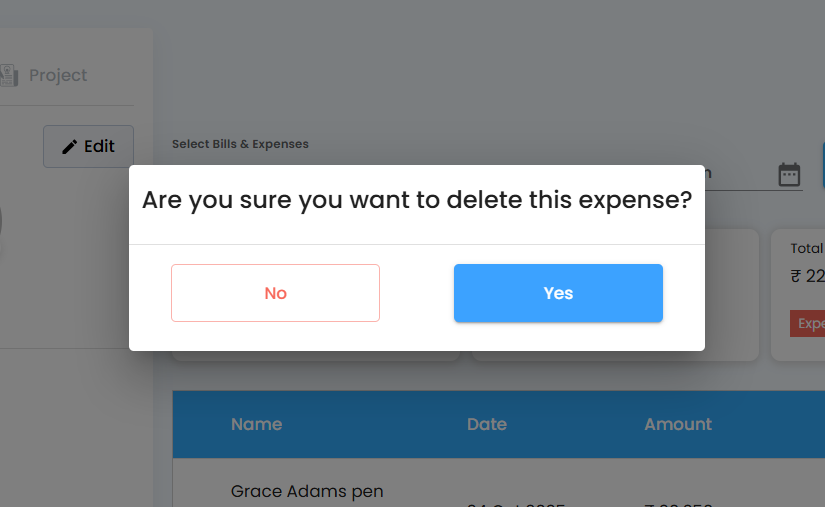
Important Note:
- Only users with All Access can delete any expense record.
- Write Only Access users can delete only the expenses they have created.
- Read Only Access users cannot delete expenses. The delete option is hidden for them.
Pro Tip:
Delete expenses with caution. Once removed, an expense cannot be recovered, and it may affect your financial summaries or reports.
Was this article helpful?
That’s Great!
Thank you for your feedback
Sorry! We couldn't be helpful
Thank you for your feedback
Feedback sent
We appreciate your effort and will try to fix the article