The Location Management feature in IntoAEC allows users to create, organize, and manage multiple locations from one centralized place. Users can maintain location details such as address, size, contact information, and stages, and link locations to individual projects.
This feature helps teams track location availability, manage allocation, and organize locations across multiple projects.
1. Accessing Location Management
To open Location Management:
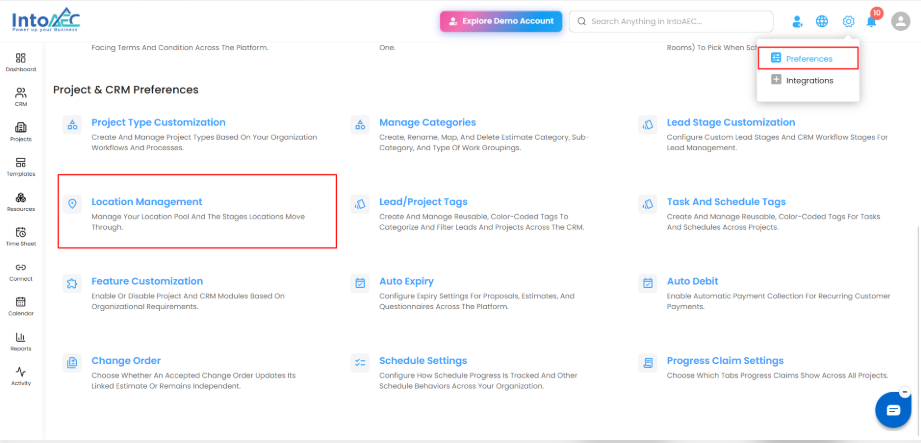
Log in to IntoAEC.
Click the Settings icon in the top-right corner.
Select Preferences.
Under Project & CRM Preferences, click Location Management.
The Location Management section will open, where users can manage the Location Pool and Location Stages.
2. Opening the Location Pool
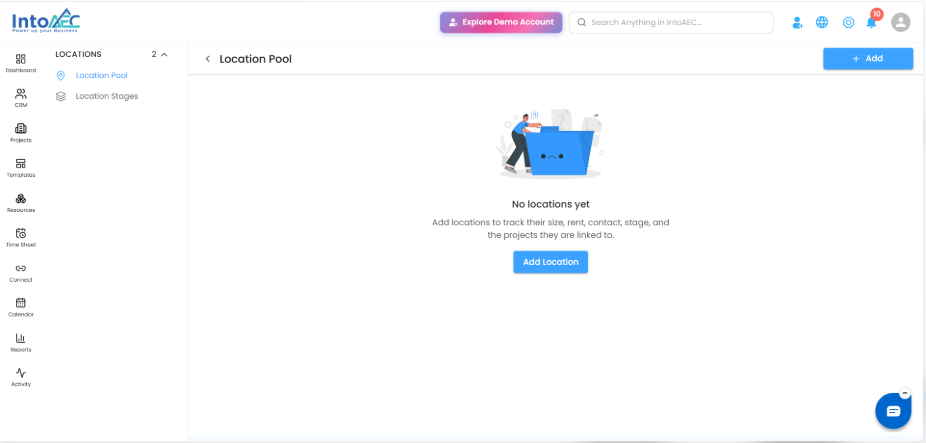
The Location Pool allows users to create and manage locations in one place.
To access it:
Open Location Management.
Click Location Pool from the side menu.
Click + Add to create a new location.
3. Creating a New Location
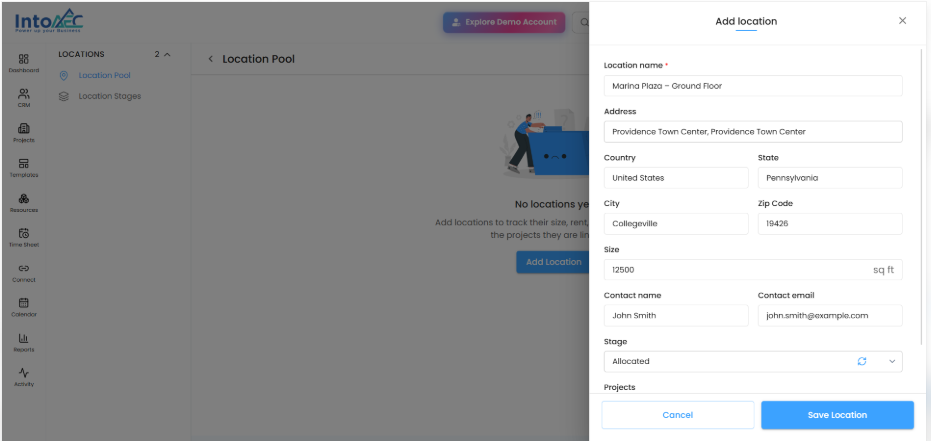
After clicking + Add, the Add Location form will open.
Enter the following details:
Location Name: Enter the name of the location.
Address: Provide the location address.
Country, State, City, and Zip Code: Enter the geographical details.
Size: Specify the location size.
Contact Name: Enter the contact person's name.
Contact Email: Provide the contact email address.
Stage: Select the current location stage.
Projects: Select the projects associated with the location.
Once all the required information is entered, click Save Location.
4. Viewing and Managing Locations
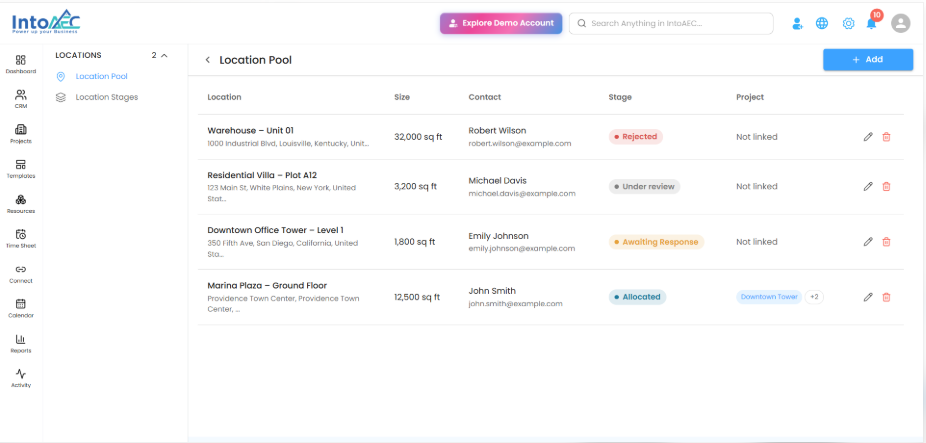
Once a location is created, it will appear in the Location Pool.
Users can view details such as:
Location name and address
Location size
Contact name and email
Current stage
Linked projects
Users can also Edit or Delete locations using the action icons available for each record.
5. Creating Location Stages
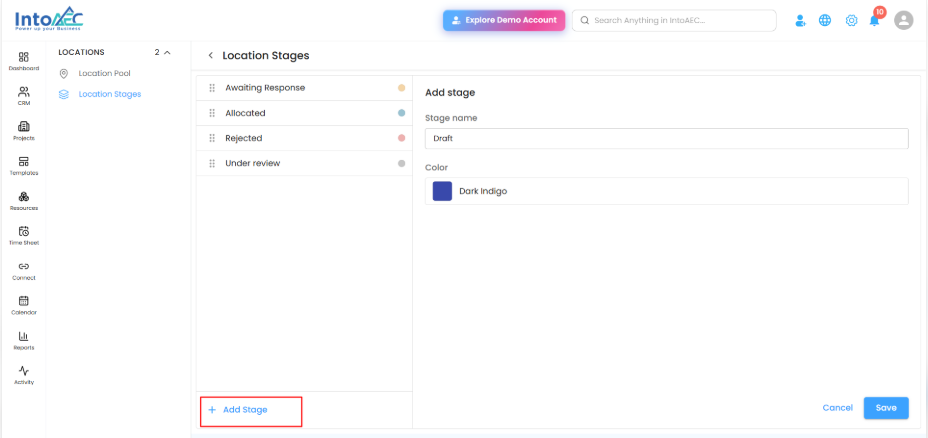
The Location Stages feature allows users to define and manage different stages for locations.
To add a new stage:
Open Location Management.
Click Location Stages from the side menu.
Click + Add Stage.
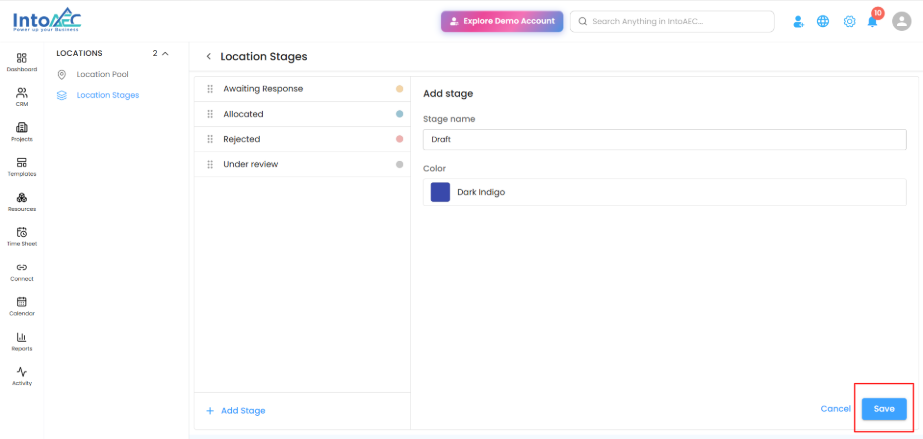
Enter the Stage Name.
Select a Color to identify the stage.
Click Save.
Users can configure stages such as Awaiting Response, Allocated, Rejected, and Under Review, helping teams identify the current status of each location.
6. Accessing Locations Within a Project
Users can also manage locations directly from an individual project.
To access project locations:
Open the required project.
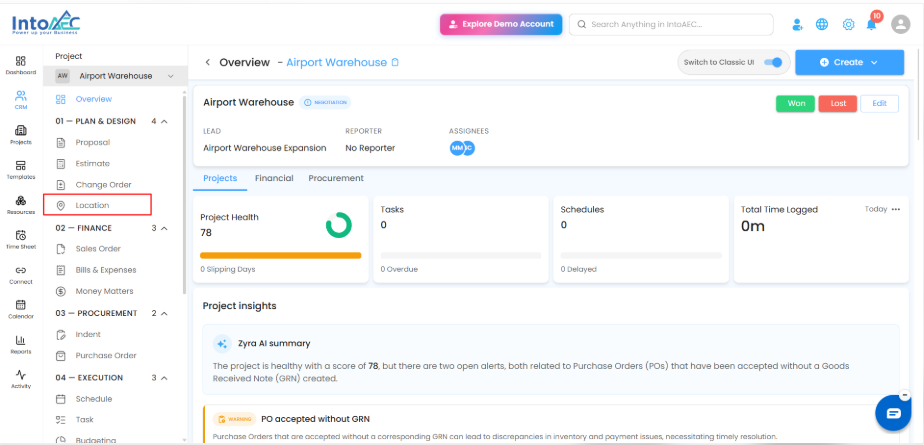
Navigate to the Plan & Design section.
Click Location.
The Location page will open, displaying the locations linked to that project.
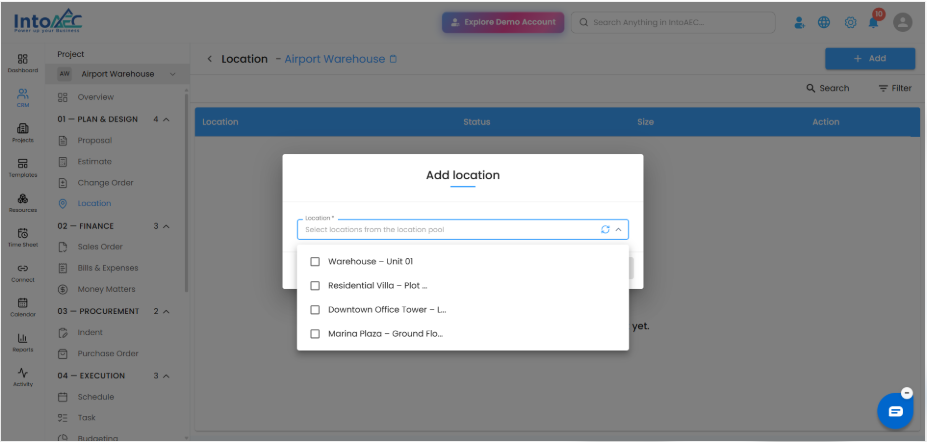
7. Adding Locations to a Project
To link locations to a project:
Open the required project.
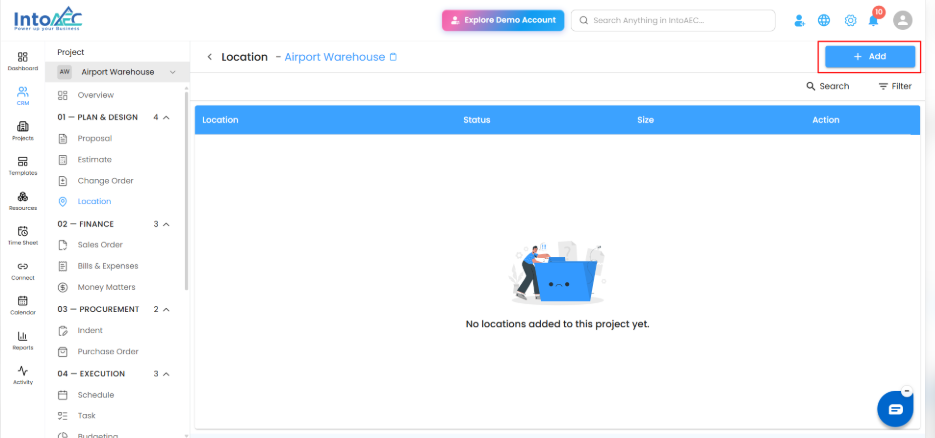
Click Location from the side menu.
Click + Add.
Select the required locations from the Location Pool dropdown.
Confirm the selection to add the locations to the project.
Users can select locations that were previously created in the Location Pool.
8. Viewing Linked Project Locations
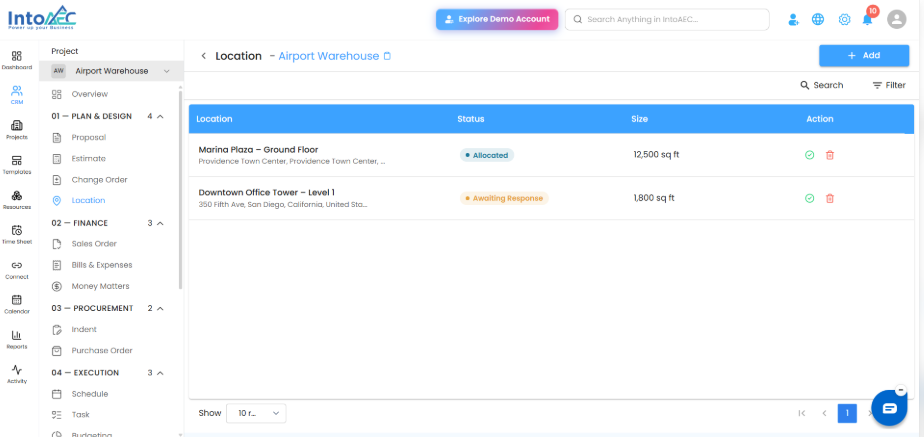
Once the locations are added, they will appear in the project's Location page.
Users can view:
Location: Name and address of the location.
Status: Current stage of the location.
Size: Total size of the location.
Action: Options to allocate or remove the location.
This helps users manage multiple locations associated with a project.
 .
.
9. Allocating a Location to a Project
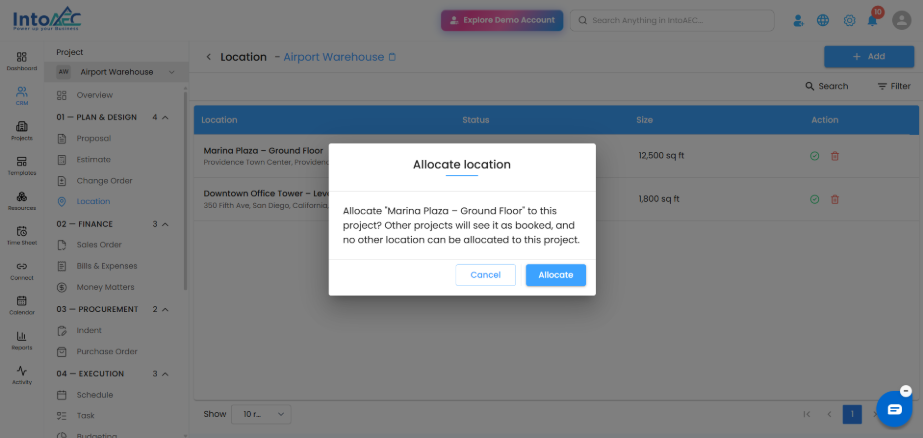
The Allocate Location functionality allows users to assign a specific location to the selected project.
To allocate a location:
Open the project's Location page.
Find the location that needs to be allocated.
Click the Allocate icon under the Action column.
A confirmation popup will appear.
Click Allocate to confirm.
Once allocated, the location will be marked as booked for other projects, and another location cannot be allocated to the same project.
10. Viewing the Allocated Location
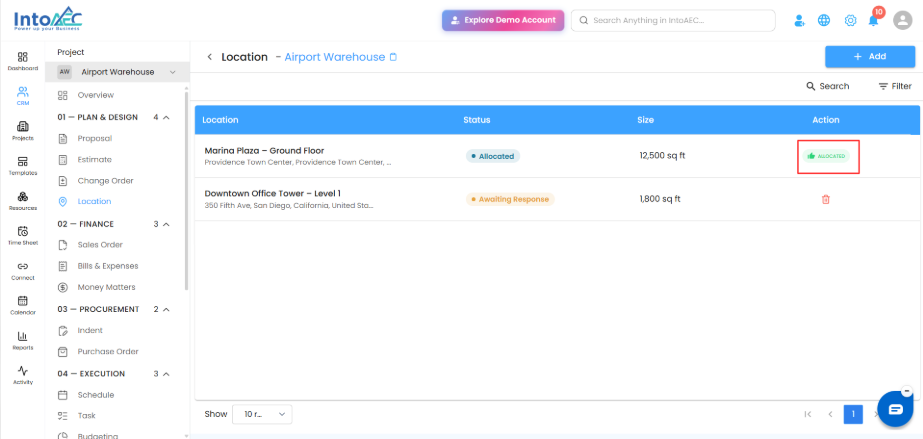
Once the allocation is completed, the location will display an Allocated indicator under the Action column.
This helps users quickly identify which location has been allocated to the project.
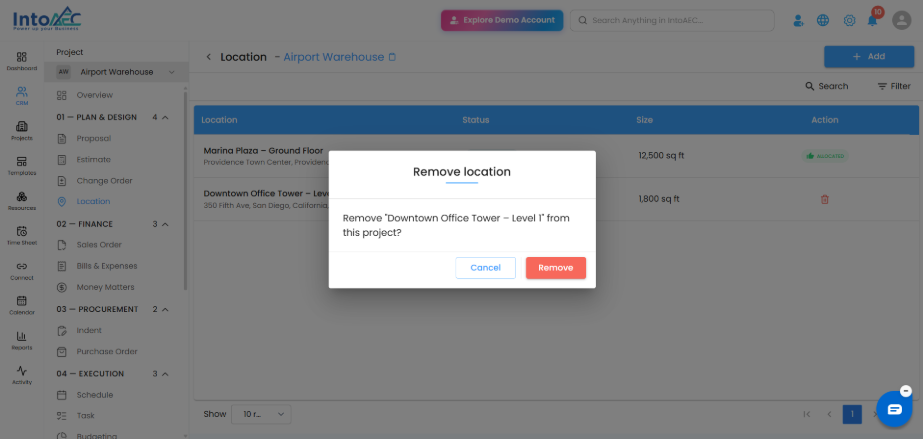
11. Removing a Location From a Project
Users can also remove a linked location from a project when it is no longer required.
To remove a location:
Open the project's Location page.
Locate the required location.
Click the Delete icon under the Action column.
A confirmation popup will appear.
Click Remove to confirm.
Summary
The Location Management feature helps users maintain a centralized Location Pool, create custom location stages, link locations to individual projects, and manage location allocation.
With this feature, teams can organize multiple locations, track their stages, and manage location availability more efficiently across projects in IntoAEC.
Was this article helpful?
That’s Great!
Thank you for your feedback
Sorry! We couldn't be helpful
Thank you for your feedback
Feedback sent
We appreciate your effort and will try to fix the article