Asset Journey Guide: From Request to Return
Managing assets in your project doesn’t have to feel complicated!
Think of each asset as a traveler on a journey — starting with a request, traveling through approvals, reaching the site, being put to use, and finally making its way back home.
With every move, the system keeps track of the asset’s status so nothing slips through the cracks. Let’s walk through the complete journey.
The Request Begins
A project member clicks Request Asset from the Asset page.
They select the required items, quantity, and approximate return time.
Once submitted, the asset appears in the system with Status: Requested.

At this point, the asset is waiting at the “departure gate” for the Asset Manager’s decision.
Actions by the Asset Manager
The Asset Manager plays a key role in shaping the journey. Using the ⋮ (three dots) action button, they can choose from the following actions:
Approve Request
When the Asset Manager approves a request, the status changes to In Transit.
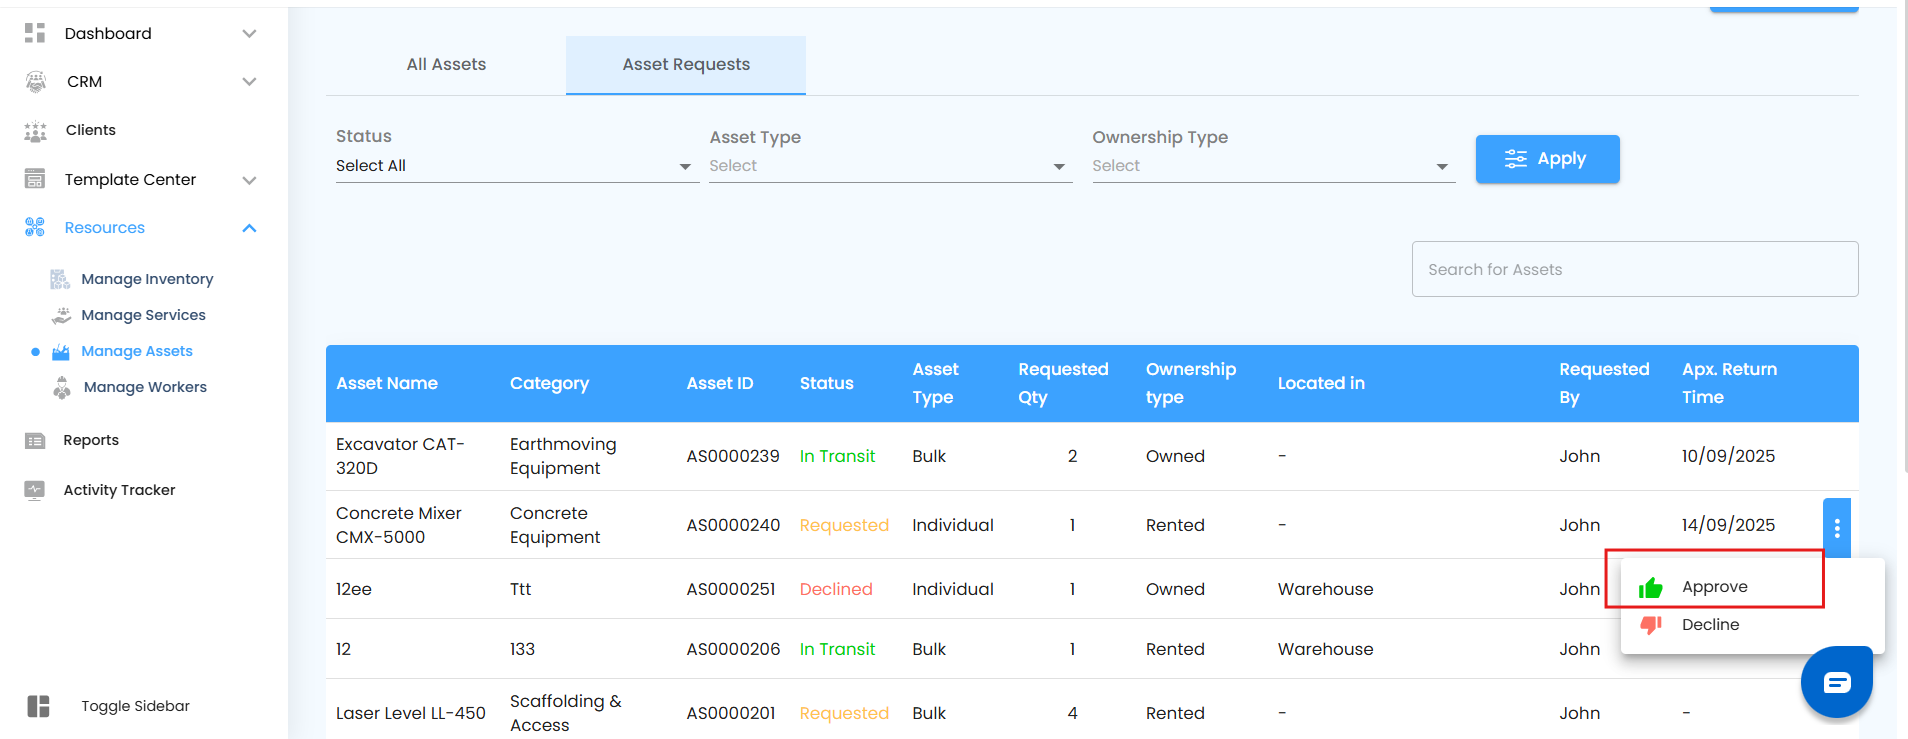

This means the asset is officially dispatched and on its way to the project site.
Decline Request
When declined, the status changes to Declined.


The request is closed, and no dispatch happens for that asset.
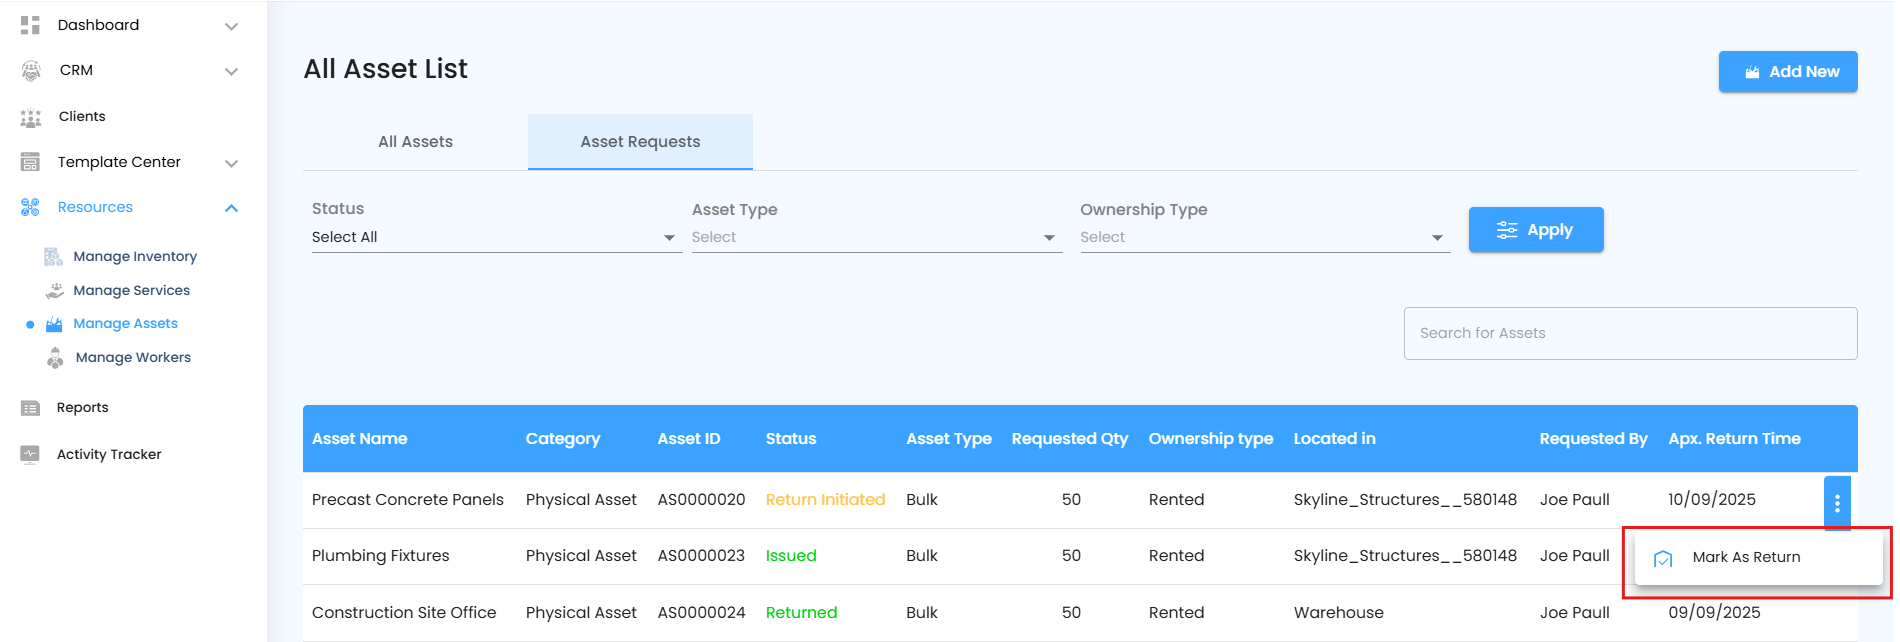
Request a Return
If the Asset Manager needs an asset back, they can trigger the Return Request action (via the ⋮ menu).
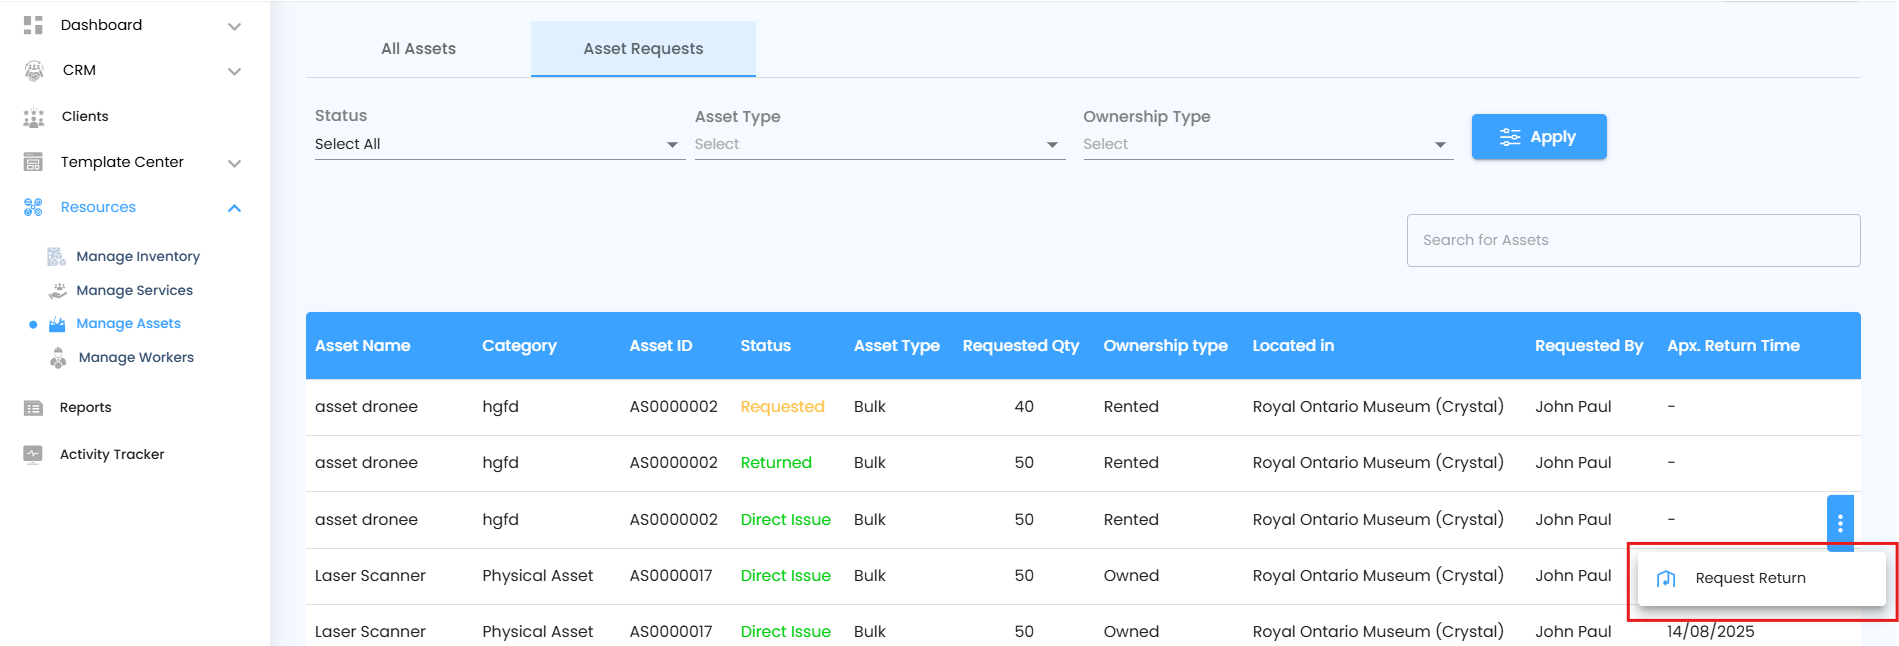
The Site Manager is notified and must confirm the return.

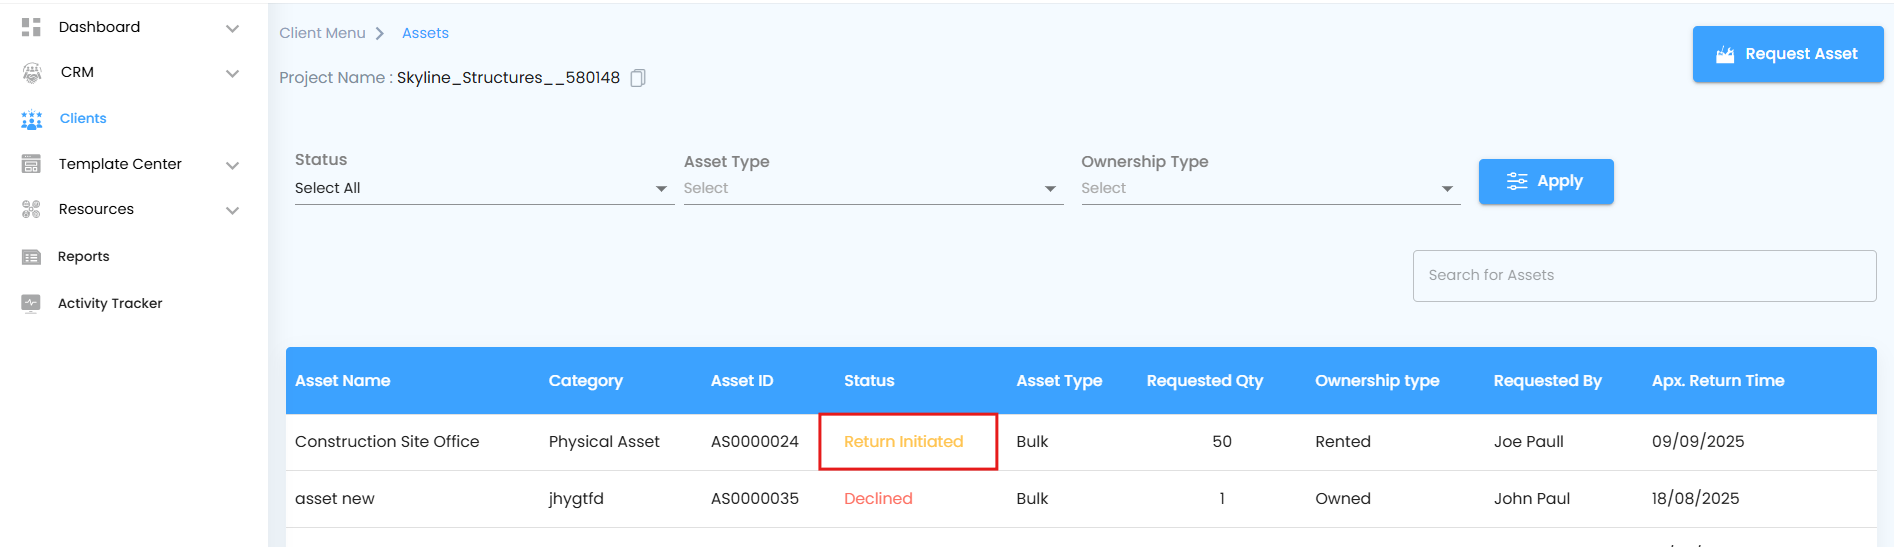
Once the Site Manager clicks Return Asset (⋮ action), the status updates to Return Initiated.
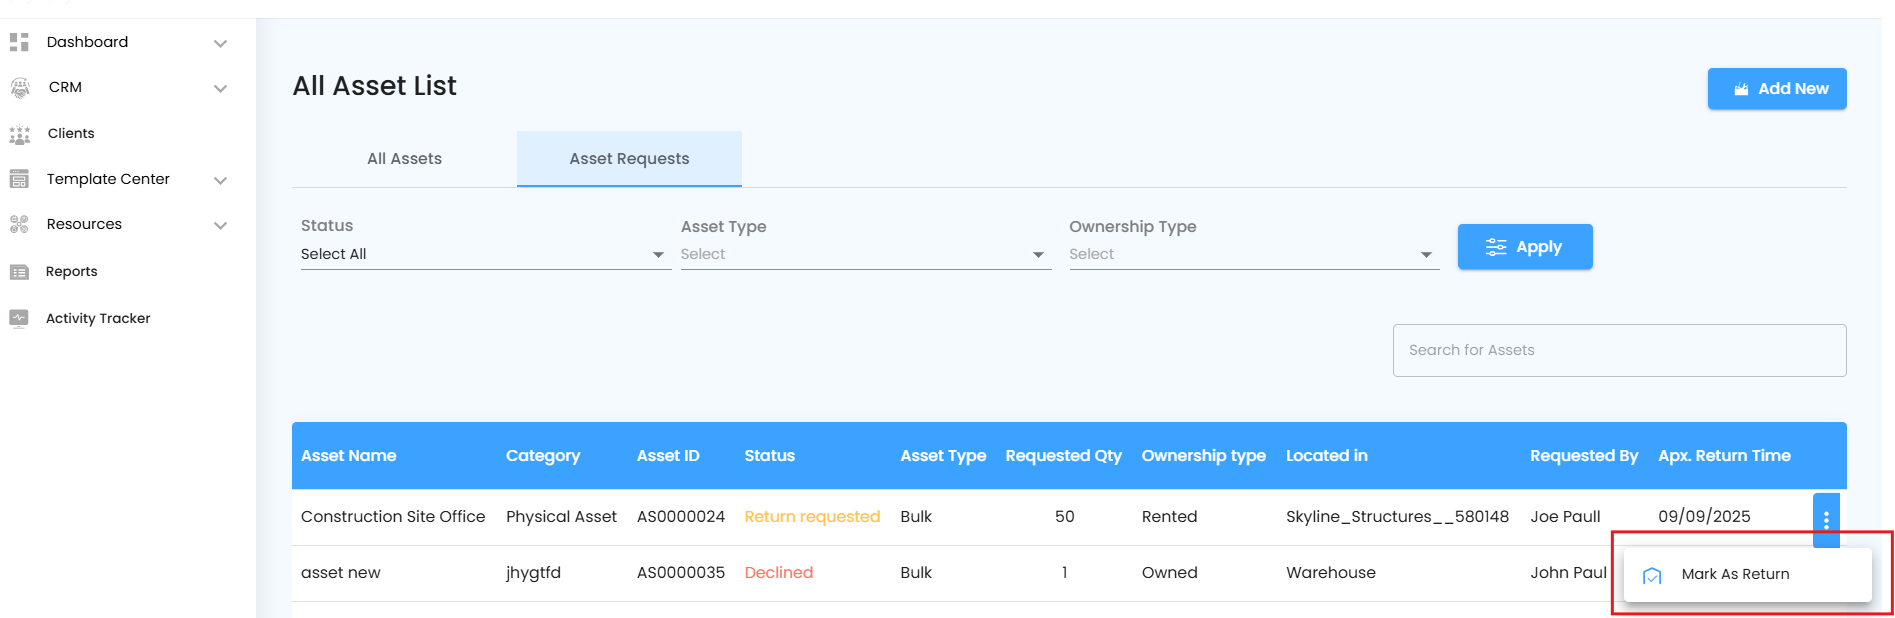
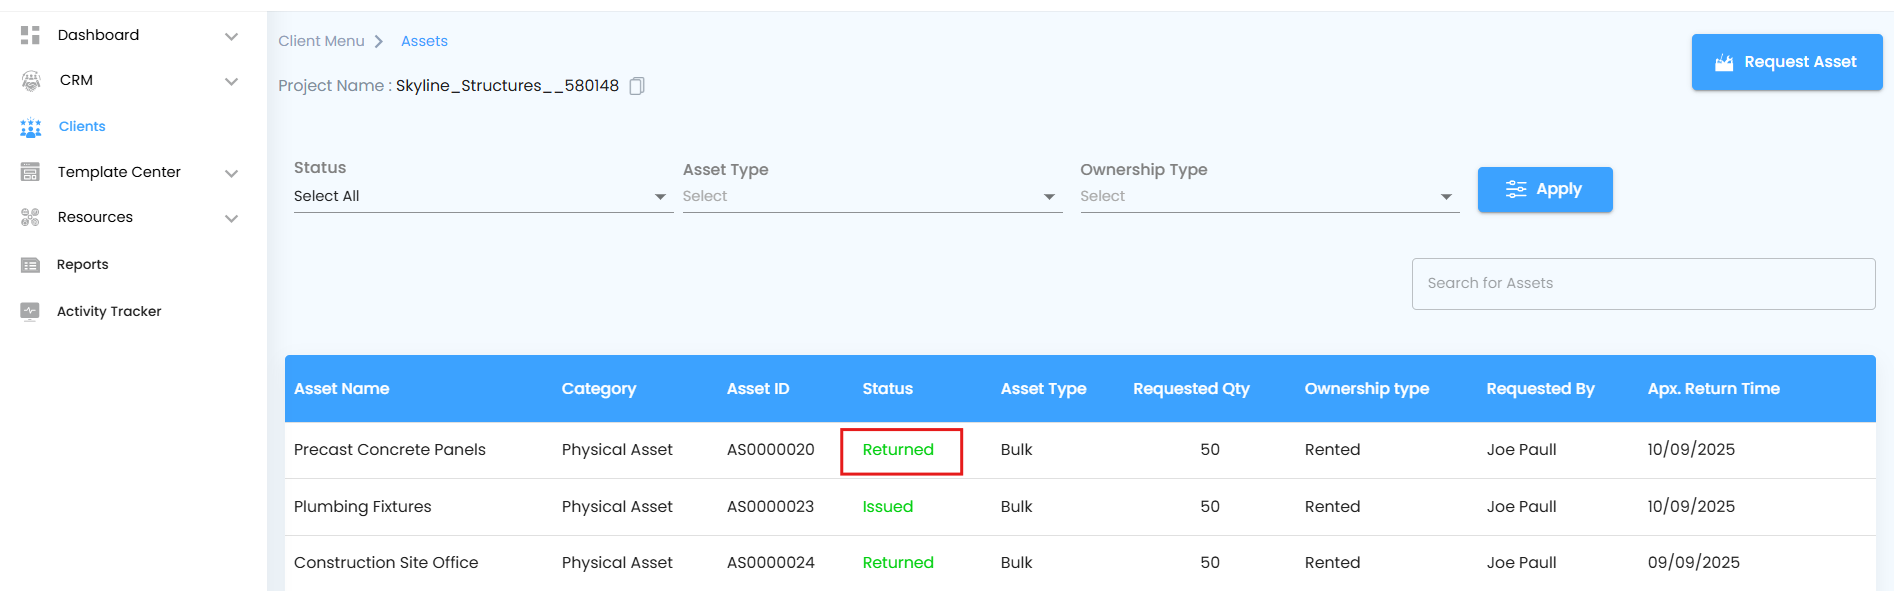
Finally, the Asset Manager marks it as Returned once it arrives back.
Actions by the Site Manager
Once the asset enters the project stage, the Site Manager takes control. Every action they perform also happens through the ⋮ (three dots) action button:
Receive Approved Asset
If the Asset Manager approves the request → The Site Manager can mark the asset as Received.
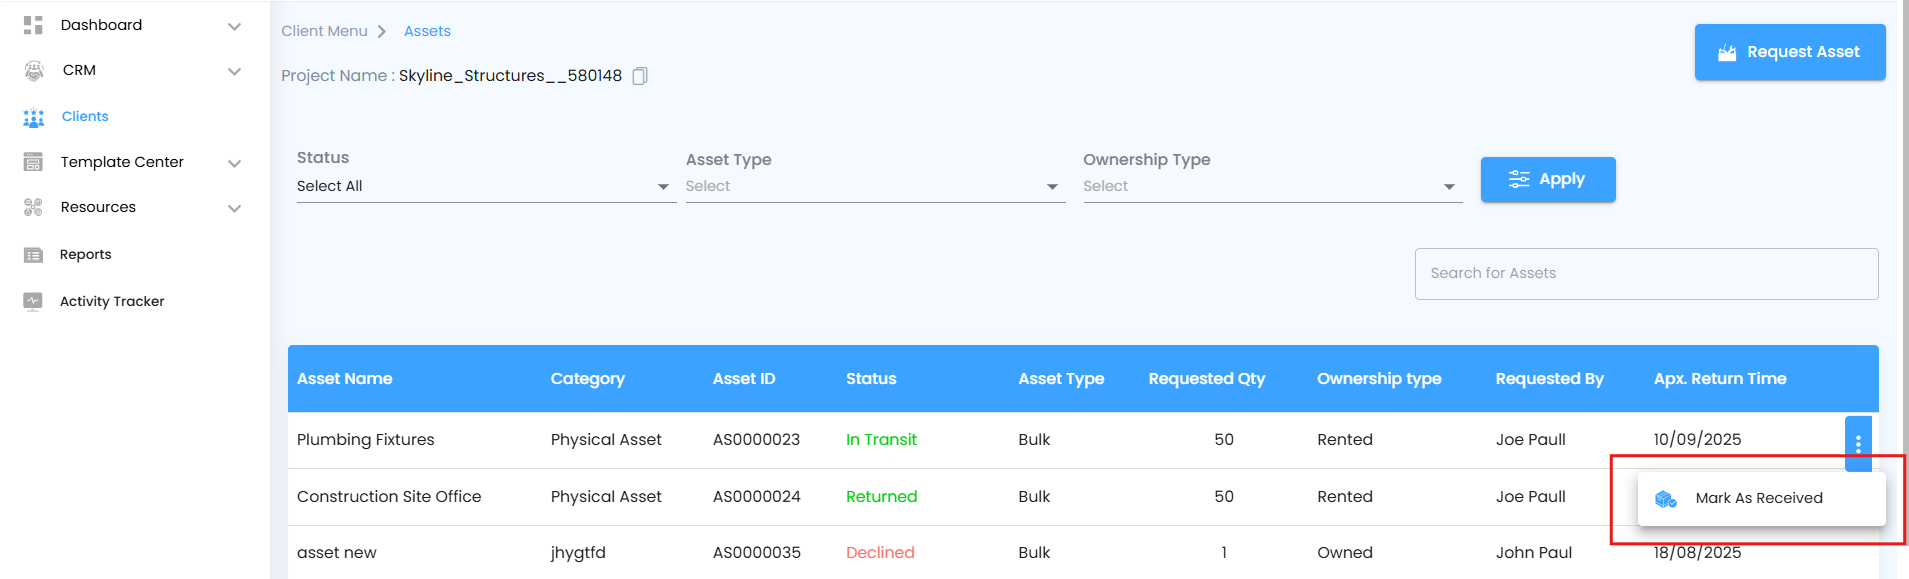
- As soon as Mark as Received is clicked, a Receive Asset off-canvas panel slides in — think of it like your project’s digital delivery slip.
- In this panel, the Site Manager selects the user responsible in the Received By field
- Key details — Asset ID, Asset Name, Requested Quantity, and Unit — are pre-filled automatically, so nothing is missed.
- Optional fields allow adding attachments (e.g., photos or documents) and notes for extra context.
- Finally, hit the Collect button — and just like signing off a package delivery the asset is officially handed over and the status updates.
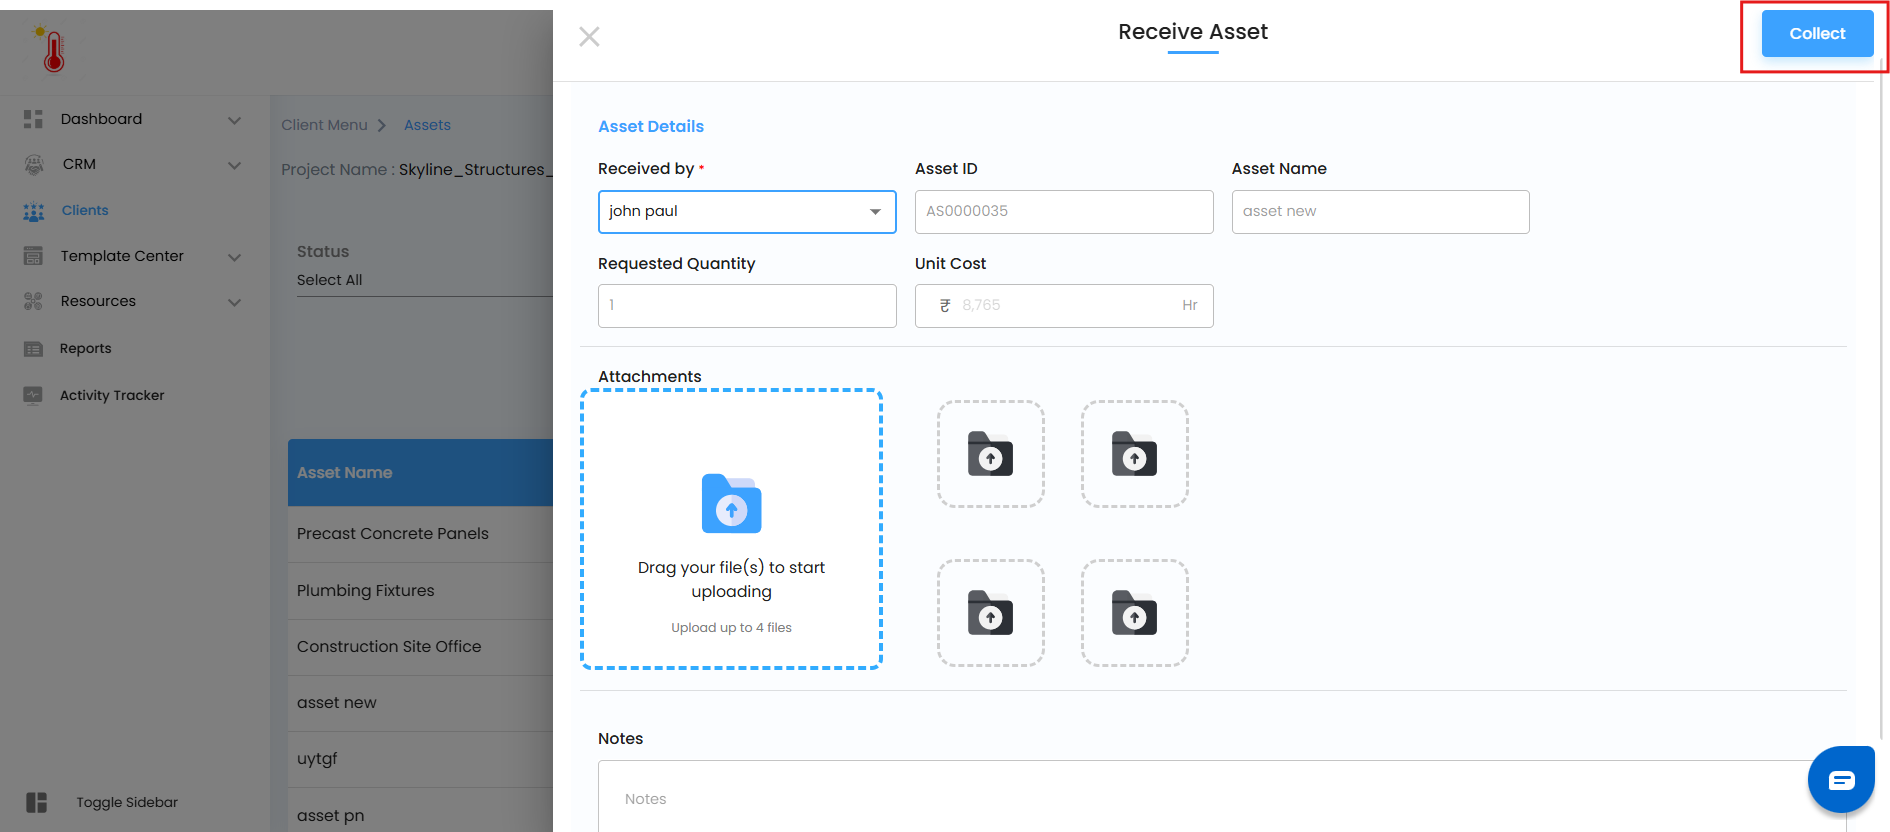
The status then changes to Issued.
Directly Receive Asset (Skip Approval)
Even if the Asset Manager hasn’t approved it, the Site Manager can directly mark the asset as Received.
In this case, the status changes to Direct Issue.
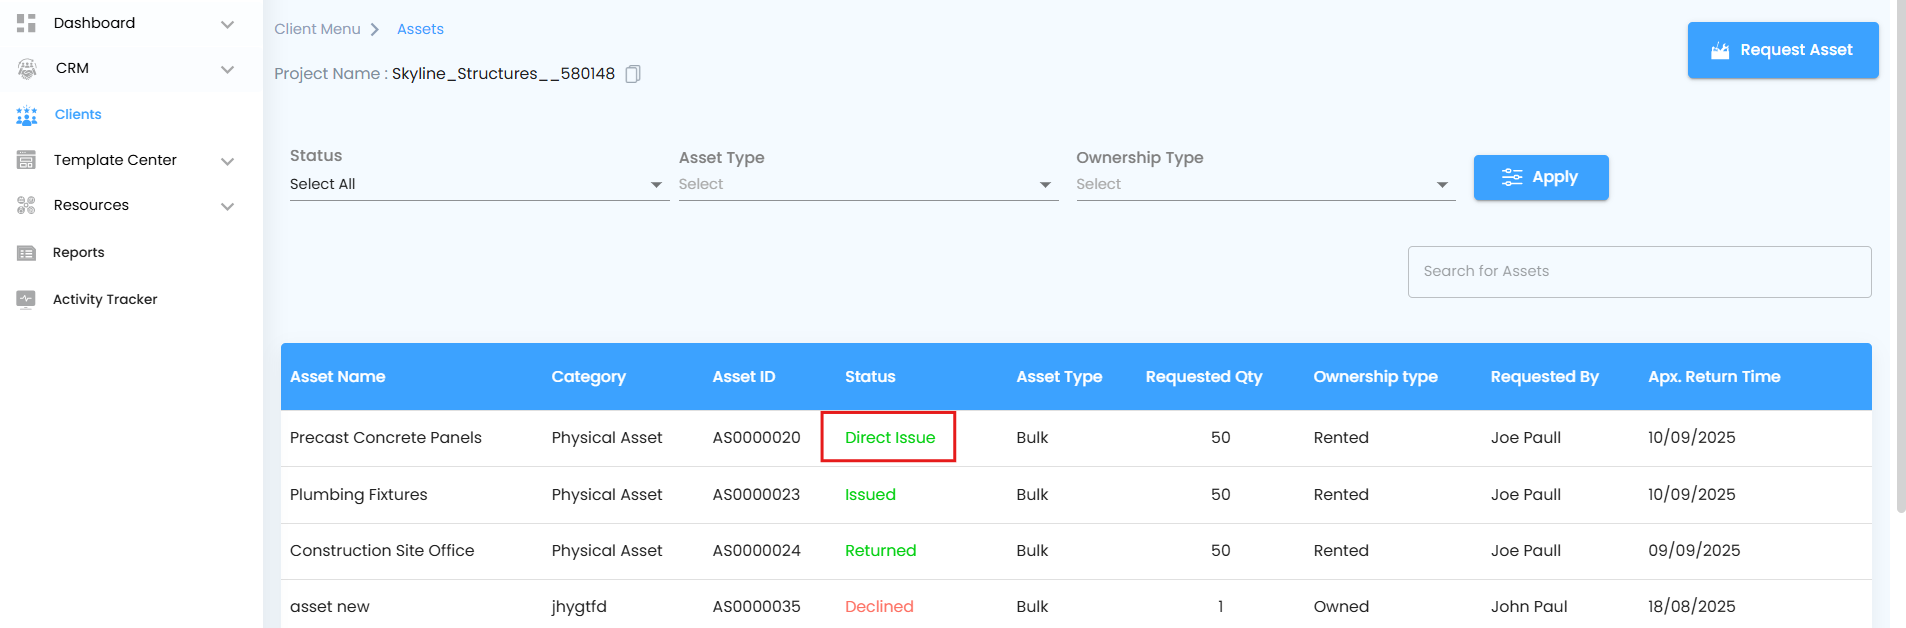
This ensures project progress is never delayed due to pending approvals.
Receive Even if Declined
If the Asset Manager declines the request, the Site Manager can still mark the asset as Received.
The status then changes to Issued.
This provides flexibility for real-world scenarios where an asset arrives or is made available despite being declined digitally.
Return an Asset
When the asset is no longer needed, the Site Manager clicks Return Asset (via the ⋮ action menu).
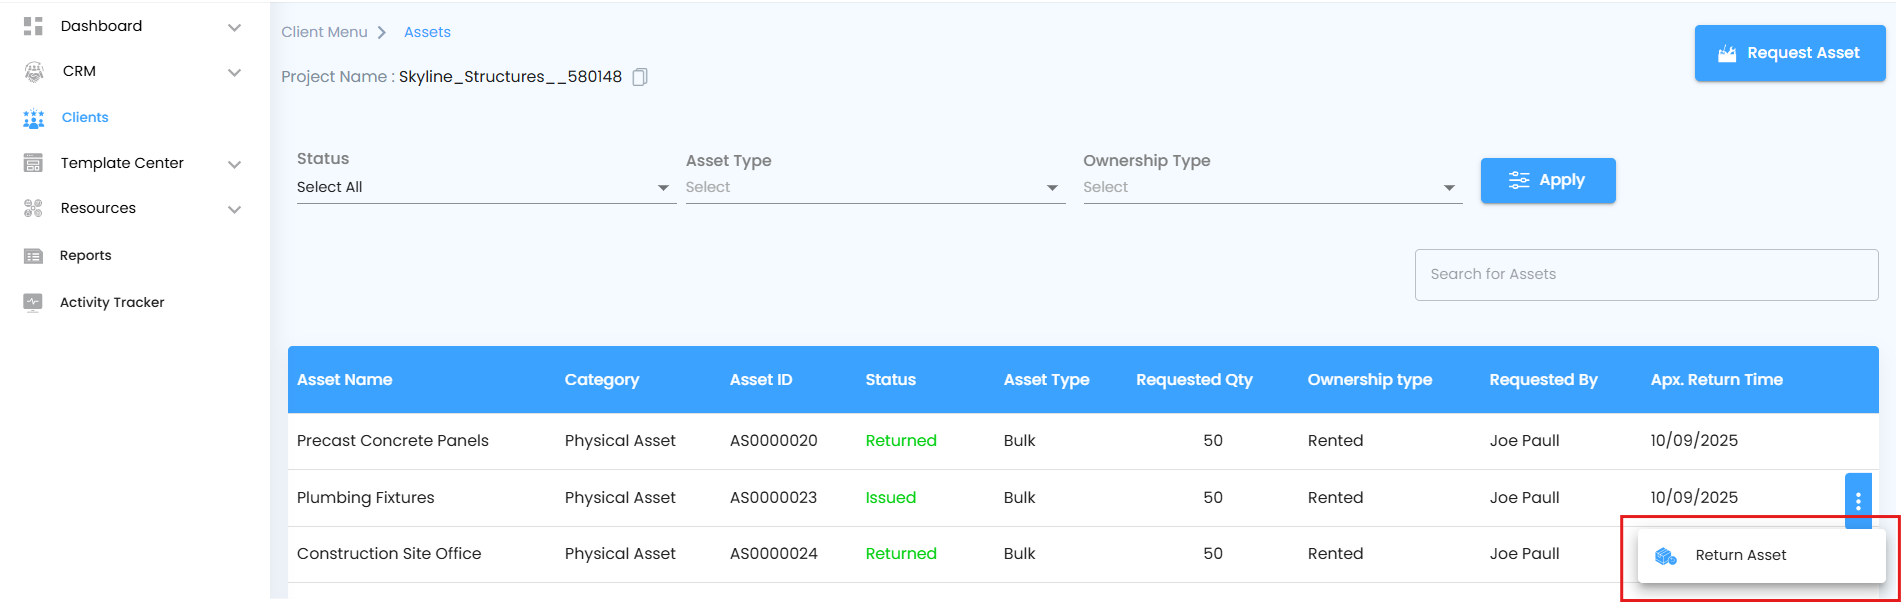
- Clicking it opens the Return Asset off-canvas panel, like a digital return desk ready to process the item.
- Key details — Asset ID, Asset Name, Requested Quantity, and Unit — are pre-filled automatically, so nothing is missed.
- Optional fields allow adding attachments (e.g., photos or documents) and notes for extra context.
- Finally, hitting the Return button completes the action and updates the status to Return Initiated, signaling the asset is officially on its way back.
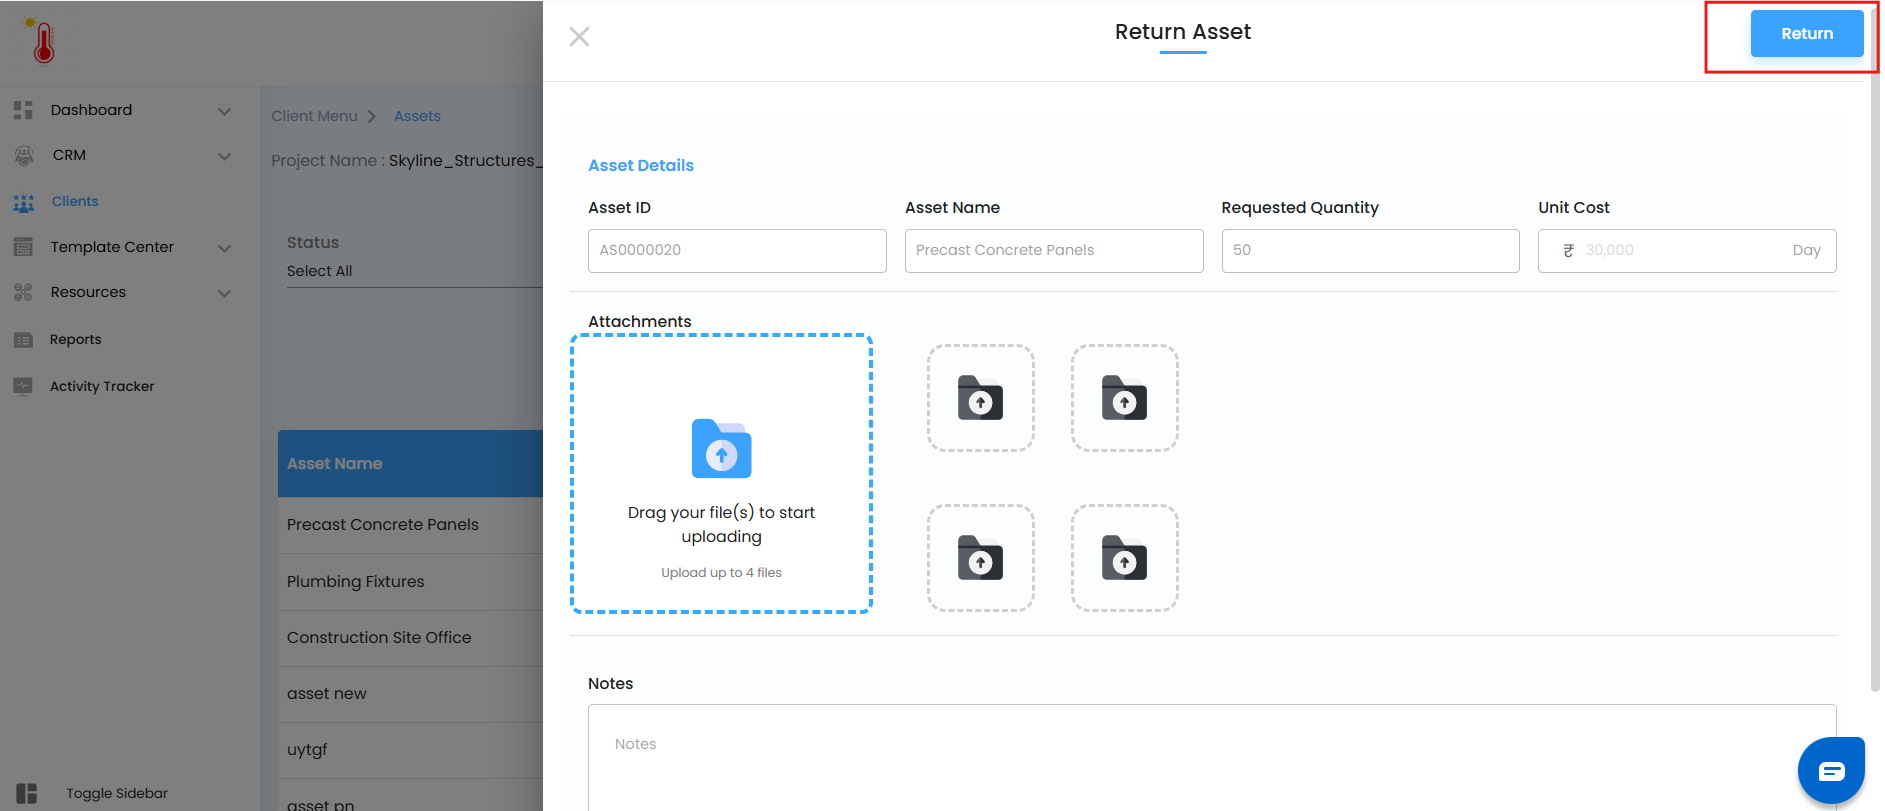
The status updates to Return Initiated.

The Return Process
Assets don’t stay on-site forever. Here’s how the return cycle works:
Return Requested (by Asset Manager) → The Asset Manager can request a return at any time using the ⋮ button. This is useful when the asset is needed elsewhere.
Return Initiated (by Site Manager) → The Site Manager signals that the asset is ready to be sent back.
Mark as Returned (by Asset Manager) → Once the asset is received back, the Asset Manager confirms the return. The status updates to Returned, completing the lifecycle.
Asset Status Journey Map
Here’s the complete flow with all possible paths:
Requested → Approved → In Transit → Issued → Return Initiated → Returned
Requested → Declined → Still Issued (by Site Manager if received anyway)
Requested → Directly Issued (Site Manager skips approval) → Return Initiated → Returned
Anytime → Return Requested (by Asset Manager) → Returned
Pro Tip: very critical action — approve, decline, receive, return — happens through the ⋮ (three dots) action button. Think of it as your project’s remote control for asset management. Master it, and you’ll always stay in charge of the journey.
With this structured workflow, assets never go “missing in action.” Every step — request, approval, issue, and return — is tracked with clarity, ensuring your project always has the right resources at the right time.
Was this article helpful?
That’s Great!
Thank you for your feedback
Sorry! We couldn't be helpful
Thank you for your feedback
Feedback sent
We appreciate your effort and will try to fix the article