Overview
The Gantt View lets you visualize project timelines, track progress, and manage dependencies in one place. Schedules appear as horizontal bars on a timeline, so you can see durations, sequencing, and overlaps at a glance.
In this article you will learn how to:
- Add and manage schedules, sub-schedules, and child phases
- Use the three-dot menu options
- Review payments linked to a schedule
- Create and manage milestones
- Complete a schedule or milestone that has linked invoices or payment terms
- Use the Critical Path, Baselines, Assignee list, and Deadlines
Open the Gantt View
- Open the required project from Clients/Projects.
- Click the Schedule tab. The Gantt View opens by default.
Add a Schedule
- Click Add Schedule to break your project into major segments.
- Enter a name, timeline, and duration for the schedule.
- Save to see the schedule appear on the Gantt chart.
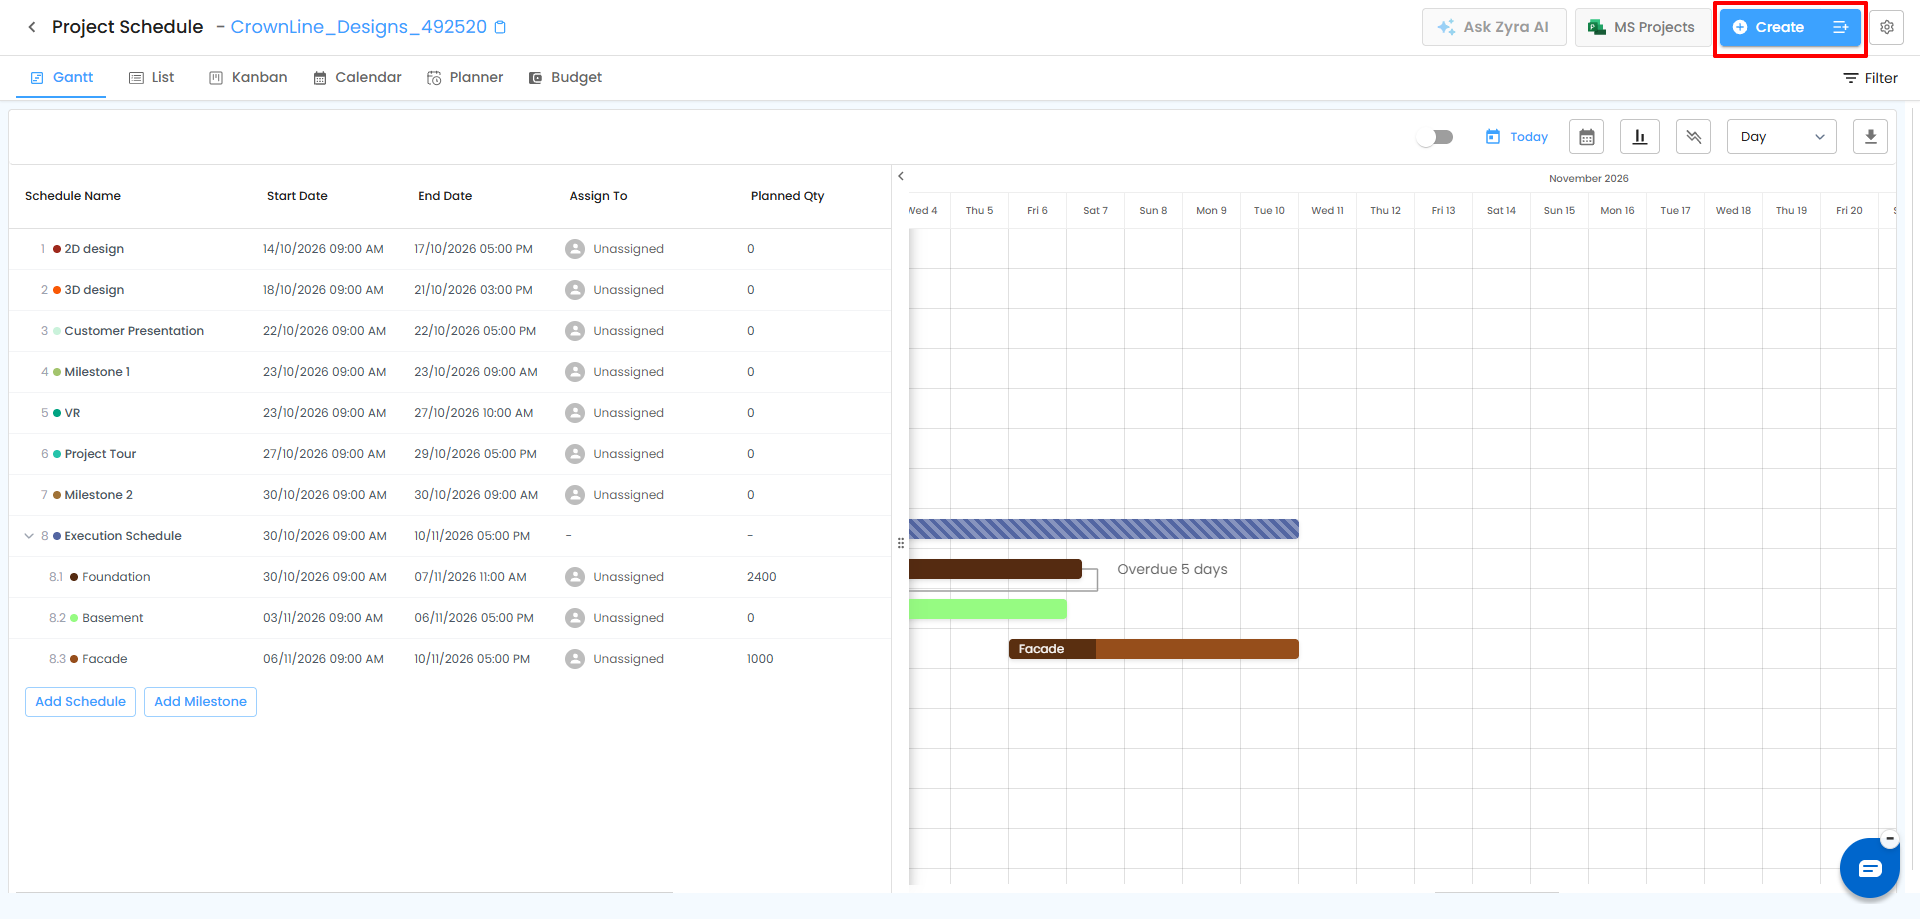
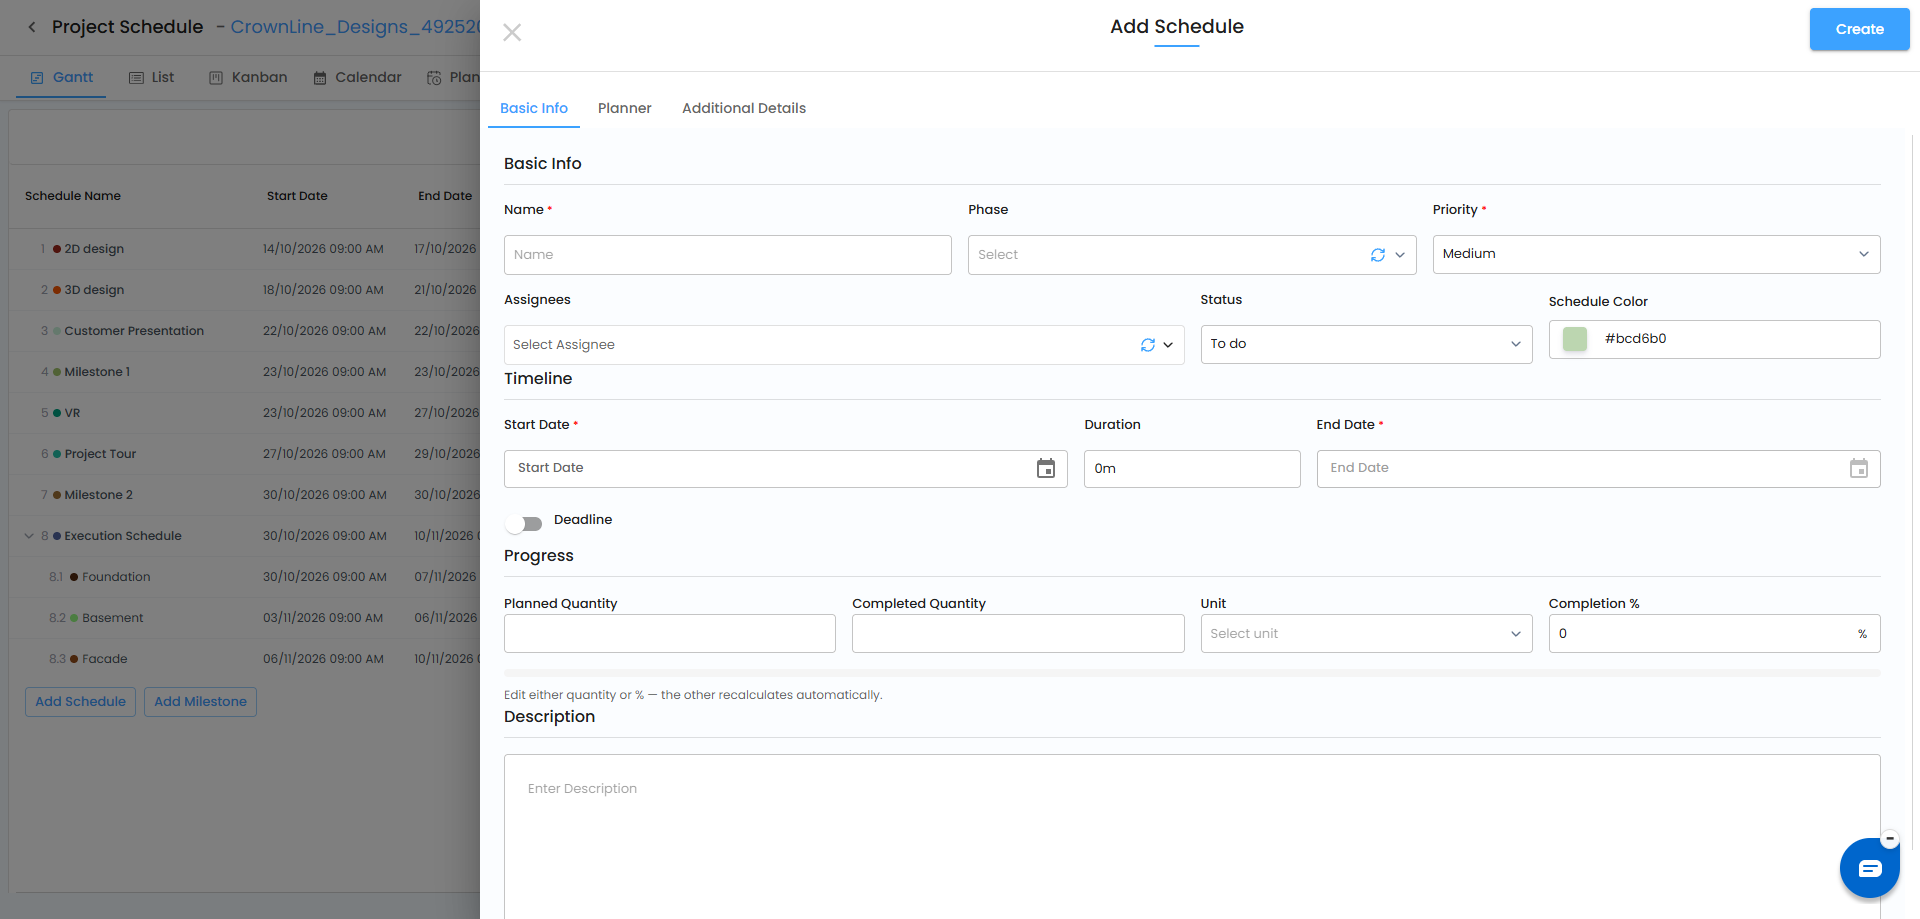
Pro Tip: Use the Gantt View for the big picture and the List View when you want to manage schedules and phases in detail.
Manage a Schedule with the Three-Dot Menu (⋮)
Hover over a schedule to reveal the three-dot menu.
| Option | What it does |
|---|---|
| Edit Schedule | Update the schedule's name and details. |
| Add Child | Create sub-schedules or activities under the selected schedule. |
| Link Invoice | Opens the Link Invoice popup so you can link one existing invoice to the schedule or milestone. |
| View Linked Invoice | Appears after an invoice is linked; opens the linked invoice. |
| Unlink Invoice | Available from the linked invoice view; removes the invoice association. |
| Link Estimate Payment Terms | Opens the page listing payment terms from accepted estimates. Select the required term(s) and click Link. |
| Change Color | Assign a color for easier identification. |
| Delete Schedule | Removes the schedule and all its sub-schedules. |
Note: If the schedule was created by converting an estimate, Link Invoice is disabled because the schedule is already linked to that estimate.
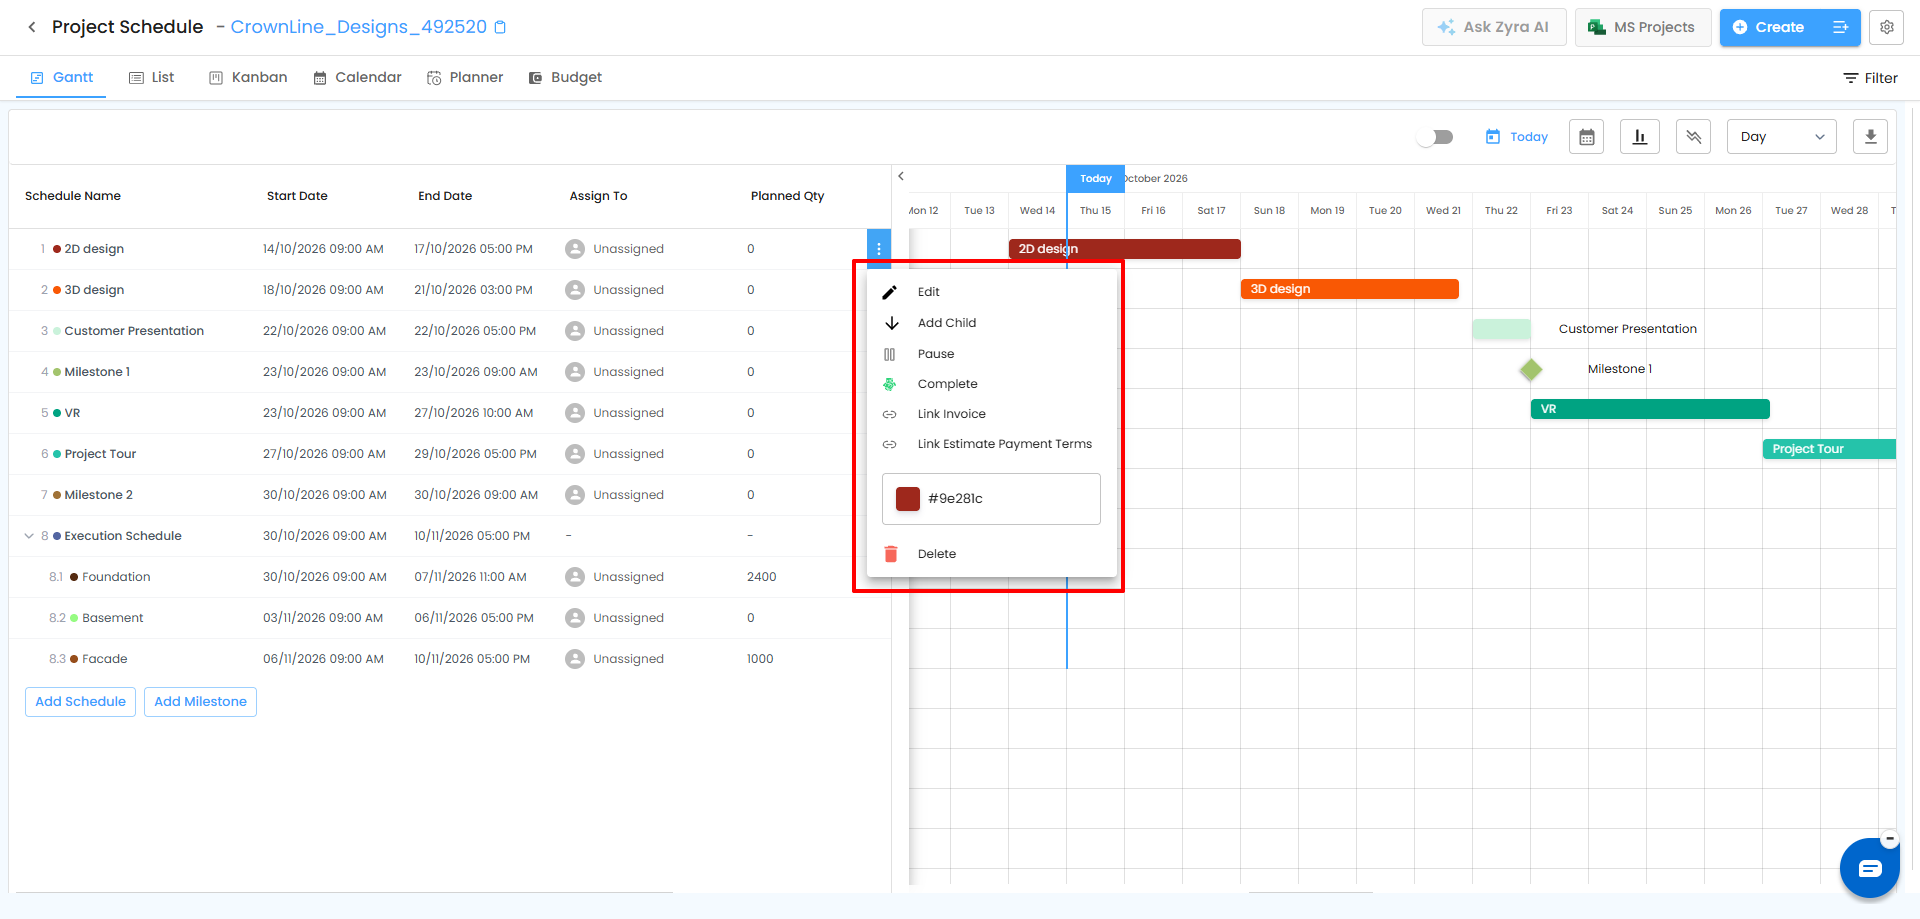
Pro Tip: Use color coding to visually track progress across multiple schedules.
Add Sub-Schedules (Phases) and Child Phases
Add a sub-schedule
- Under the newly created schedule, click + Add Schedule.
- Each sub-schedule represents a major segment of work inside the parent schedule.
Add a child phase
- Inside a sub-schedule, add a specific Child Phase.
- Assign a timeline to each child phase.
Phases appear as horizontal bars that reflect their duration.
Adjust dates quickly
Click and drag a bar to change its start and end dates.
Mark progress
Click Mark As Completed once a task or sub-schedule is done.
Edit and Manage a Schedule or Phase
Locate it on the Gantt chart and click the Edit button next to it.
| Option | What it does |
|---|---|
| Pause | Temporarily stops the schedule/phase without deleting it. |
| Edit | Modify name, start date, end date, and other details. |
| Complete | Marks it as completed by setting progress to 100%. |
| Incomplete | Changes a completed item back to incomplete by setting progress to 0%. |
| Link Invoice | Links an invoice to the scheduled work. |
| Link Estimate Payment Terms | Links estimate payment terms to it. |
| Change Color | Customizes its appearance. |
| Delete | Permanently removes it. |
Pro Tip: Use sub-schedules to structure work clearly and color coding to track status, priority, or category at a glance.
Scheduled Payments (Receivables and Payables)
The Scheduled Payments tab in the Edit Schedule panel shows the money linked to a schedule in one place.
To open it:
- Locate the schedule in the Gantt View.
- Open its three-dot menu and click Edit Schedule.
- Click the Scheduled Payments tab.
| Section | What it shows |
|---|---|
| Receivables | Estimate and invoice details linked to the schedule, i.e. payments expected from the customer. |
| Payables | Expenses linked to the schedule, i.e. costs associated with the scheduled work. |
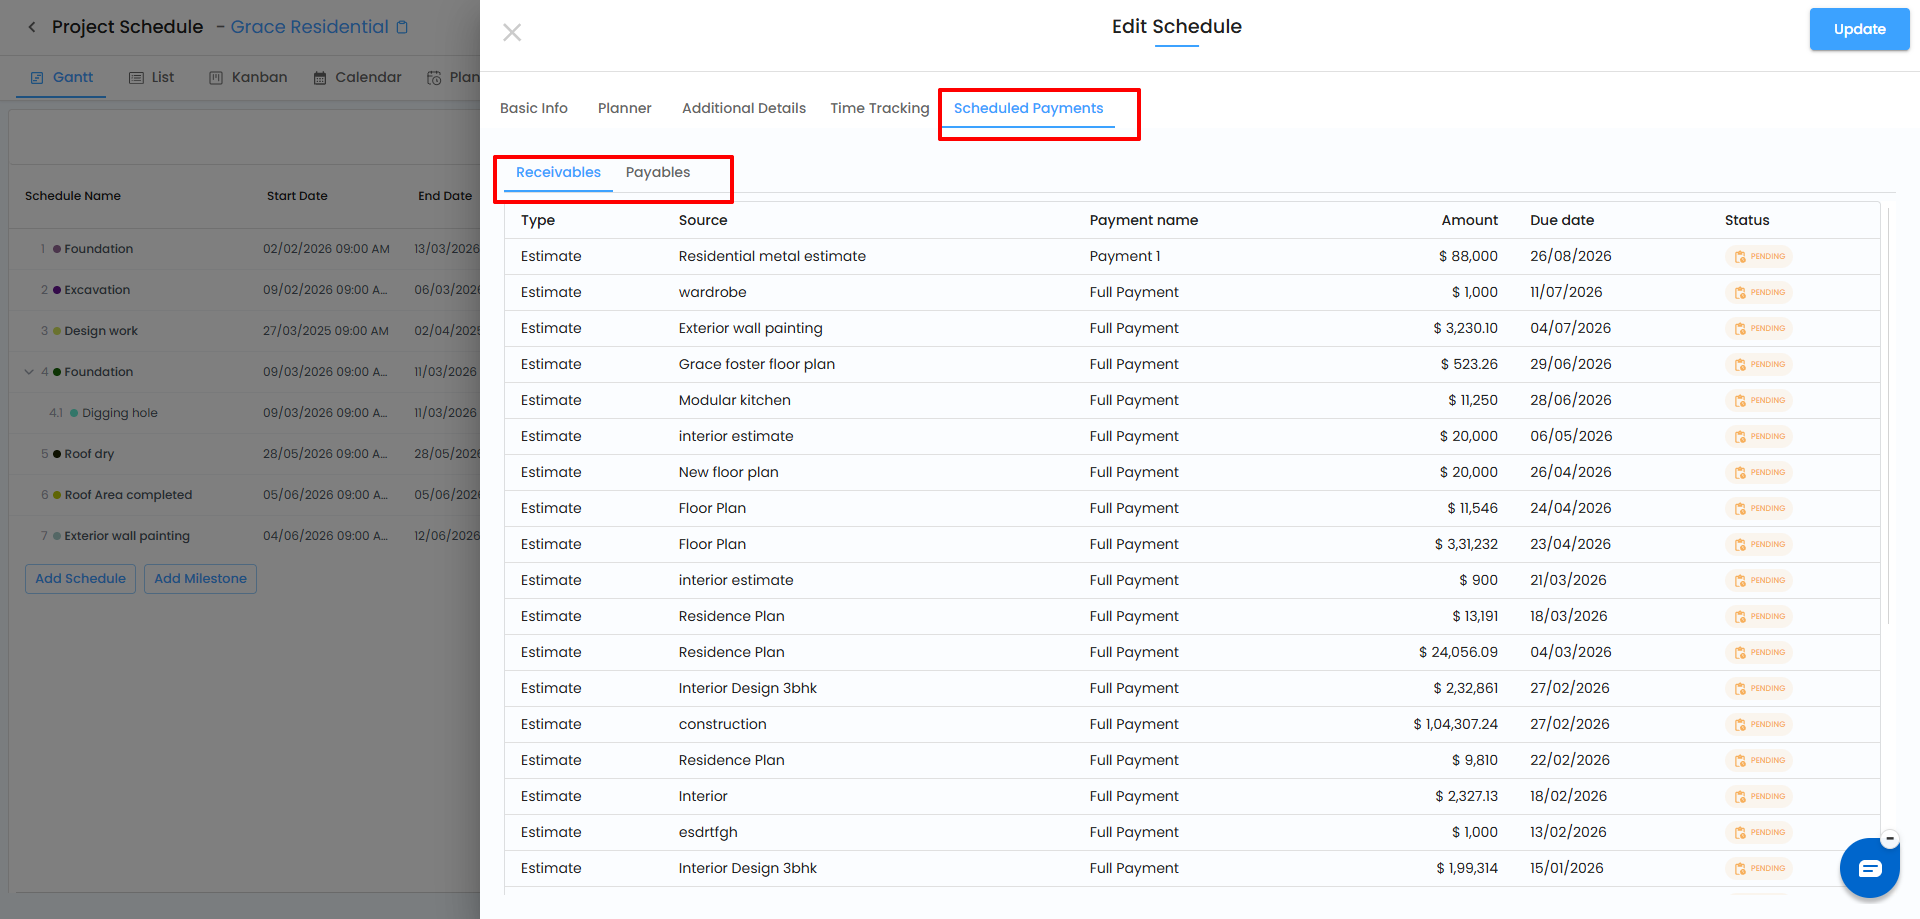
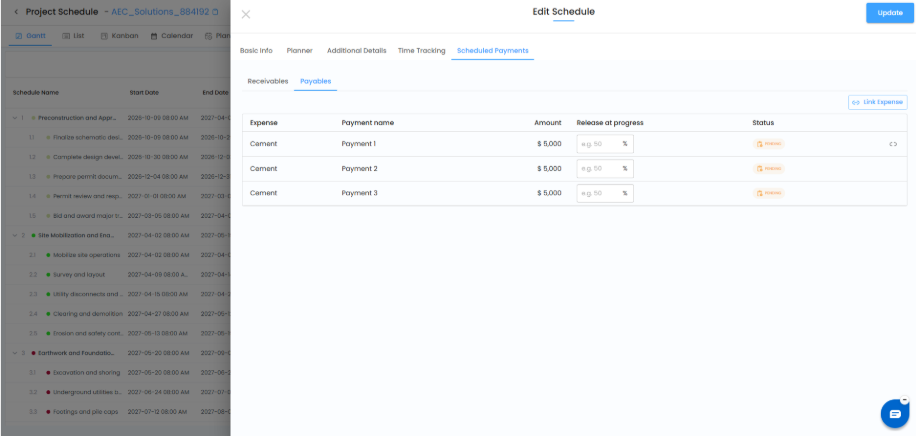
Pro Tip: Review both Receivables and Payables regularly to keep track of customer-related financial items and expenses for each schedule.
See also: Schedule / Milestone Linking to Invoice, Linking Estimate Payment Terms to Project Schedule, Linking Expenses to Project Schedules.
Milestones
A Milestone is a critical one-day task, usually marking the completion of a phase or an important checkpoint. Milestones appear on the timeline alongside tasks and phases.
Create a milestone
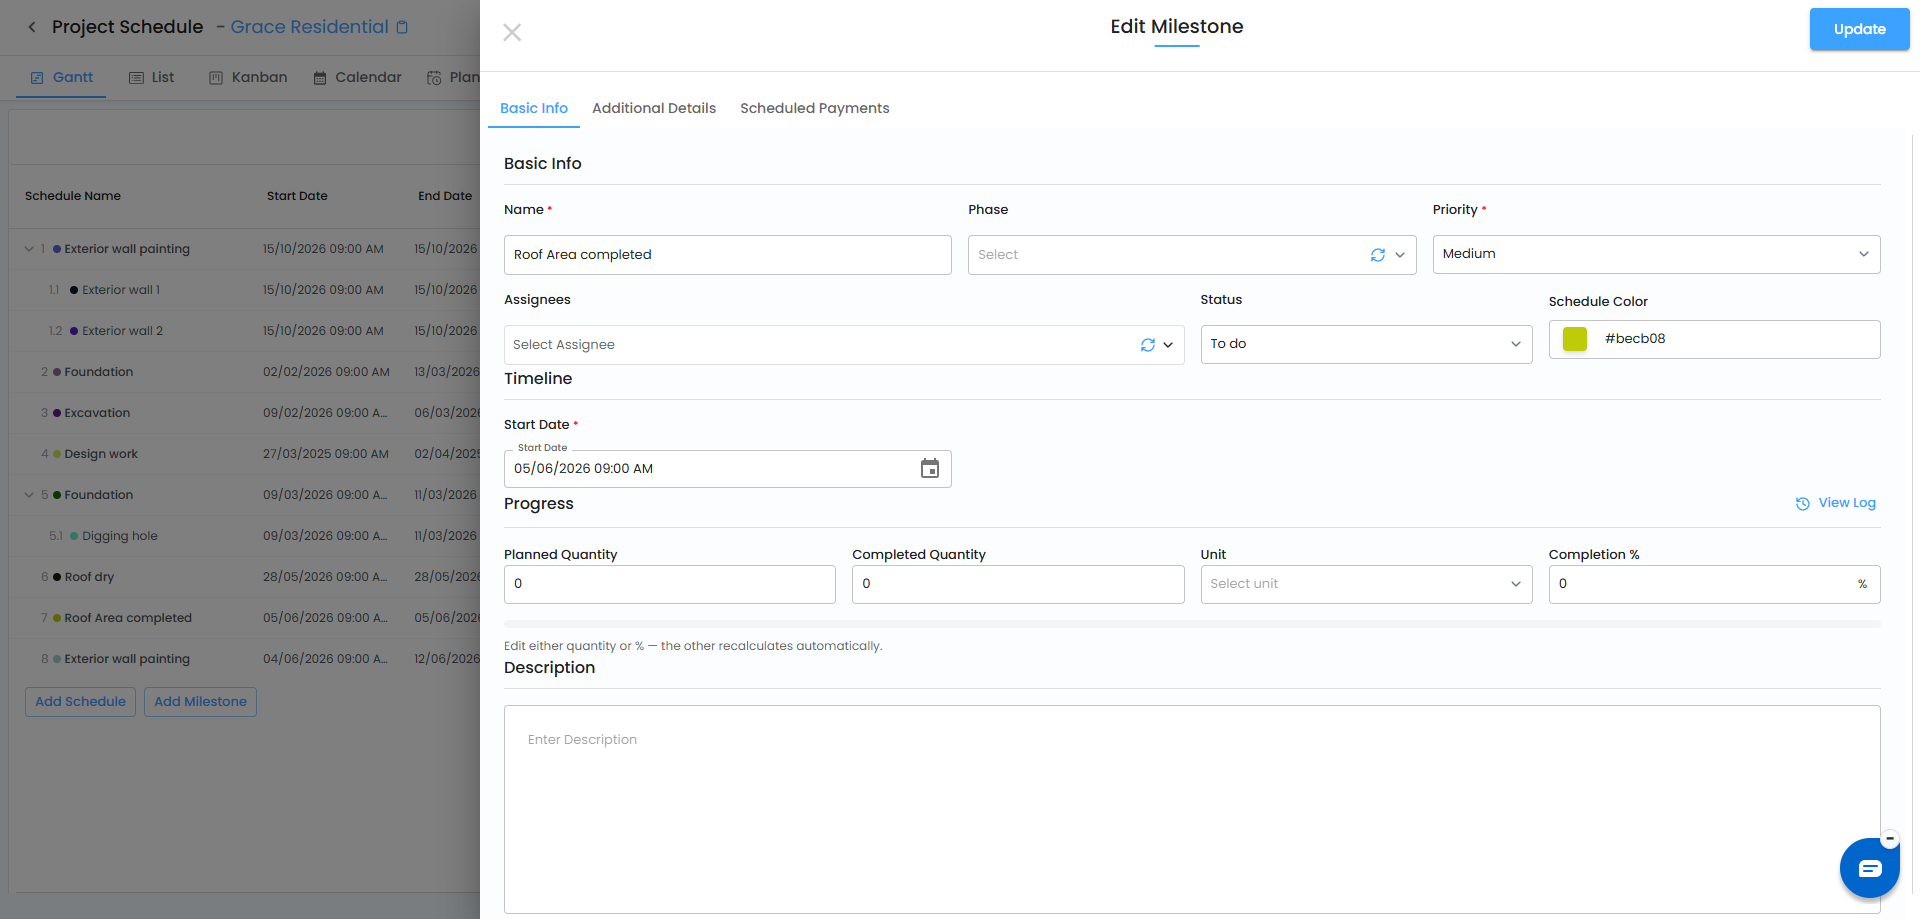
- Click Add Milestone and enter the milestone name.
- Click the three-dot menu (⋮) beside the milestone and select Edit to open the Edit Milestone window.
- Complete the details below.
- Click Update to save.
| Field | Description |
|---|---|
| Name | Enter or update the milestone name. |
| Phase | The phase the milestone belongs to. |
| Assignees | Team members responsible. |
| Priority | Priority level. |
| Completion % | Progress of the milestone. |
| Milestone Color | Color used on the timeline. |
| Start Date | The date of the milestone. Because milestones are single-day events, only a start date is needed. |
| Description | Optional extra information. |
Additional Details
Expand Additional Details to configure:
- Add Dependency – link the milestone to related schedule activities.
- Add Task – add a task associated with the milestone.
- Add Reminder – set a reminder.
- Attachments – upload up to 5 files, each up to 500 MB.
Milestone three-dot menu options
| Option | What it does |
|---|---|
| Edit | Open the Edit Milestone window. |
| Link Invoice | Link an invoice to the milestone. |
| Link Estimate Payment Terms | Link estimate payment terms to the milestone. |
| Complete | Sets completion to 100%. |
| Incomplete | Resets a completed milestone to 0%. |
| Delete | Removes the milestone. |
Pro Tip: Keep milestone names clear and meaningful, assign the right team members, and use Complete/Incomplete to update progress quickly.
Completing a Schedule or Milestone with Linked Financial Details
When you mark a schedule or milestone as completed, IntoAEC checks whether an invoice or estimate payment terms are linked to it.
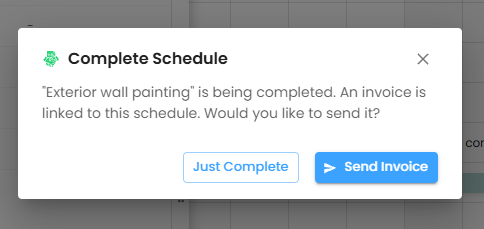
When an invoice is linked
A completion popup tells you an invoice is linked. Choose:
- Just Complete – mark as completed without sending the invoice.
- Send Invoice – mark as completed and send the linked invoice to the customer.
When estimate payment terms are linked and pending
A completion popup offers:
- Just Complete – mark as completed without sending a payment link or reminder.
- Send Reminder – email a reminder about the pending payment.
- Send Payment Link – email the customer a link that takes them directly to the payment page.
Critical Path
What is the Critical Path?
The Critical Path is the longest sequence of dependent tasks that determines your project's finish date. Any delay to a critical path task pushes back the entire project. In IntoAEC it is overlaid on the Gantt chart so you can instantly see which tasks drive your timeline.
Show or hide the Critical Path
- Open the Schedule tab and make sure you are in Gantt View.
- In the top-right toolbar, click the Critical Path icon.
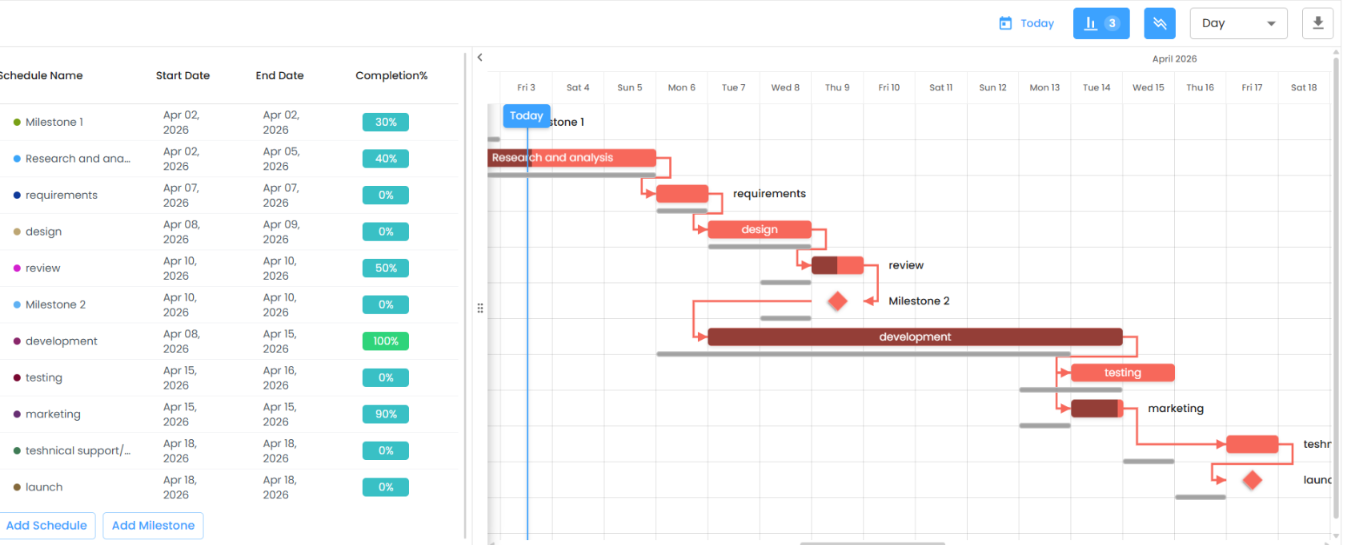
- Critical path tasks are highlighted in red, along with the dependency arrows that connect them.
- To hide it, click the same icon again. The tooltip reads Hide Critical Path.
What you will see
- Critical tasks are shown in red/salmon.
- Dependency arrows between critical tasks are red, tracing the chain from start to finish.
- Critical milestones are red diamonds.
- Non-critical tasks keep their original colors.
Why use it?
- Instantly see which tasks cannot be delayed
- Prioritize resources on high-impact tasks
- Spot bottlenecks before they cause overruns
- Communicate project risk to stakeholders
Pro Tip: Critical path tasks have zero float. Review the critical path every time you change durations or add dependencies, because it may shift.
Baseline
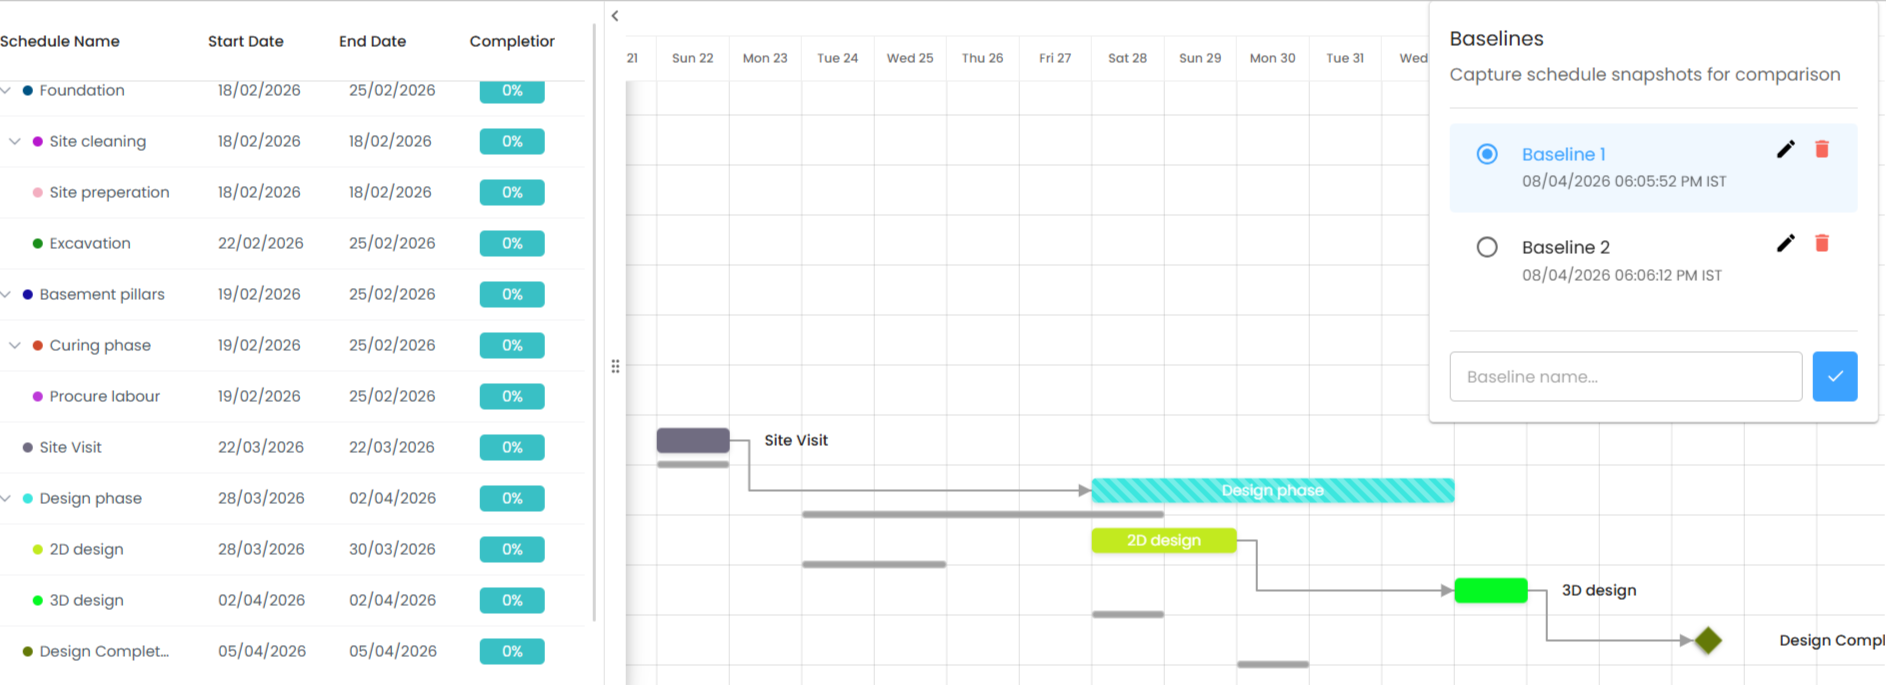
A Baseline is a saved snapshot of your schedule at a specific point in time. It gives you a reference to compare against as the project changes, and is typically created before making major changes.
Create a baseline
- In the Schedule view, click Baseline at the top corner of the screen.
- Enter a name that identifies this version, for example Initial Plan or Phase 1 Plan.
- Save.
You can then keep editing dates, dependencies, and timelines without losing the original plan.
Compare against a baseline
Open a saved baseline to overlay it on your current schedule. The earlier plan appears as gray lines, while the current schedule stays in color, so you can see where tasks were originally planned versus where they are now.
Pro Tip: Create a baseline before every major re-plan so reports always have a clear historical reference.
Assignee List in the Gantt View
The assignee list is visible directly in the Gantt View, so you can see who is assigned to each schedule activity without opening its details.
Deadline
When creating or editing a schedule, turn on the Deadline toggle and pick a date. The deadline is tracked separately from the planned start and end dates, which makes upcoming or delayed work easier to spot.
Frequently Asked Questions
What happens to sub-schedules if I delete a schedule?They are deleted along with it.
Why is Link Invoice greyed out on my schedule?The schedule was created by converting an estimate and is already linked to that estimate.
Does editing a baseline-compared schedule change the baseline?No. The baseline is a saved snapshot, so you can keep updating the schedule.
Related Articles
- How to Create a Schedule
- Schedule / Milestone Linking to Invoice
- Linking Estimate Payment Terms to Project Schedule
- Setting Off-Days & Working Hours
Need Further Assistance?
Contact your organization administrator or the IntoAEC support team.
Was this article helpful?
That’s Great!
Thank you for your feedback
Sorry! We couldn't be helpful
Thank you for your feedback
Feedback sent
We appreciate your effort and will try to fix the article