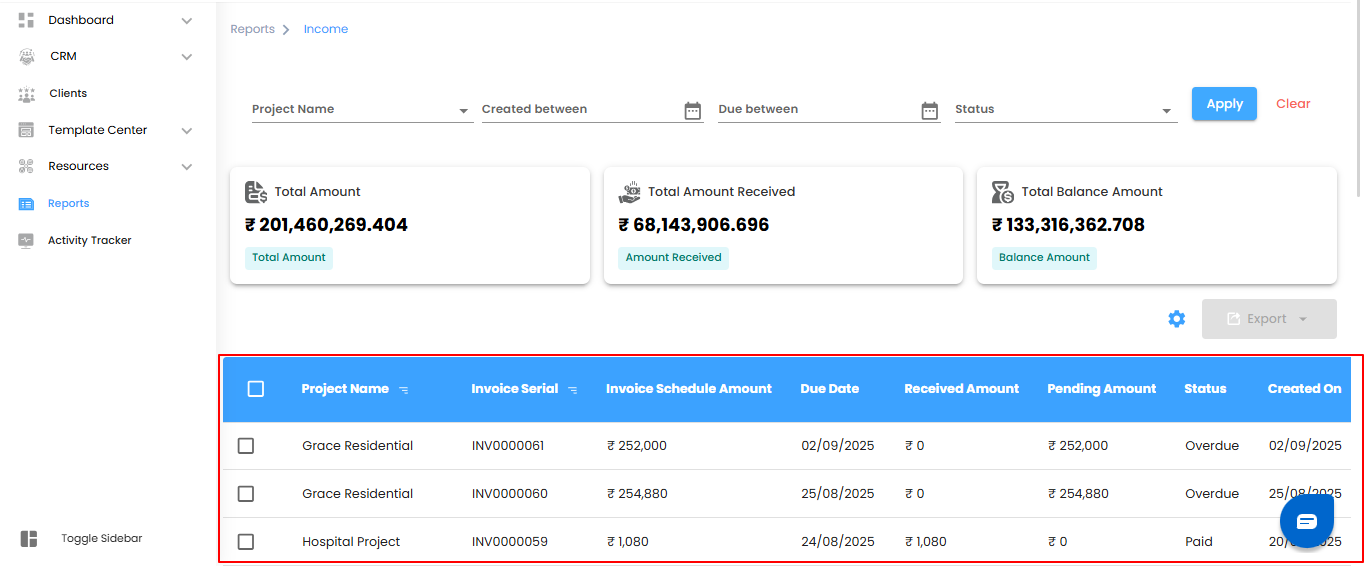
Income Report – Your Project’s Cash Flow Command Center
Think of the Income Report as your project’s financial dashboard—showing exactly what money is coming in, what’s pending, and what’s outstanding. With this report, managing project finances becomes smooth, transparent, and stress-free.
What You Can Do Here
- Track Transactions – Monitor invoices, payments received, and outstanding balances in one place.
- Filter & Refine – Narrow down data by date, client, or status to focus on what matters most.
- Analyze Trends – Spot patterns in income, payment cycles, and client behavior.
- Export Reports – Download data for deeper analysis, presentations, or record-keeping.
- Accessing the Income Report
- Go to Reports – From the IntoAEC dashboard, navigate to the Reports section.
- Select Income Report – Click to open a detailed view of all your income-related transactions.
Pro tip: Treat this report like your project’s financial pulse—check it regularly to stay on top of cash flow and client payments.
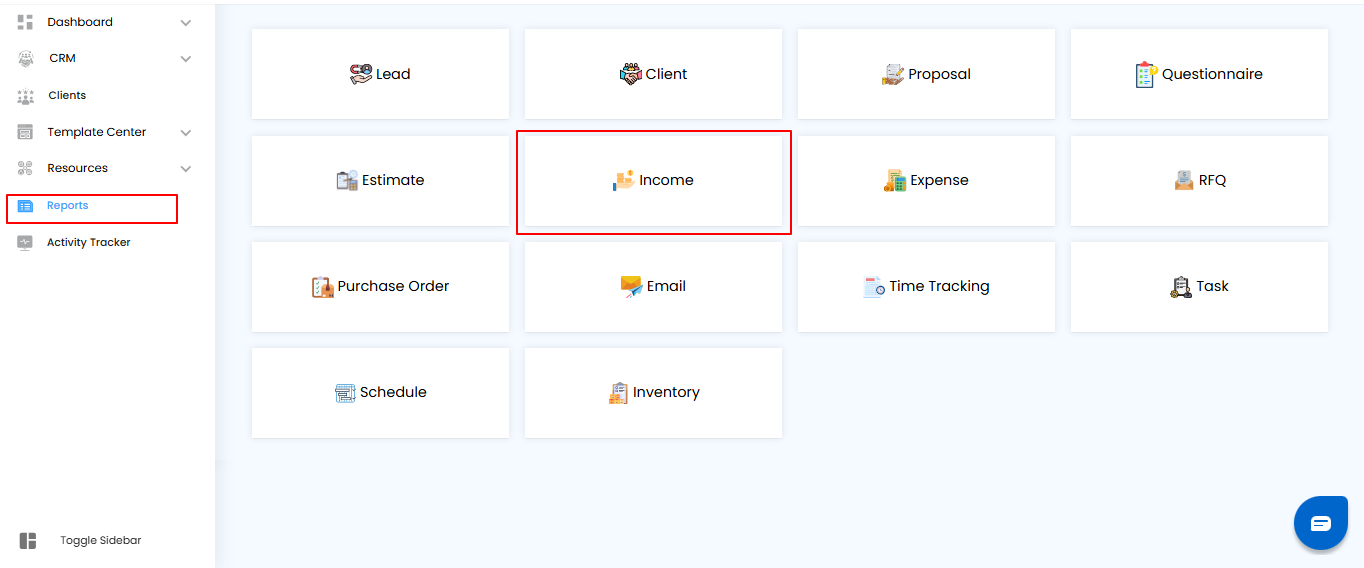
Applying Filters – Zoom In on What Matters
Think of filters as your project’s magnifying glass for income data. Quickly find the transactions that matter without scrolling through everything.
How to Refine Your Income Records:
- Project Name – Select a specific project to see only its transactions.
- Created Between – Filter invoices based on when they were created.
- Due Between – Narrow down invoices by their due dates.
- Status – Focus on Paid, Pending, or Overdue invoices.
- Once you’ve set your filters, click Apply to update the report or Clear to reset and see all records again.
Pro tip: Combine multiple filters to pinpoint exactly what you need—perfect for monthly reviews, overdue follow-ups, or project-specific audits.
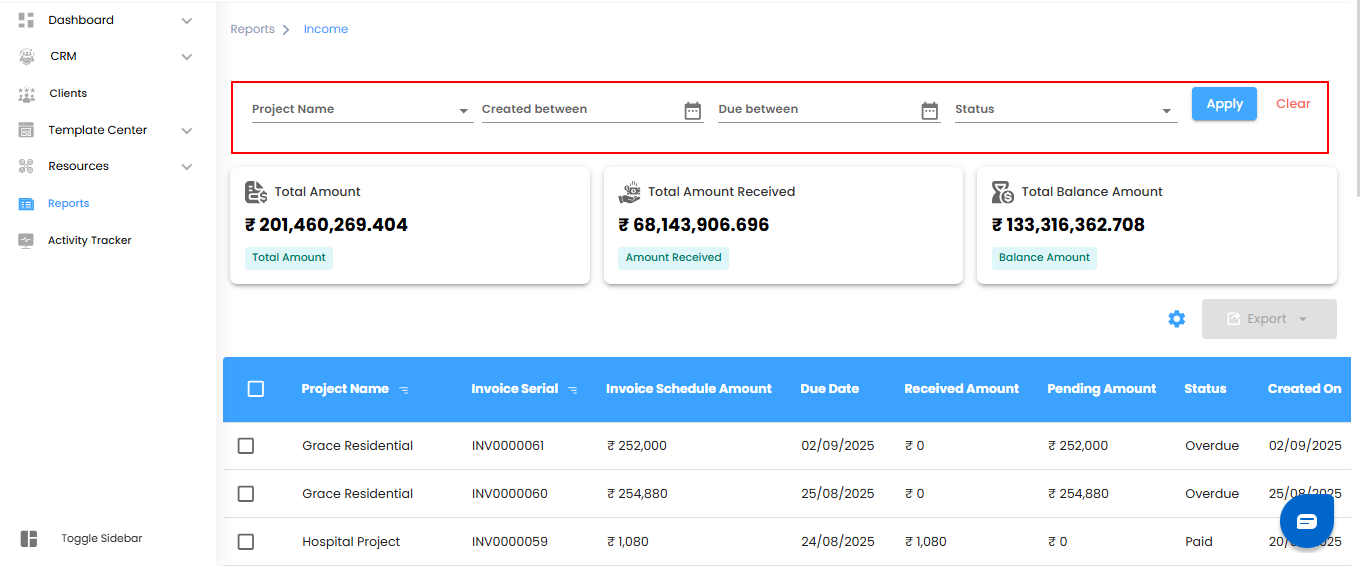
Dashboard Metrics – Your Financial Snapshot
Think of the dashboard as your project’s quick-view financial cockpit—everything you need to understand cash flow at a glance.
Key Metrics You’ll See:
- Total Amount – The total invoiced amount across all projects.
- Total Amount Received – The payments you’ve successfully collected.
- Total Balance Amount – What’s still pending and yet to come in.
Pro tip: Keep an eye on these metrics regularly—they give you an instant pulse of your project’s financial health and help spot trends or potential issues early.
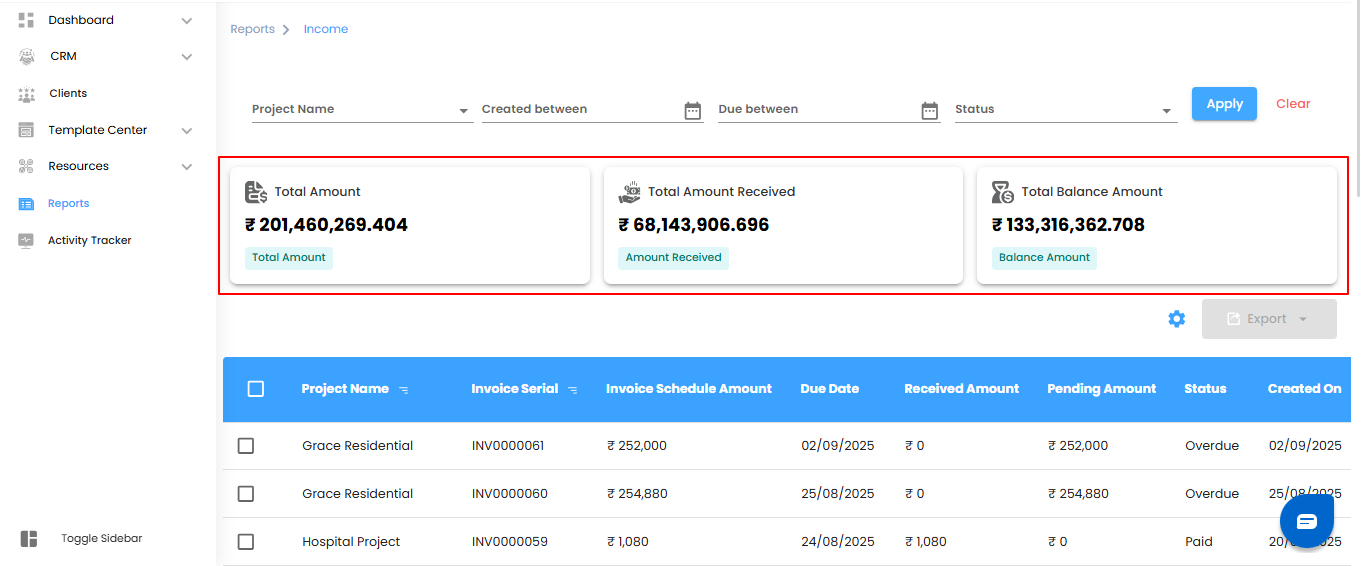
Viewing Income Details – Get the Full Picture
Think of the Income Report table as your project’s financial ledger—every invoice, every payment, all laid out in one place. It’s where you get the complete story behind your cash flow.
Key Details You’ll Find:
- Project Name – Which project the invoice belongs to.
- Invoice Serial – The unique identifier for each invoice.
- Invoice Schedule Amount – The total amount scheduled for the invoice.
- Due Date – When the payment is expected.
- Pending Amount – The outstanding balance yet to be collected.
- Received Amount – How much has already been received.
- Status – Whether the invoice is Paid, Pending, or Overdue.
- Created On – The date the invoice was generated.
Pro tip: Use this table as your command center quickly spot overdue invoices, track collections, and follow up with clients efficiently.
Managing Income – Bulk Actions & Exporting Made Easy
Think of this as your project’s multitool for finances—handle multiple invoices at once or take your data wherever you need it.
Bulk Actions – Work Smarter
- Select multiple income records to perform updates or actions together.
- Keep transactions organized and manage multiple invoices efficiently without repeating steps.
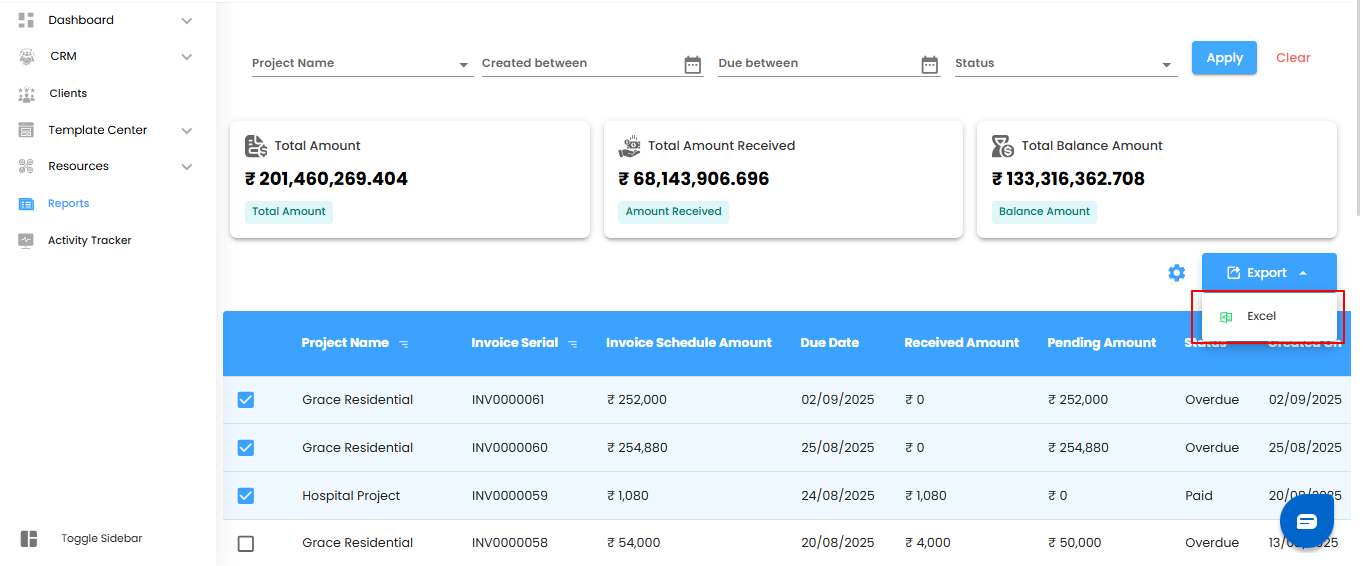
- Exporting Data – Take Control of Your Numbers
- Download your Income Report in Excel format for offline analysis.
- Use the exported data for audits, forecasting, or detailed reporting.
Pro tip: Combine bulk actions with filters—narrow down the data first, select multiple records, and export. It’s fast, efficient, and keeps your project finances under control.
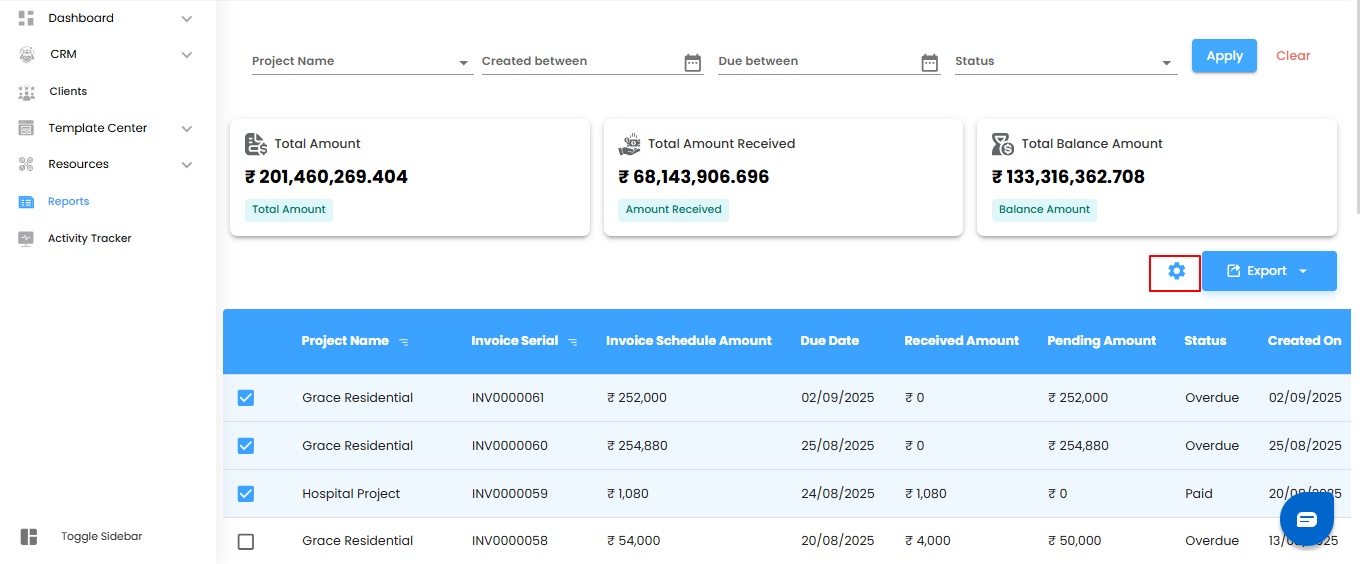
Configure Income Report Automation – Let the Numbers Flow Automatically
Why wait for updates when your income reports can come to you automatically? Set it once, and your financial insights will be delivered on schedule—reliably and effortlessly.
Step 1: Open the Automation Popup
- Click the Configure Report Automation icon to open the Income Report Automation popup. Think of it as unlocking your project’s personal financial assistant.
Pro tip: Treat this popup as your control center—everything you need to schedule, manage, and automate income reports is right here.
Select Report Recipients – Deliver Insights to the Right People
Think of this as directing your project’s financial updates straight to the inboxes that matter. Use the Send To dropdown to select the users who should receive your automated income reports—simple, precise, and hassle-free.
Define Report Timing
- Under the Generate Report dropdown, decide how often your reports should arrive:
- Daily (Default) – Fresh insights every day, generated within one hour of your chosen time.
- Example: Set for 6:00 PM, and your report will appear between 6:00 PM and 6:59 PM.
- Weekly – Receive a full week’s summary at the same day and time next week—ideal for tracking weekly cash flow.
- Monthly – Get a monthly overview delivered at the same day and time next month—perfect for big-picture planning.
Pro tip: Treat the delivery schedule like the heartbeat of your project—consistent timing keeps everyone informed and aligned.

Set the Start Date & Time – Schedule Your Automation Like Clockwork
- Pick the Start Date and Start Time to tell your automation exactly when to begin. Once set, your income reports will roll out automatically according to your chosen schedule.
- Note: Don’t forget the Start Time—without it, your reports won’t be generated.
Save or Cancel – Lock It In or Start Fresh
- Save – Apply your settings and let the automation take over.
- Cancel – Exit without saving if you need to rethink your schedule.
Pro tip: Think of the start time as the first beat of a drum—everything else follows smoothly once it’s set.

Income Report – Your Project’s Revenue Radar
Think of the Income Report as your project’s financial compass—tracking revenue, monitoring payments, and giving you a clear view of cash flow. With detailed insights, filters, and export options, managing income becomes efficient, accurate, and stress-free.
What You Can Do Here
- Track Revenue – Keep tabs on all invoices, payments received, and outstanding balances.
- Filter & Refine – Quickly zero in on the data that matters most.
- Export for Analysis – Download reports for audits, forecasting, or sharing with your team.
Pro tip: Treat this report like your project’s financial radar—check it regularly to spot trends, catch overdue payments, and make informed decisions.
Was this article helpful?
That’s Great!
Thank you for your feedback
Sorry! We couldn't be helpful
Thank you for your feedback
Feedback sent
We appreciate your effort and will try to fix the article
