This is the full walkthrough for building an estimate from nothing and sending it to your client. Work through it in order — every part of the estimate page is covered here.
Before you start
Make sure the client you are estimating for already exists under Clients.
Step 1 — Open a blank estimate
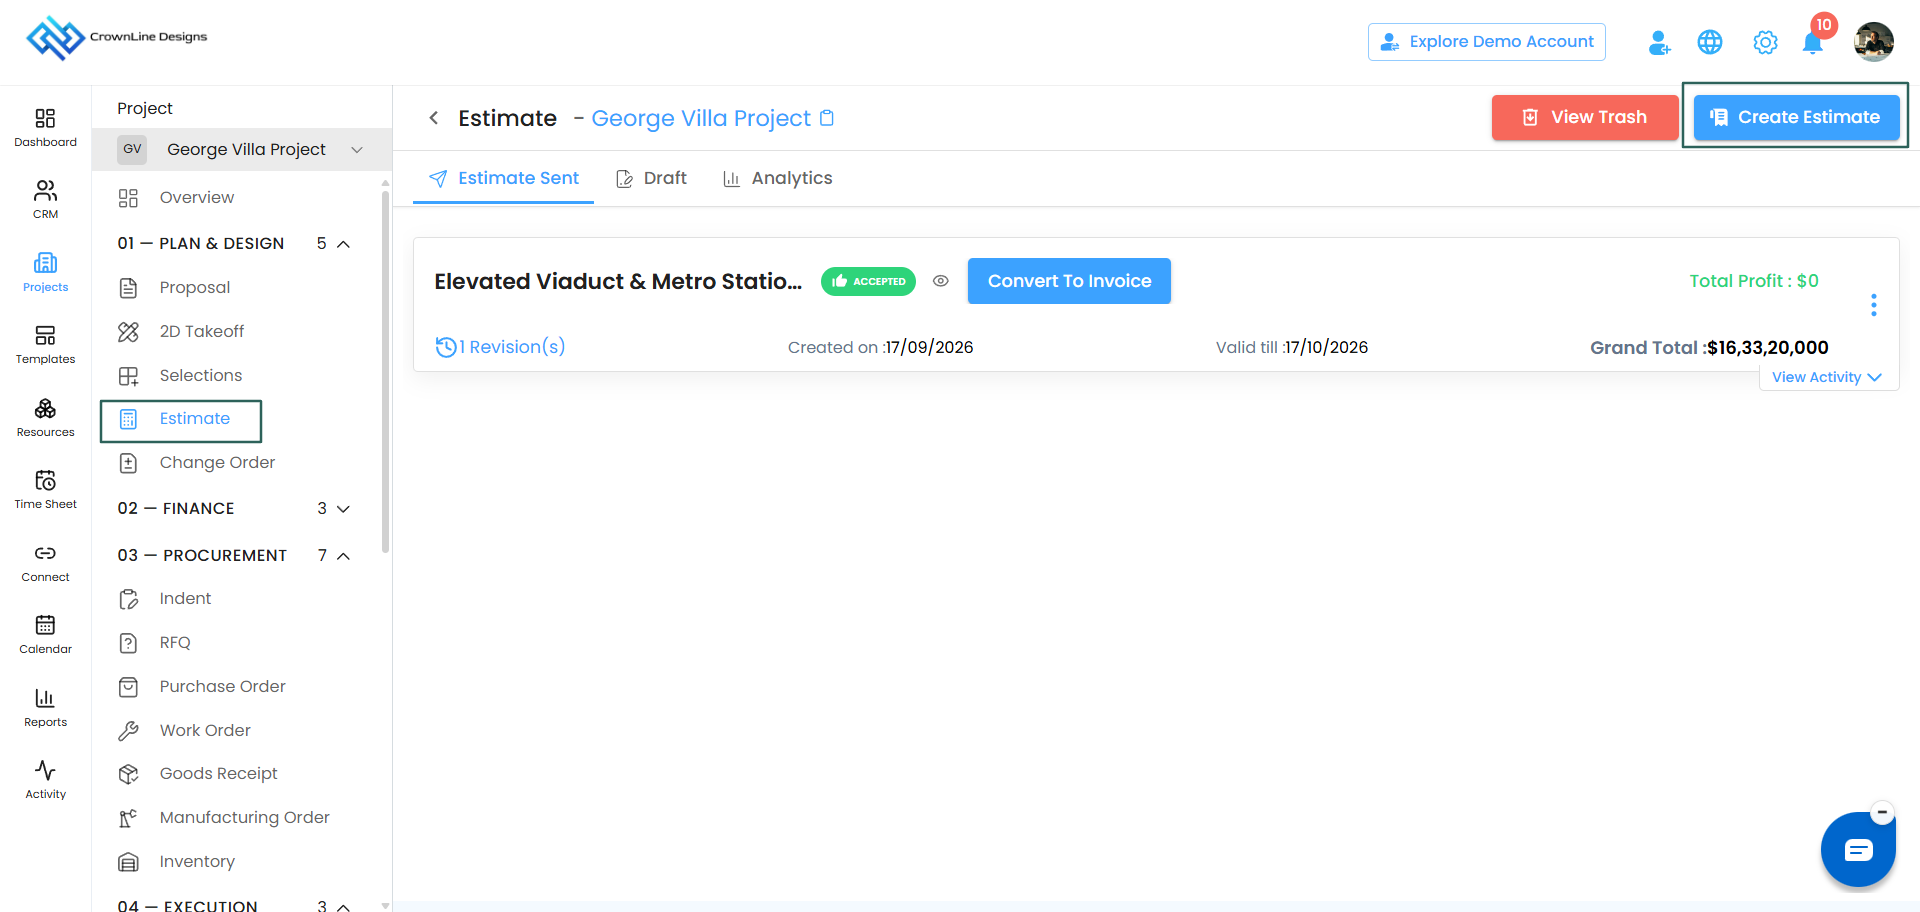
- Go to Clients, select your client, and open the Estimate card.
- Click Create Estimate.
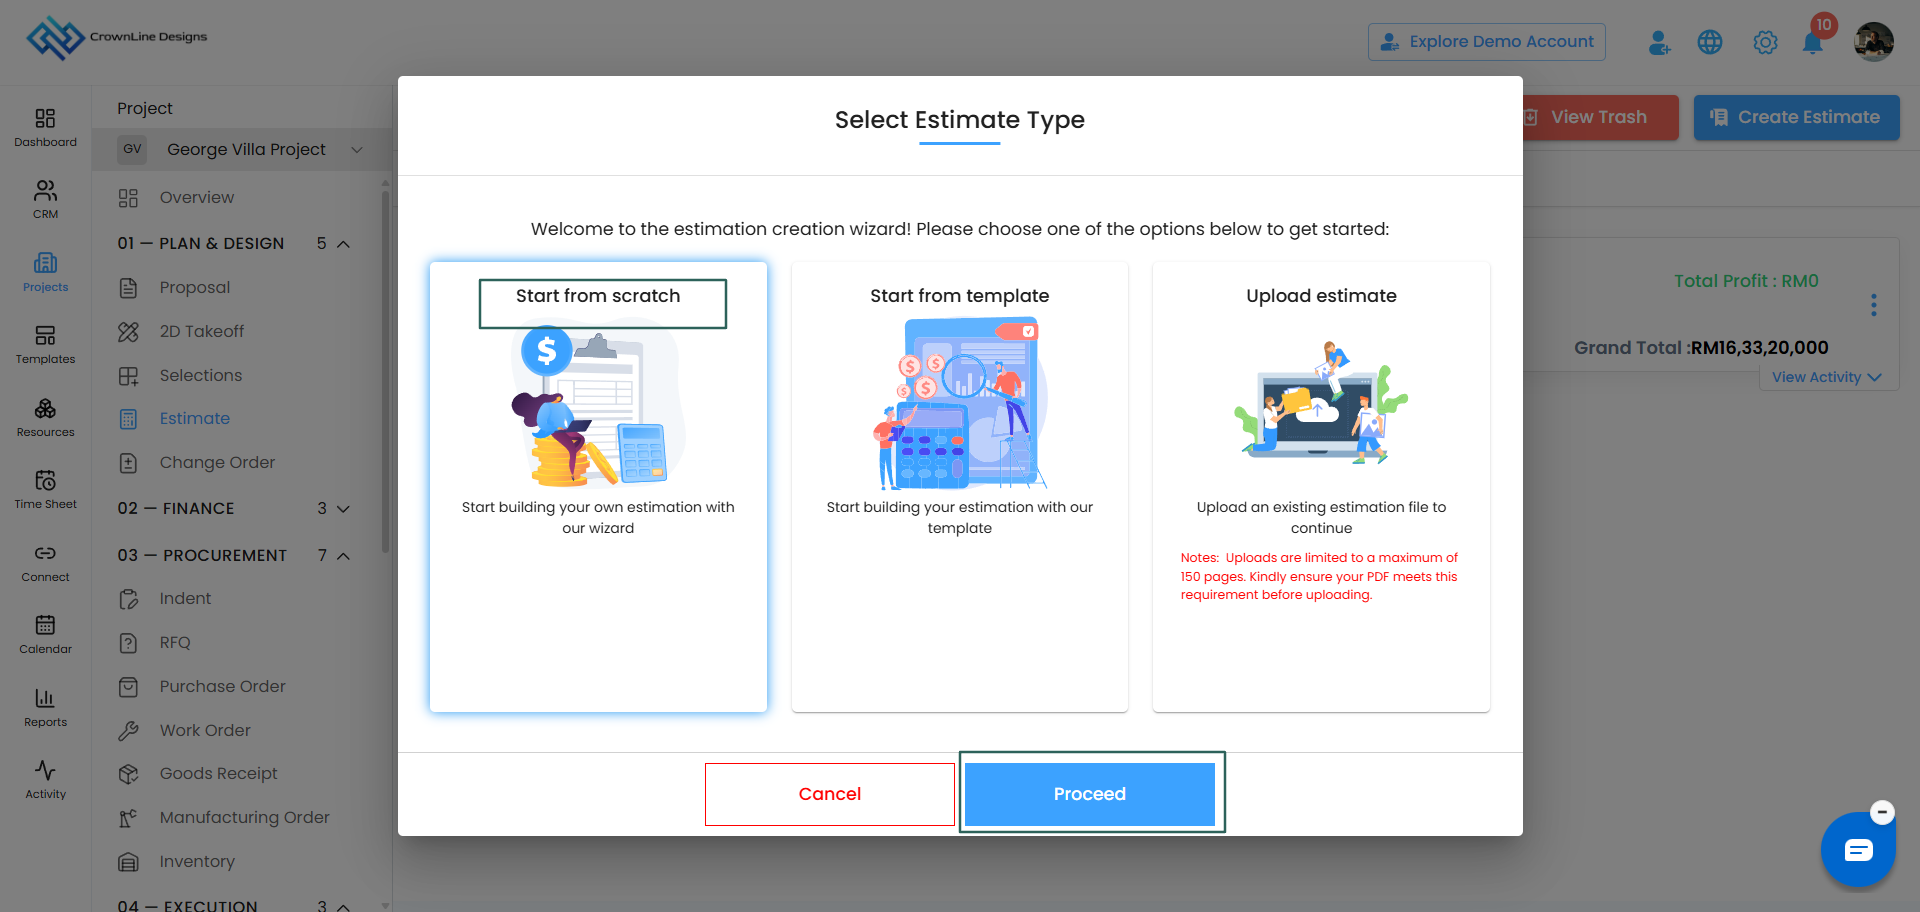
- In the Select Estimate Type popup, choose Start from Scratch.
- Click Proceed.
You land on the estimate create page.
Step 2 — Fill in the header details
At the top of the page you will find:
- Serial Number — generated automatically. You do not need to touch it.
- Title — type a name for this estimate.
- Created On — today's date by default.
- Valid Till — the same date next month by default. Change it if you want to give your client a shorter or longer window.
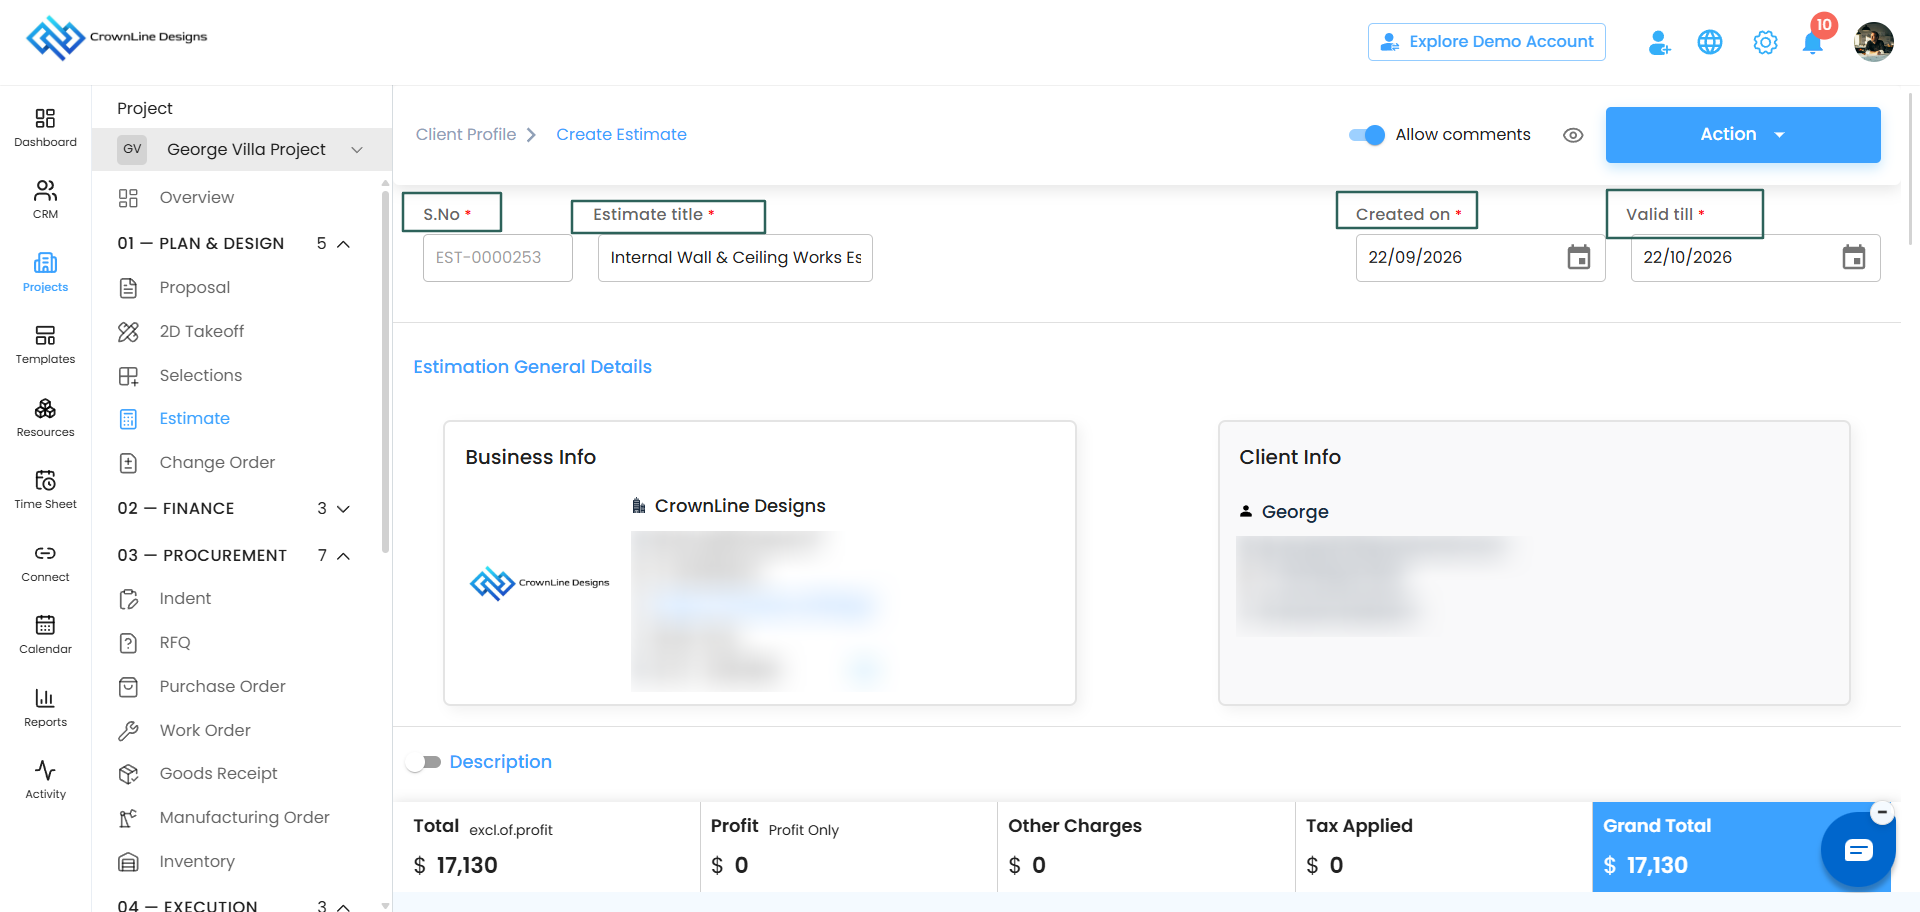
Below that, two blocks of information appear side by side:
- Business Info — your own company details
- Client Info — the details of the client you are sending to
Step 3 — Decide on description and images
Two toggles sit above the estimate table.
Description
Every line item has its own description field. If you would rather write one description for the whole estimate instead of typing one on every single line, switch on the Description toggle and write it once here.
What you write appears in the preview and in the estimate your client receives.
Show Images
Switch on Show Images and an image upload field appears on every line item. Upload a photo where it helps your client picture the work. Leave the toggle off and no image fields appear at all.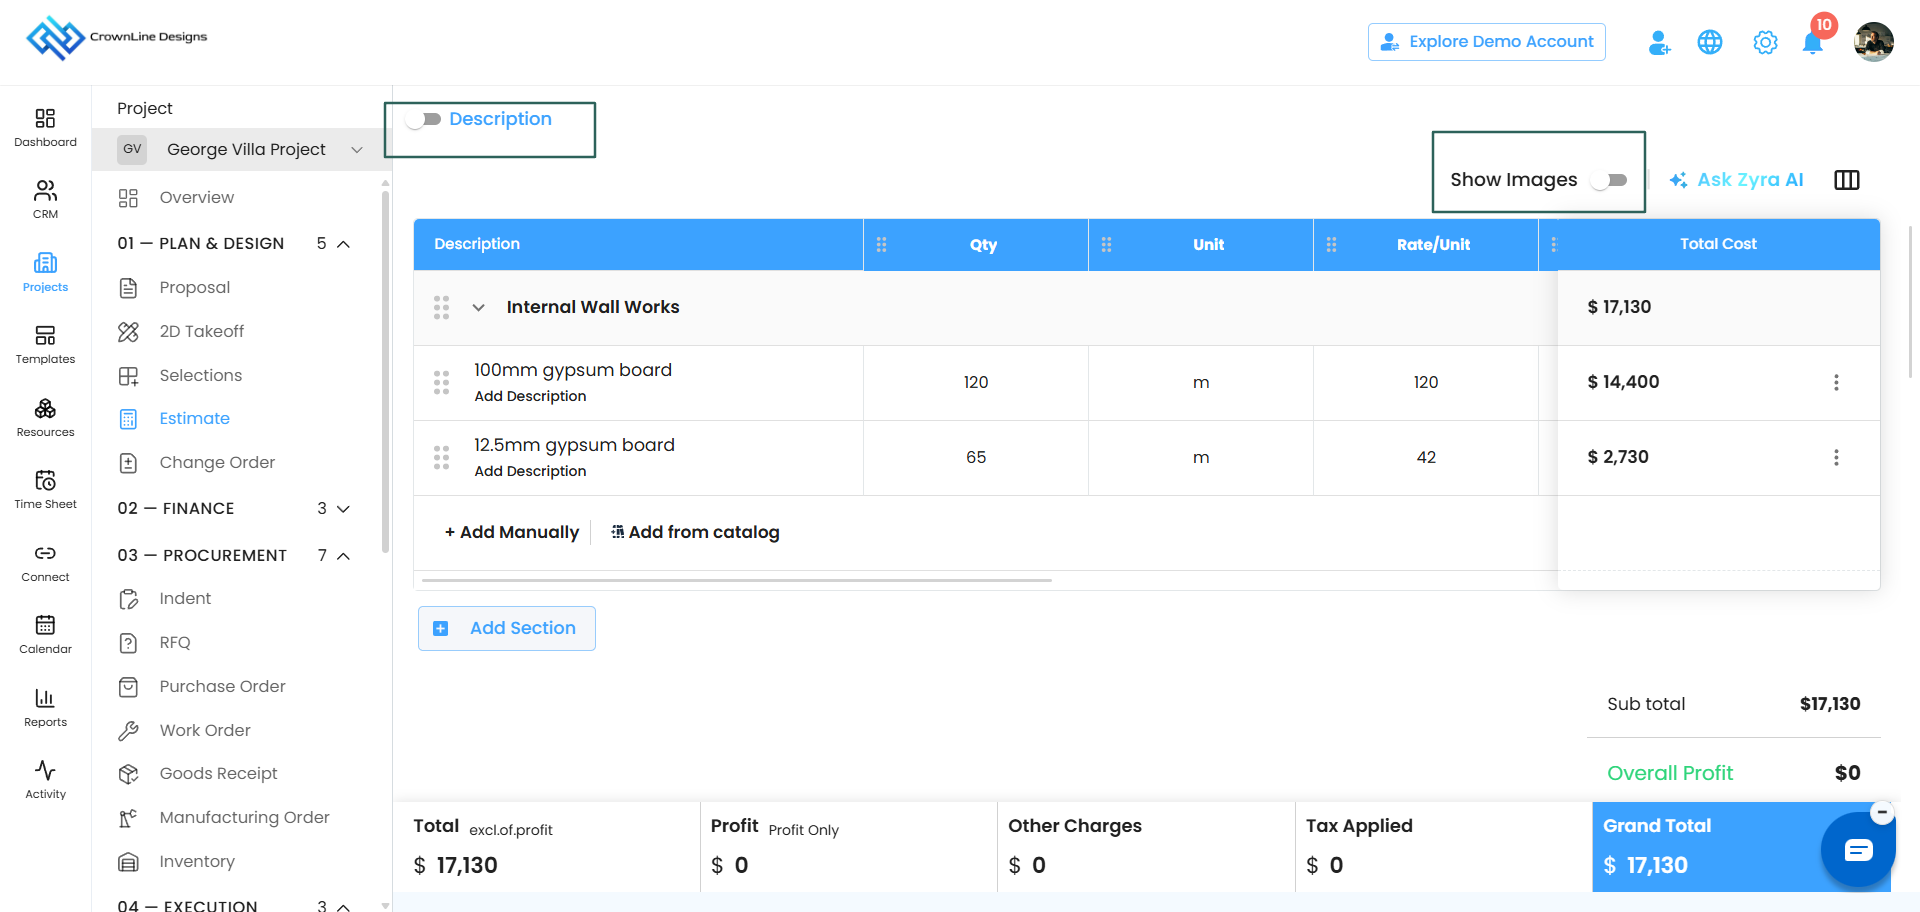
Step 4 — Set up your table columns
Next to the AI panel at the top of the table you will find Manage Columns.
Columns that are always there
Five columns are part of every estimate and cannot be shown or hidden:
Description, Qty, Unit, Profit, Rate Inclusive Tax.
Columns you can show or hide
Four columns are yours to control. Switch them on or off to suit the job:
Rate / Unit, Rate Excluding Tax, Tax, Total Cost.
Schedule columns
Start Date, Duration and End Date are also in the list. Switch them on if you will be converting this estimate into a schedule later, so the timing is captured while you are pricing.
Adding your own column
If you need something the standard columns do not cover:
- Open Manage Column.
- Type a name into the New Column field — for example, Area.
- Use the Select dropdown to choose what kind of information it holds.
- Add it, then click Apply.
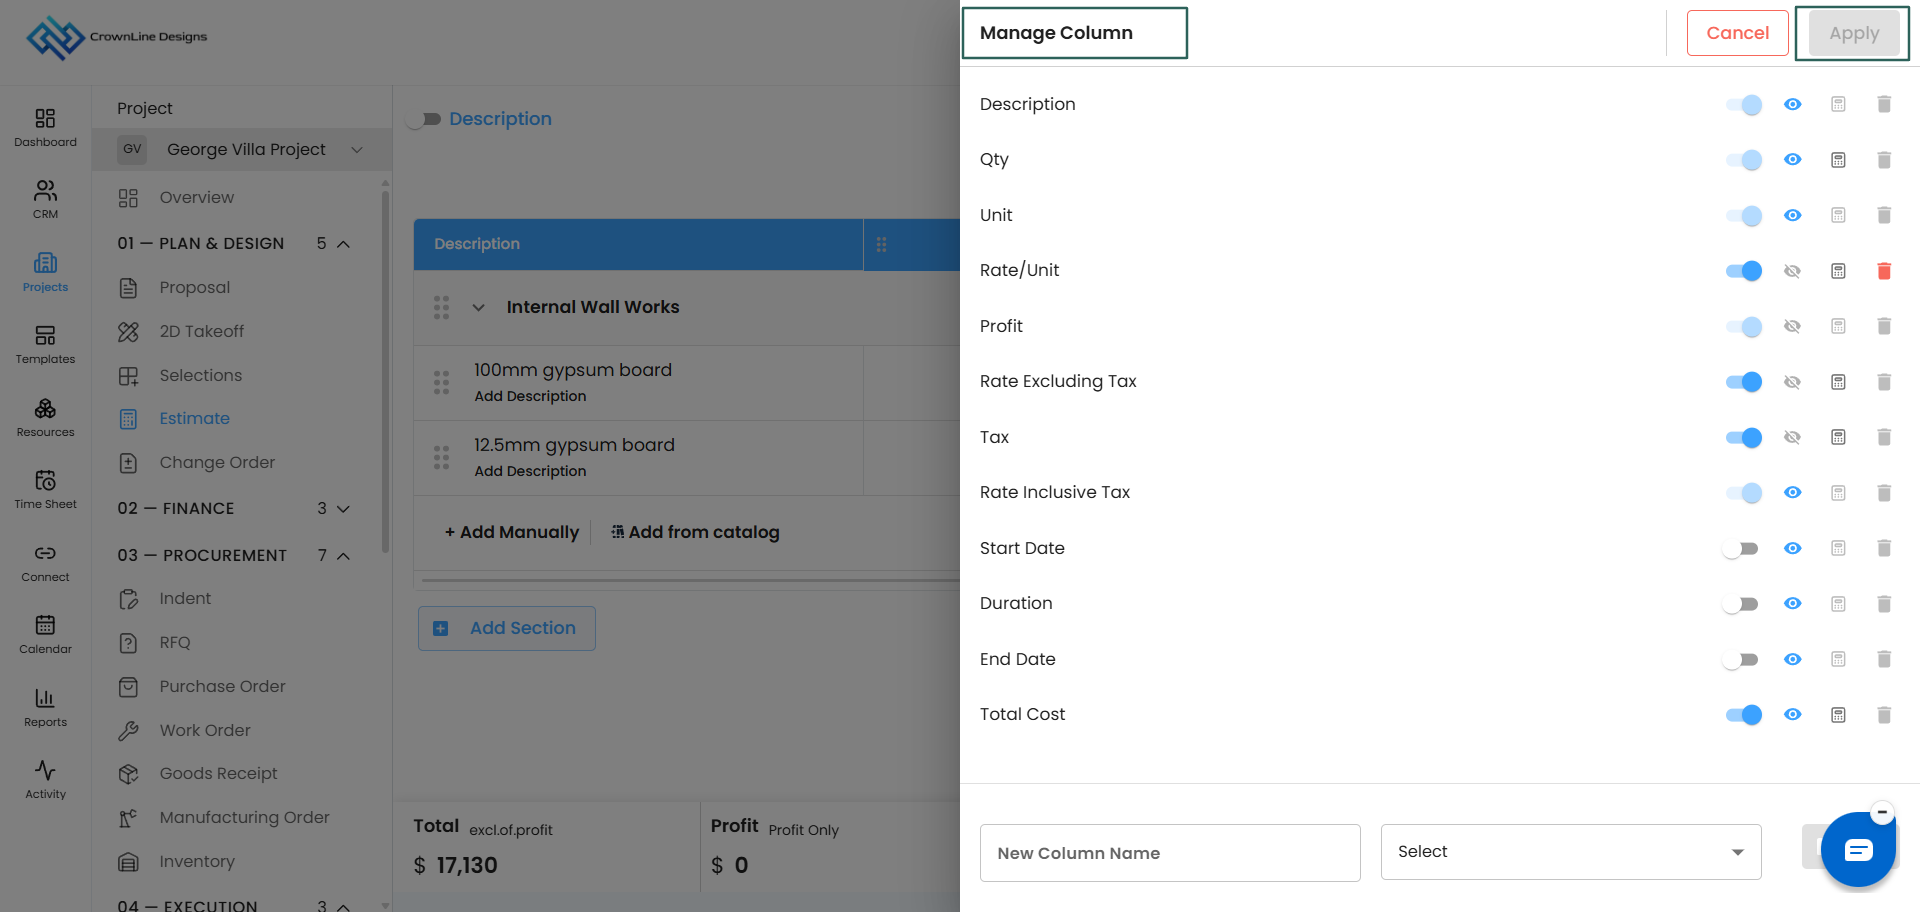
You can also set up a formula so a column works out its own value, using either a direct formula or conditional rules.
For the full detail on formulas, the show and hide controls, and what each icon does, see Manage Columns and Formula Configuration.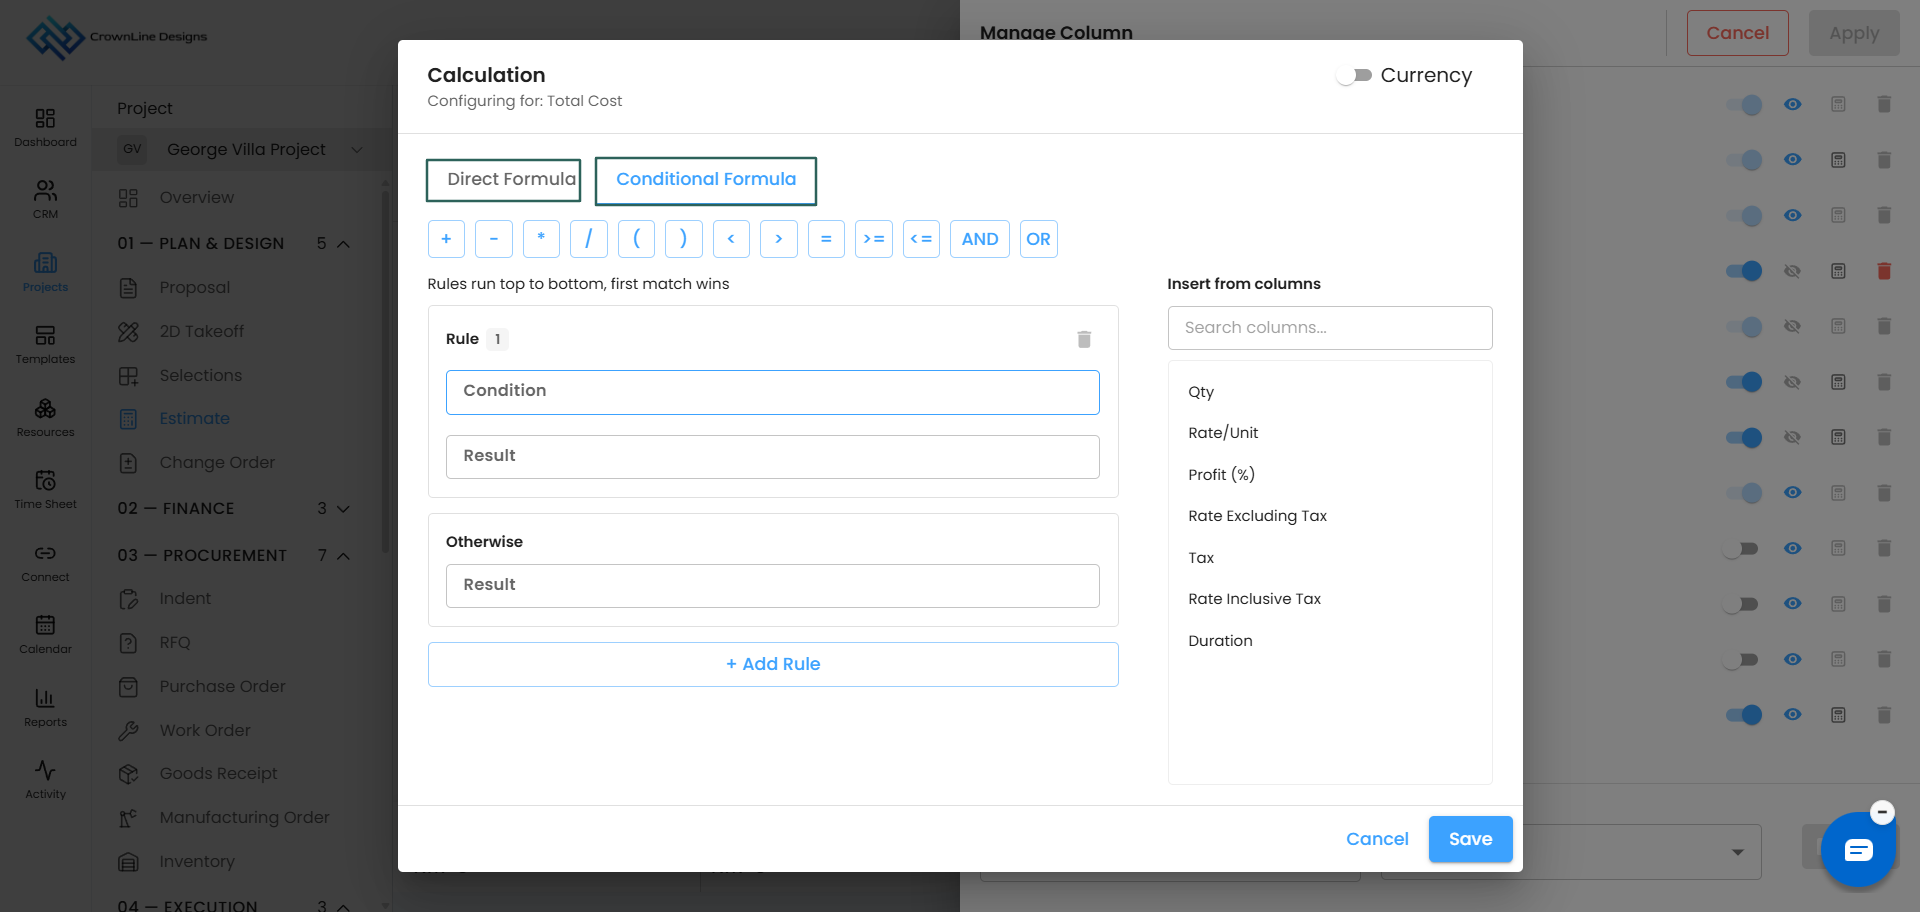
Step 5 — Build your sections and line items
Your estimate starts with one section and one line item.
Naming a section
Give the section a name that tells your client what part of the job it covers.
Adding line items
- Click Add Manually to add the next line item.
- Click Add from Catalog to pull items in from your Cost Catalog. See Add Items from the Cost Catalog for the full detail.
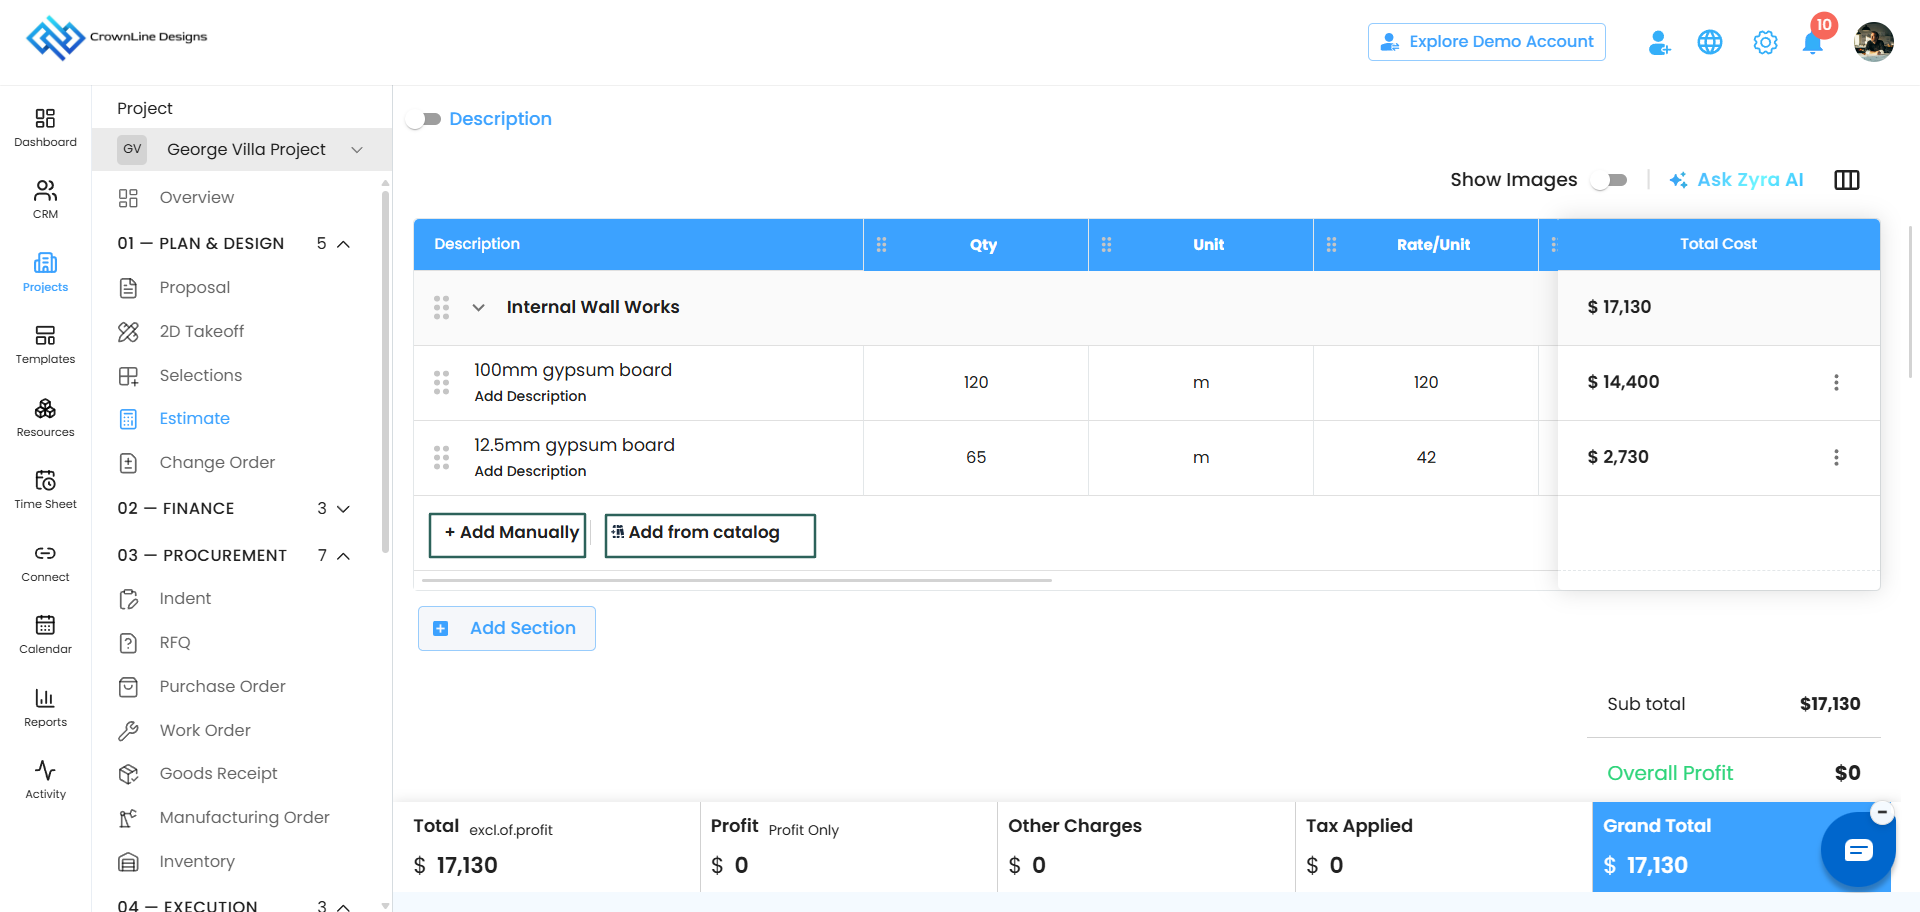
For every line item you fill in Description, Quantity, Unit, Rate per Unit, Profit, Rate Excluding Tax, Tax, Rate Including Tax and Total Cost.
Adding a description to a line item
Click into the description field on the line item, type what you need, and click Add.
Adding materials under a line item
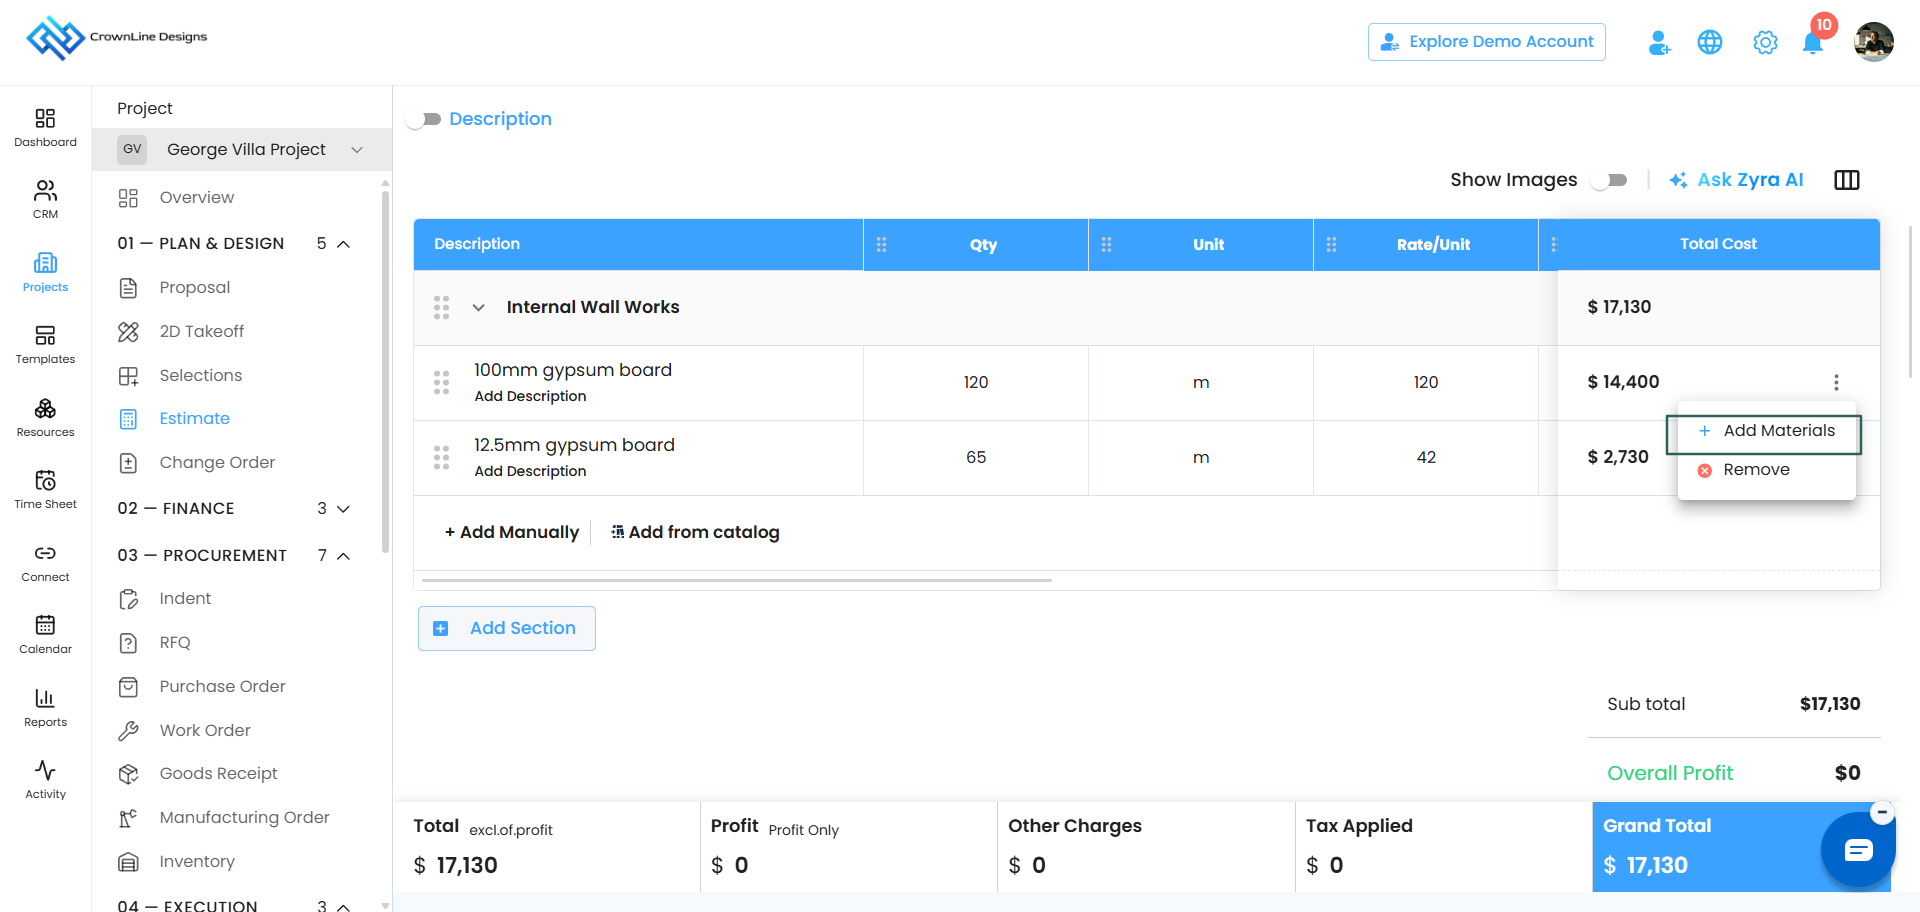
Each line item has a three-dot menu with two options:
- Add Materials — list the materials that sit under this line item
- Remove — take a material off the line item
Adding another section
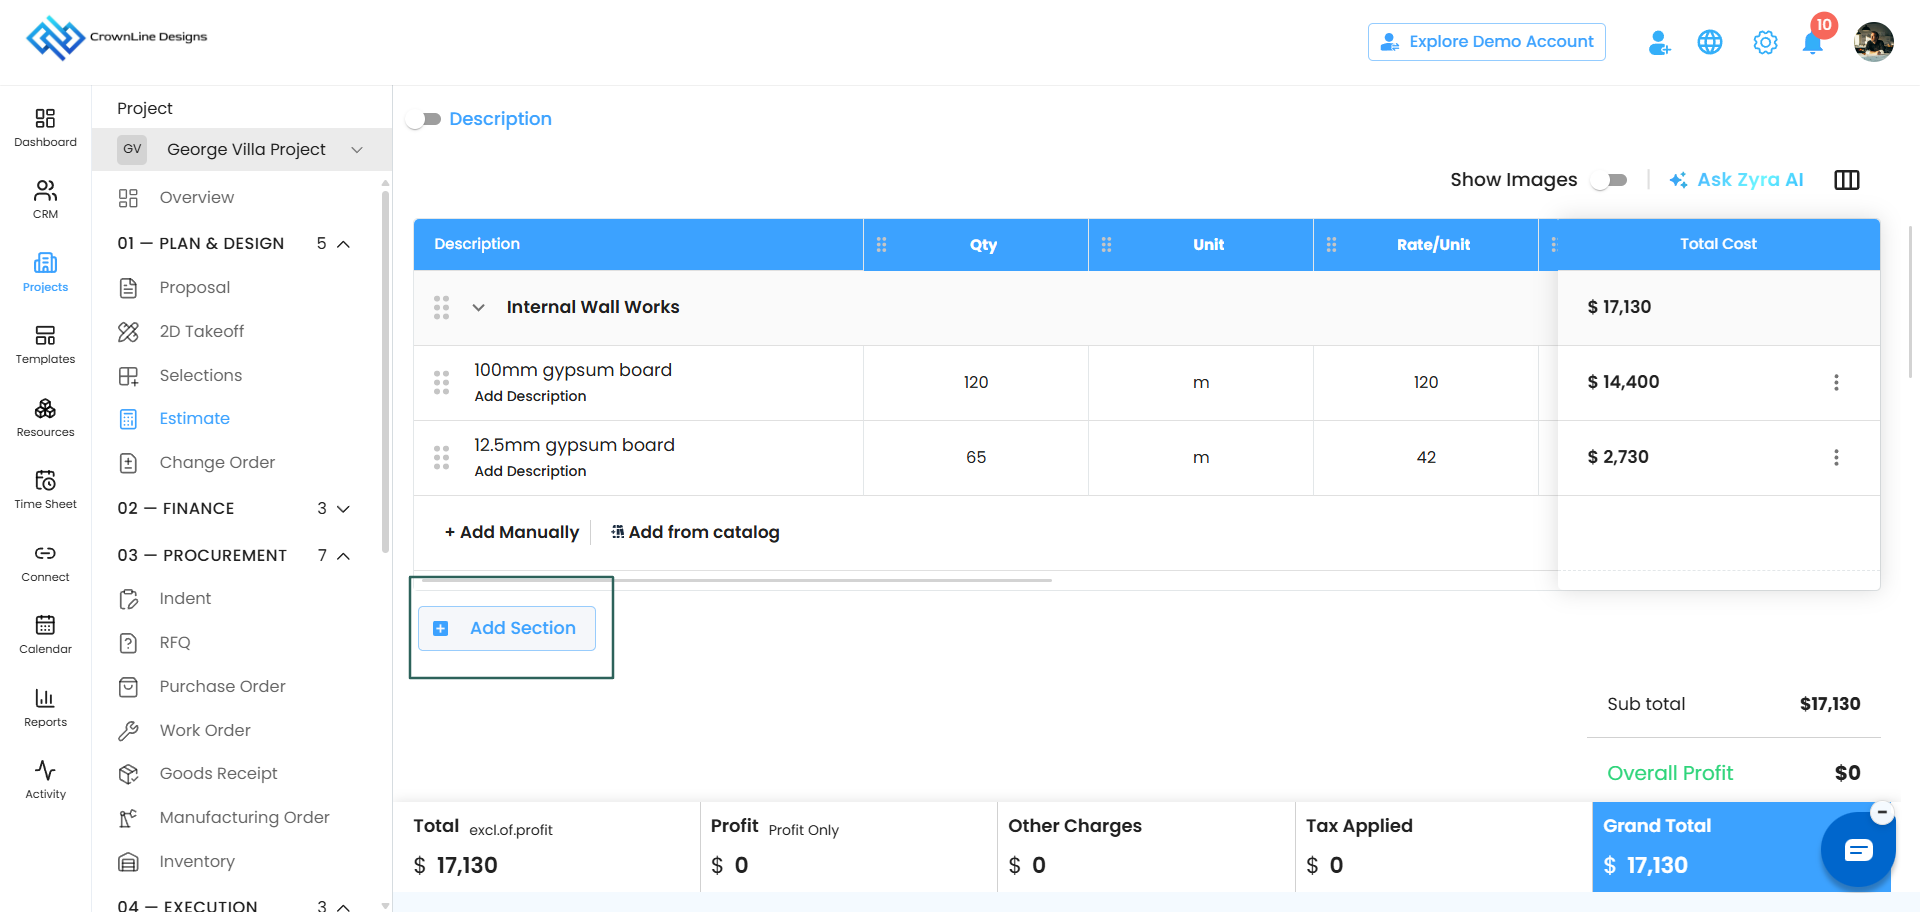
Click Add Section to start a new table. To remove one, click the remove icon and confirm with Yes.
Moving things around
You can drag and drop to reorder:
- Sections can be dragged above or below each other.
- Line items can be dragged within a section or moved into a different section.
- Materials cannot be dragged. They stay with the line item they belong to.
 Step 6 — Set your profit
Profit can be entered as a percentage or as a fixed value — use whichever suits the job.
At the bottom of the table, Overall Profit shows you the total profit across the whole estimate.
Step 7 — Add other charges
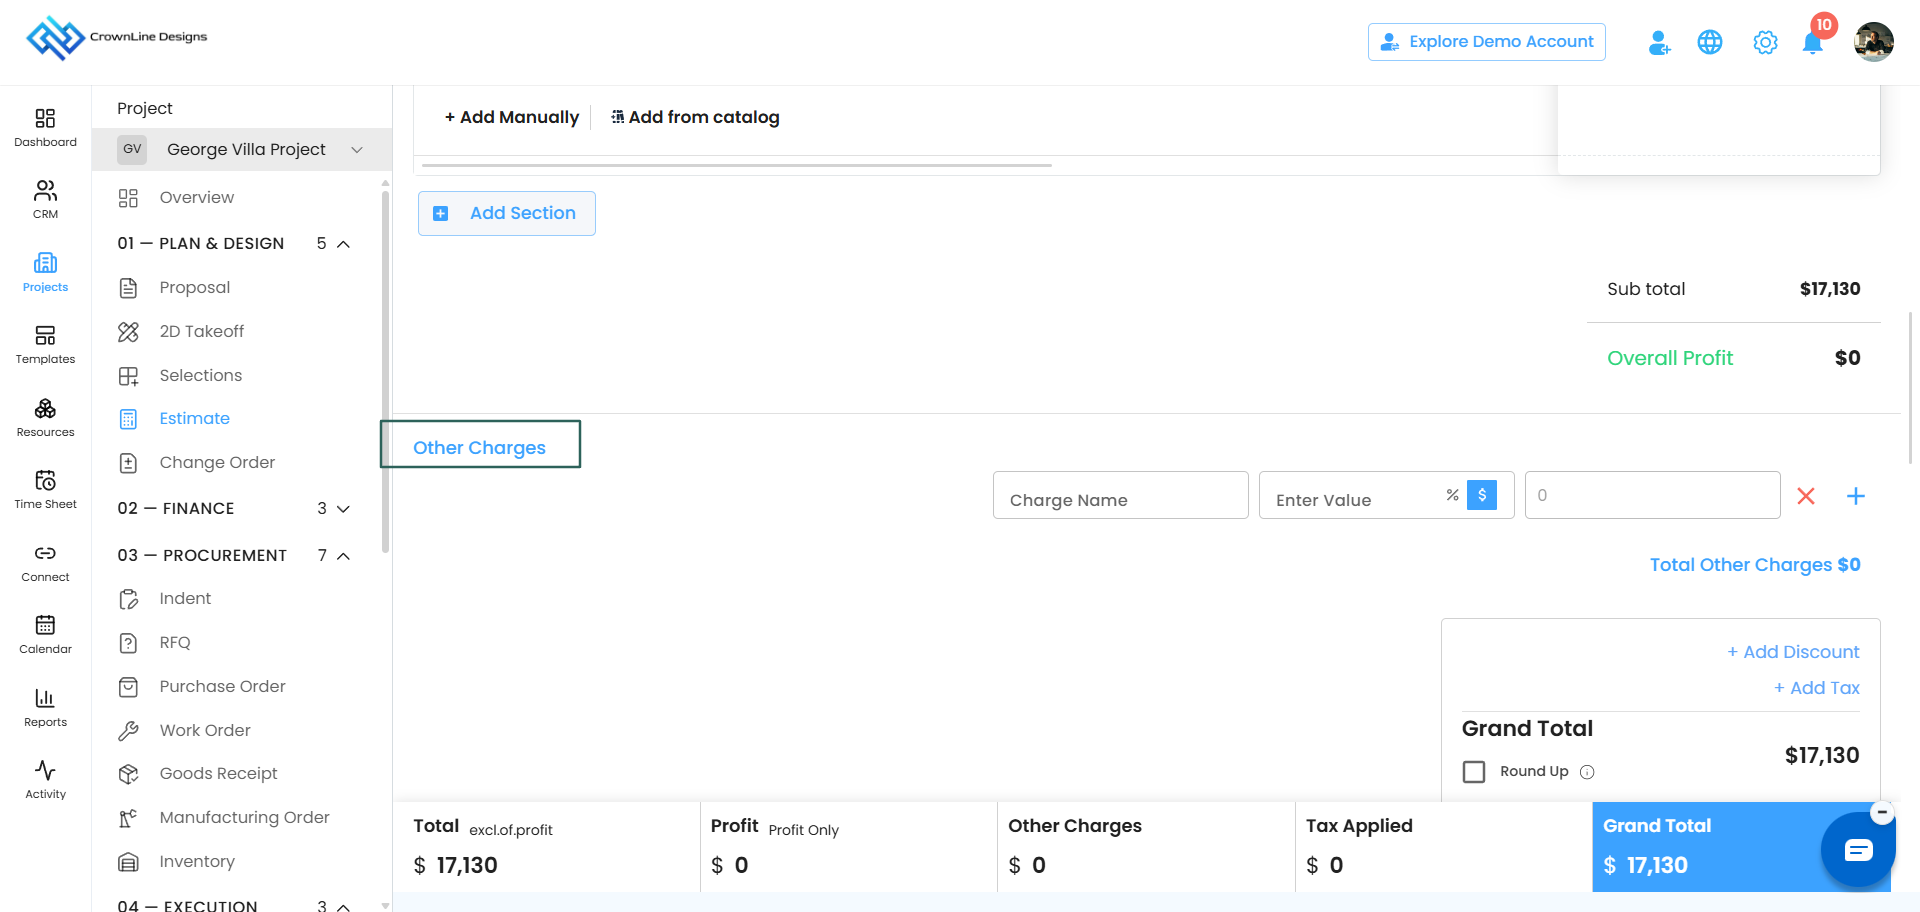
Below the table you can add any charges that sit outside your line items.
- Name the charge.
- Enter it as a percentage or a value.
- Click the + icon to add another charge.
- Click the × icon to remove one.
The total of your other charges is shown below the list, so you always know how much has been added.
 Step 8 — Add discount and tax
Discount
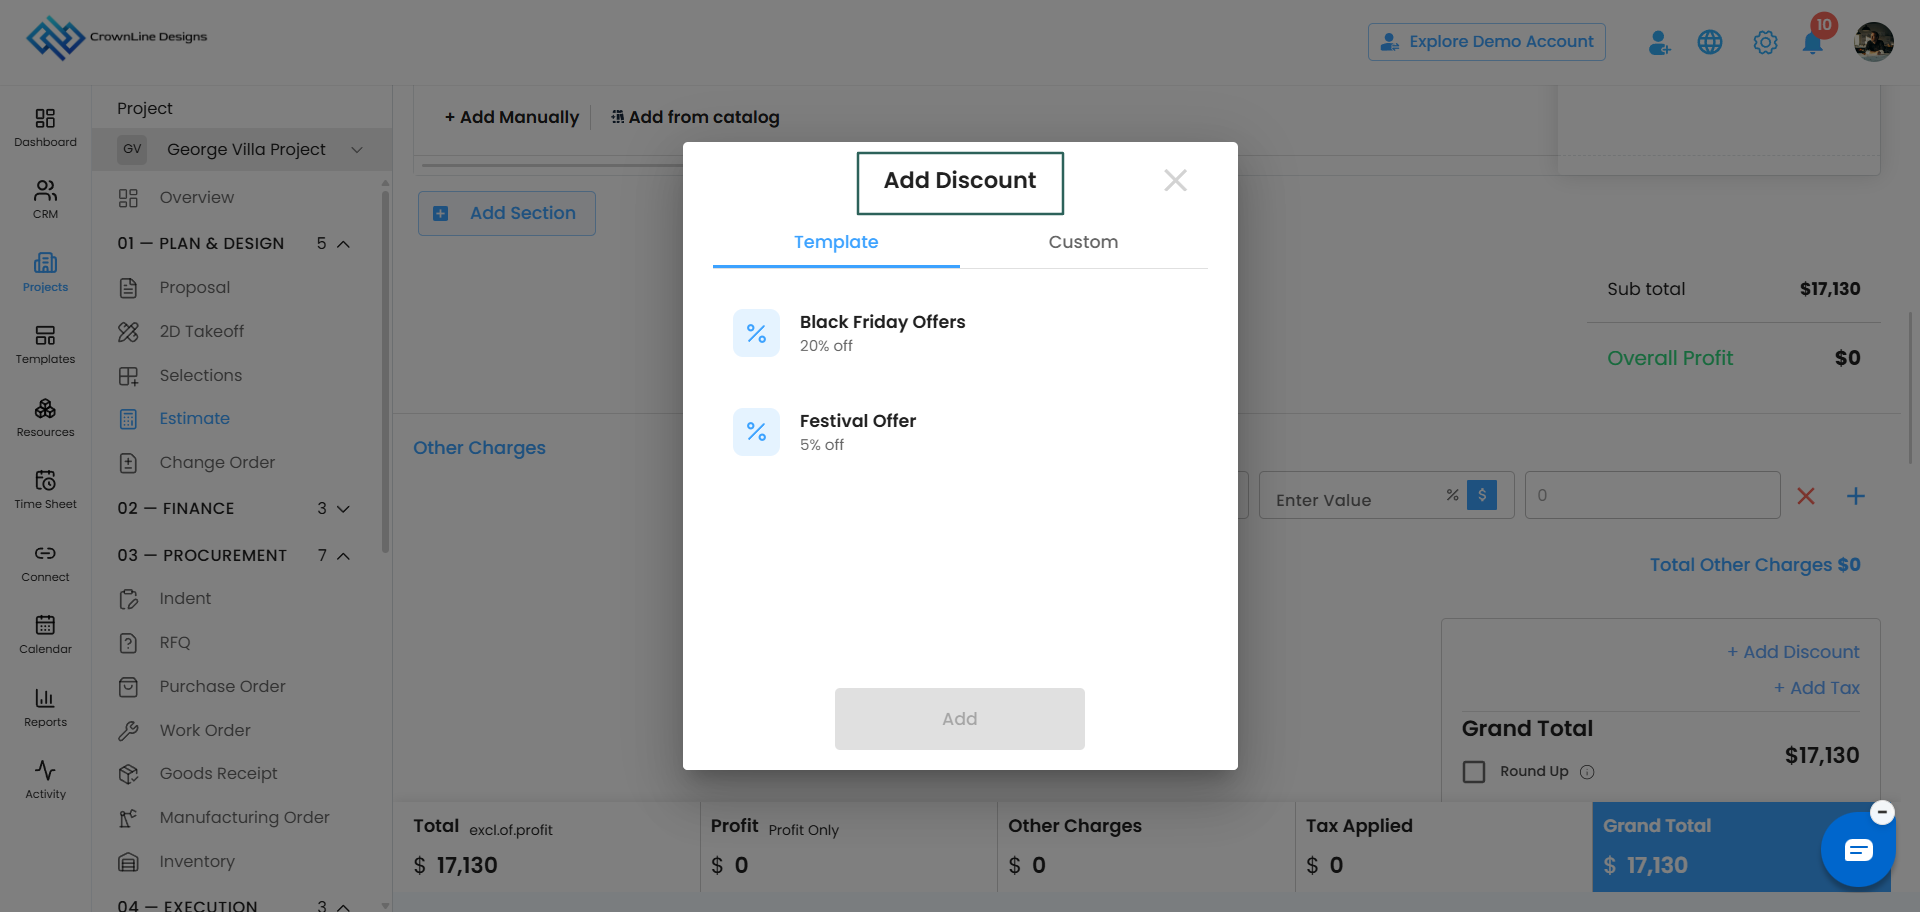
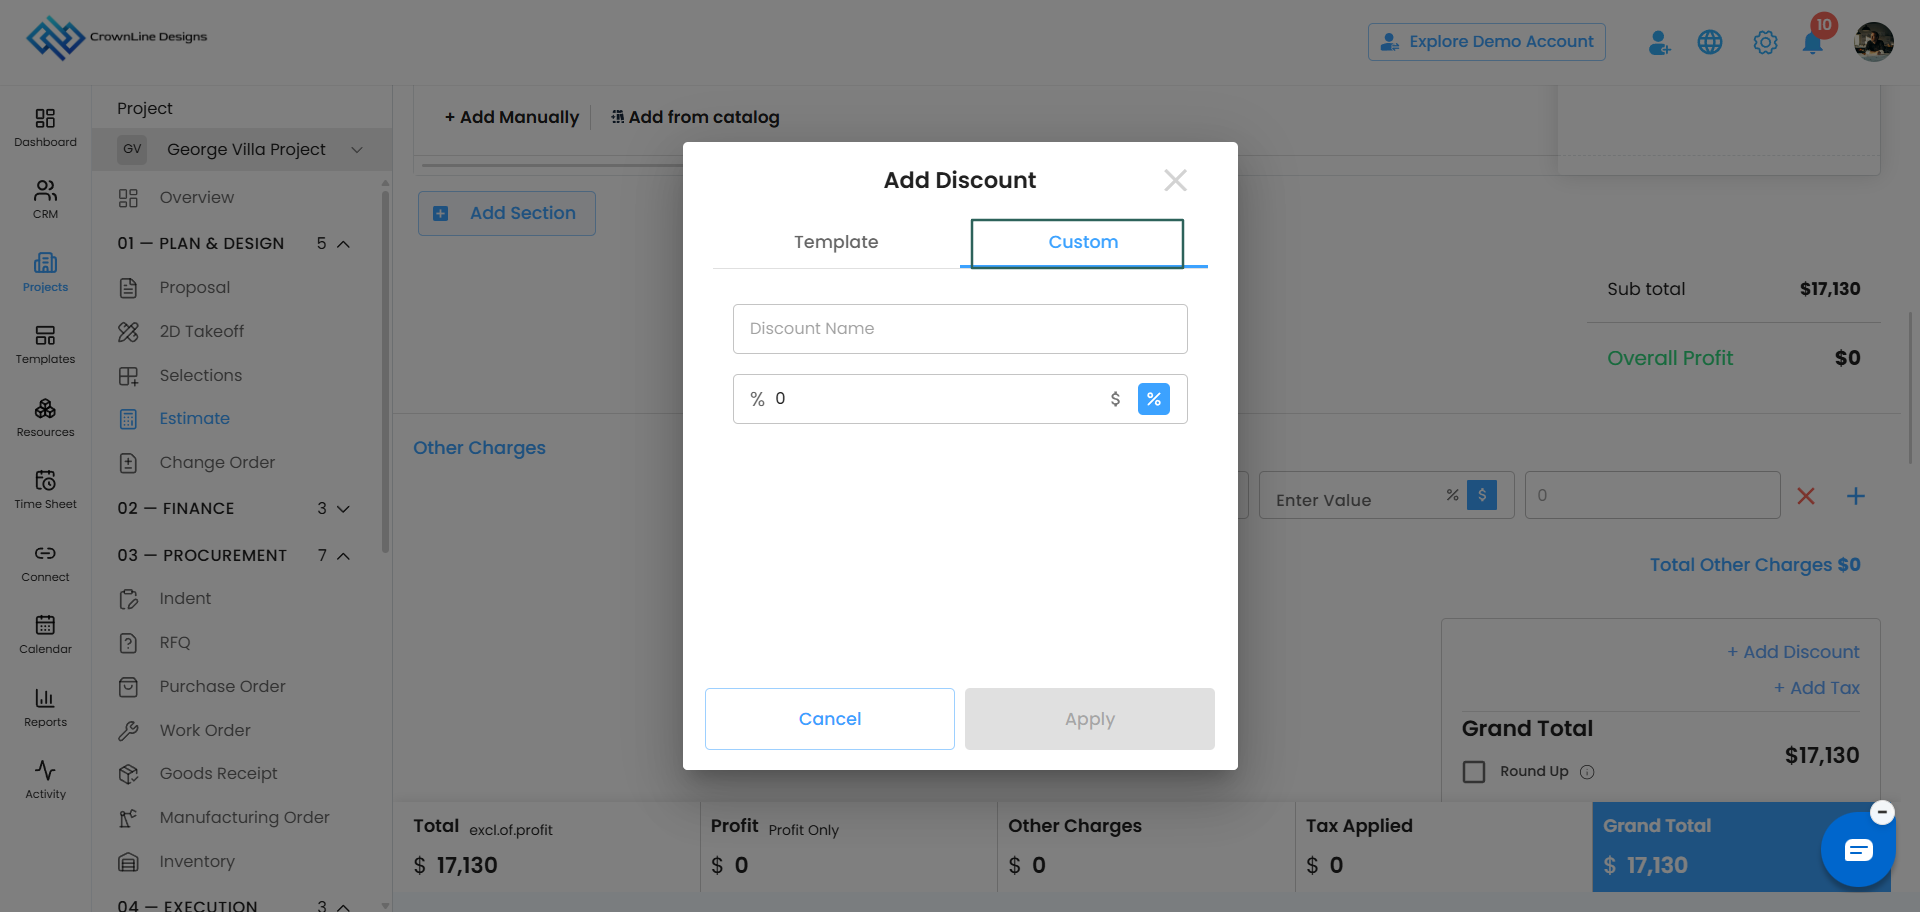
Click Add Discount. You can either:
- pick a discount your team has already set up in Template Center, or
- create a Custom Discount on the spot by entering a name and an amount.
Enter the amount as a percentage or a value, then apply it. Cancel it any time if you change your mind.
Tax
Click Add Tax and choose from the taxes your team has configured in templates. Cancel to remove it.
Step 9 — Check your totals
Below the table you will see:
- Subtotal
- Other Charges
- Tax Applied
- Total Profit
- Grand Total
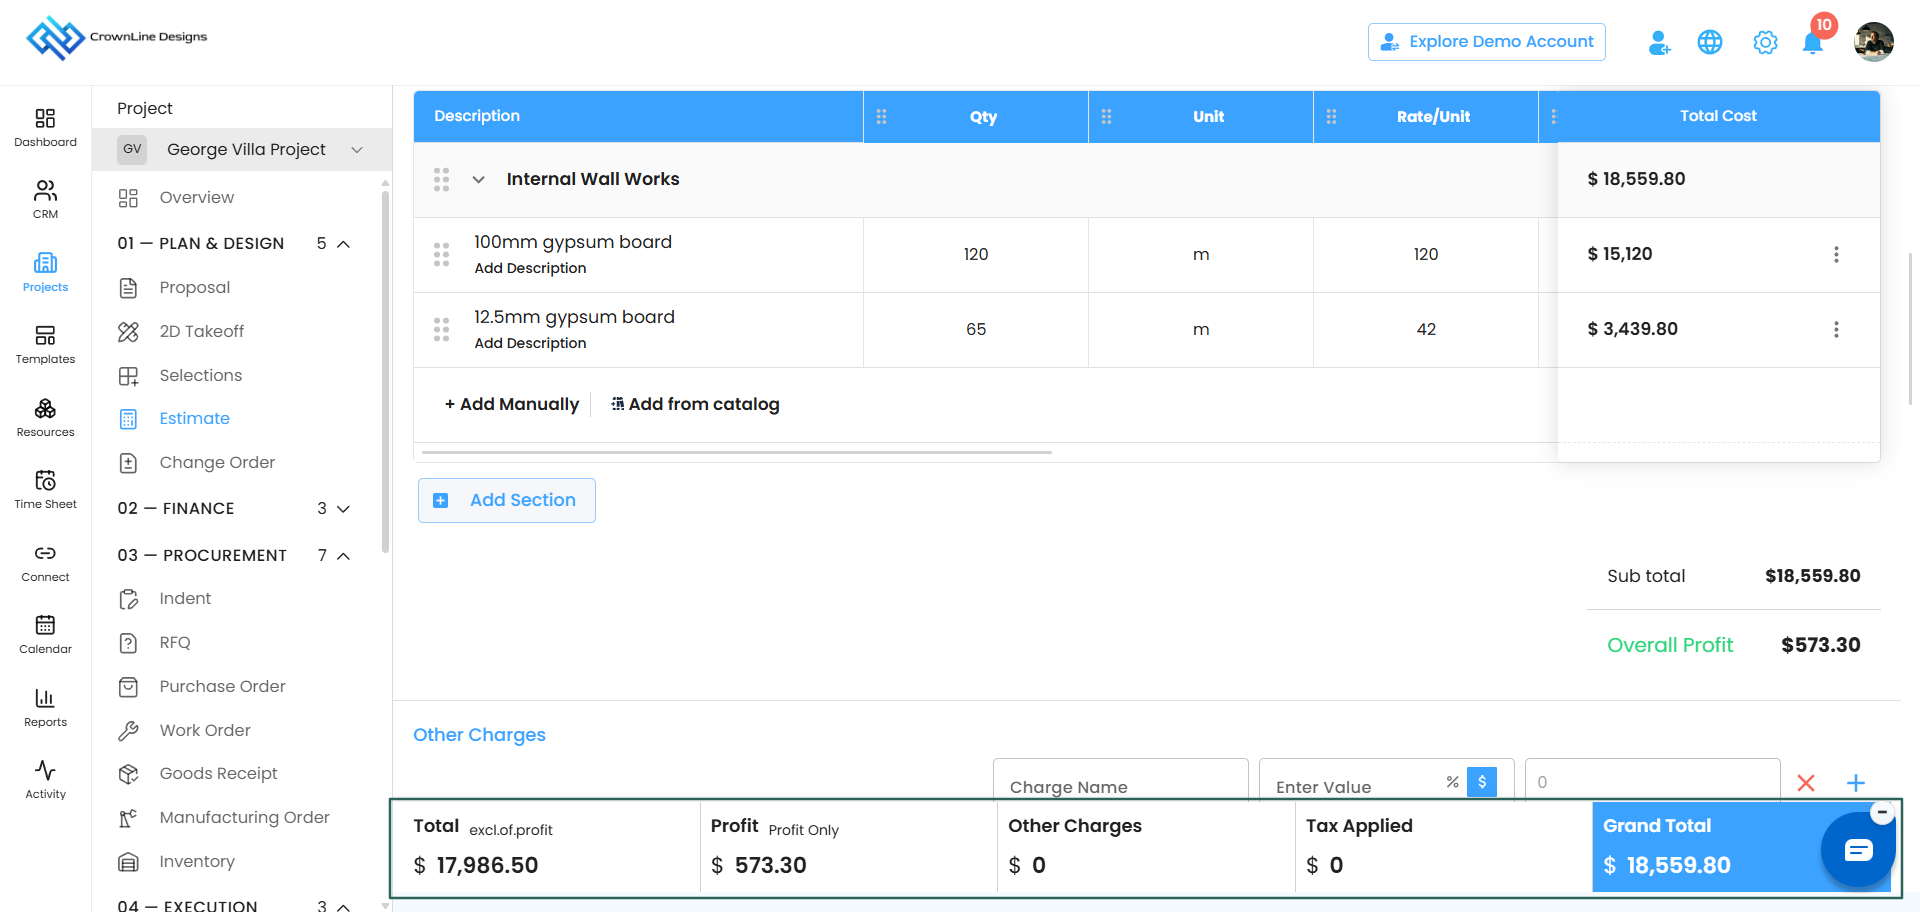
If your grand total is landing on awkward decimal values, tick Round Off to bring it to a clean figure.
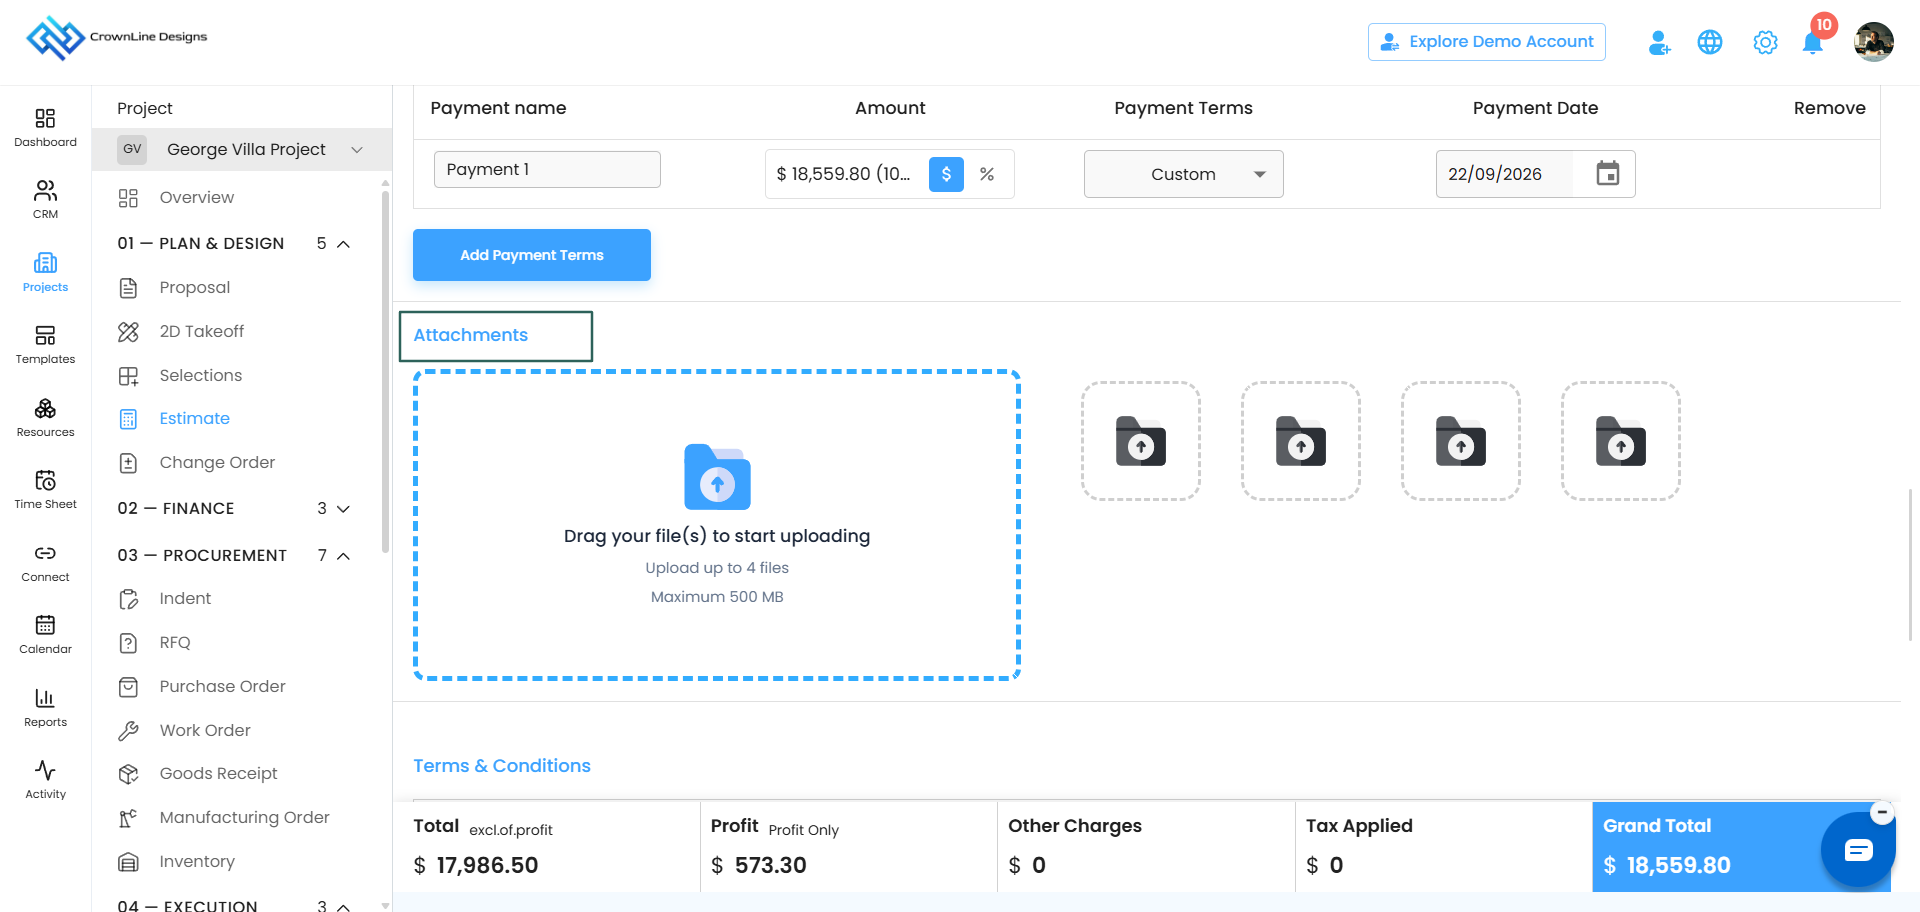
Step 10 — Set up payment terms
Payment terms let you split the estimate total into stages so your client knows exactly what to pay and when.
How the split works
The total is divided evenly across however many terms you create. On an estimate of 10,00,000:
- three payment terms gives you roughly 3,33,333 each
- ten payment terms gives you 1,00,000 each
Setting your own amounts
You are not stuck with the even split. On the same 10,00,000 estimate you could set three terms of 5,00,000, 4,00,000 and 1,00,000. Type your own figures and the system keeps up.
What each payment term holds
- Payment Name — shown as Payment 1, Payment 2 and so on. Rename it to something clearer if you like.
- Amount — enter a percentage or a value.
- Terms— choose from the dropdown:
- Due on Receipt
- Net 15 — 15 days from today
- Net 30 — 30 days from today
- Net 60 — 60 days from today
- Custom — pick your own date
Adding and removing terms
Click to add another payment term at any time. Use the remove option to take one out.
One thing to note: the very first payment term can only be removed once you have added a second one. There must always be at least one payment term on the estimate.
Step 11 — Attach supporting files
Drag and drop your files, or browse for them.
- Up to 4 files
- Maximum 500 MB
Step 12 — Add terms and conditions
Write your terms and conditions directly, or click Choose from Template.
Choosing from template opens a popup showing the template name and category for everything your team has set up. Select the one you want and it fills in. Cancel if you decide against it.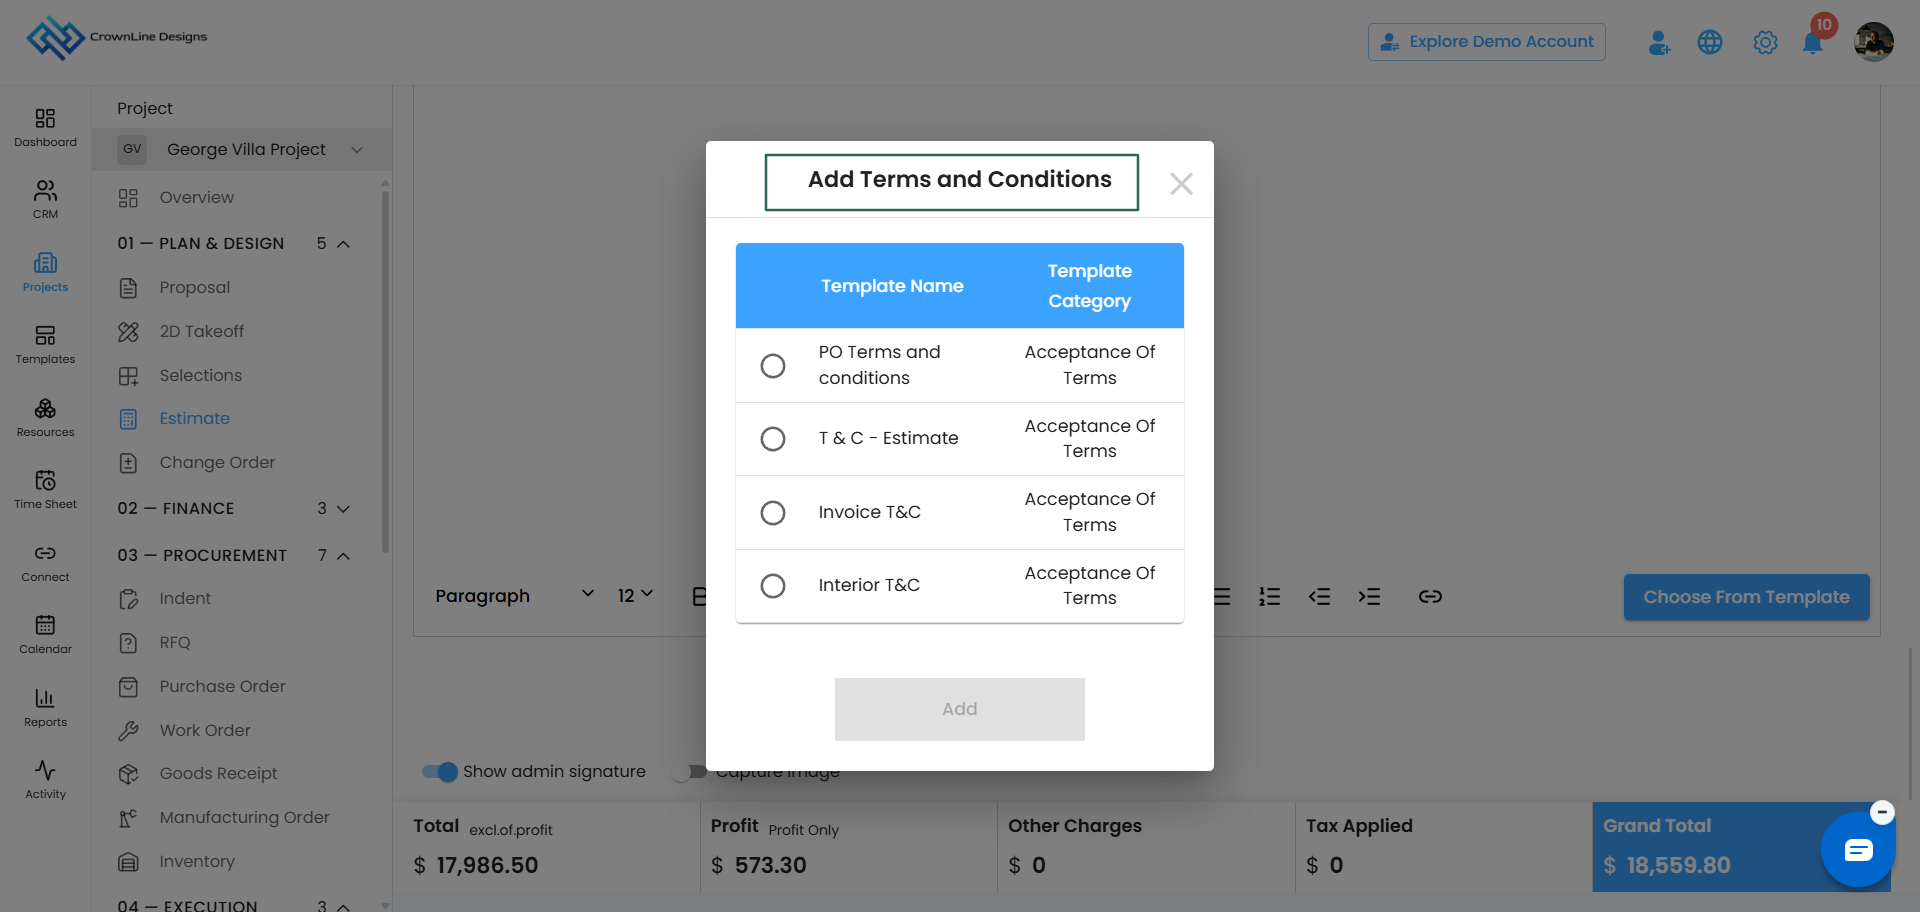
Step 13 — Set up signatures
Two toggles control how signing works.
Show Admin Signature
Switch this on and a signature block appears for your side of the agreement, headed with your organisation's name as the legal representative.
Underneath, choose which person from your organisation signs. If your organisation has ten users, pick the one who should sign this particular estimate and their signature is used.
Leave the toggle off and no signature block appears.
Capture Image
Switch this on and your client's camera opens when they go to sign. They take a photo first, then sign.
This gives you a clear record of who actually accepted the estimate, which matters when several people at your client's office have access to the same email.
Client signature
The client signature field is visible on this page so you can see how the estimate is laid out, but you cannot fill it in. Your client signs it from their side when they receive the estimate.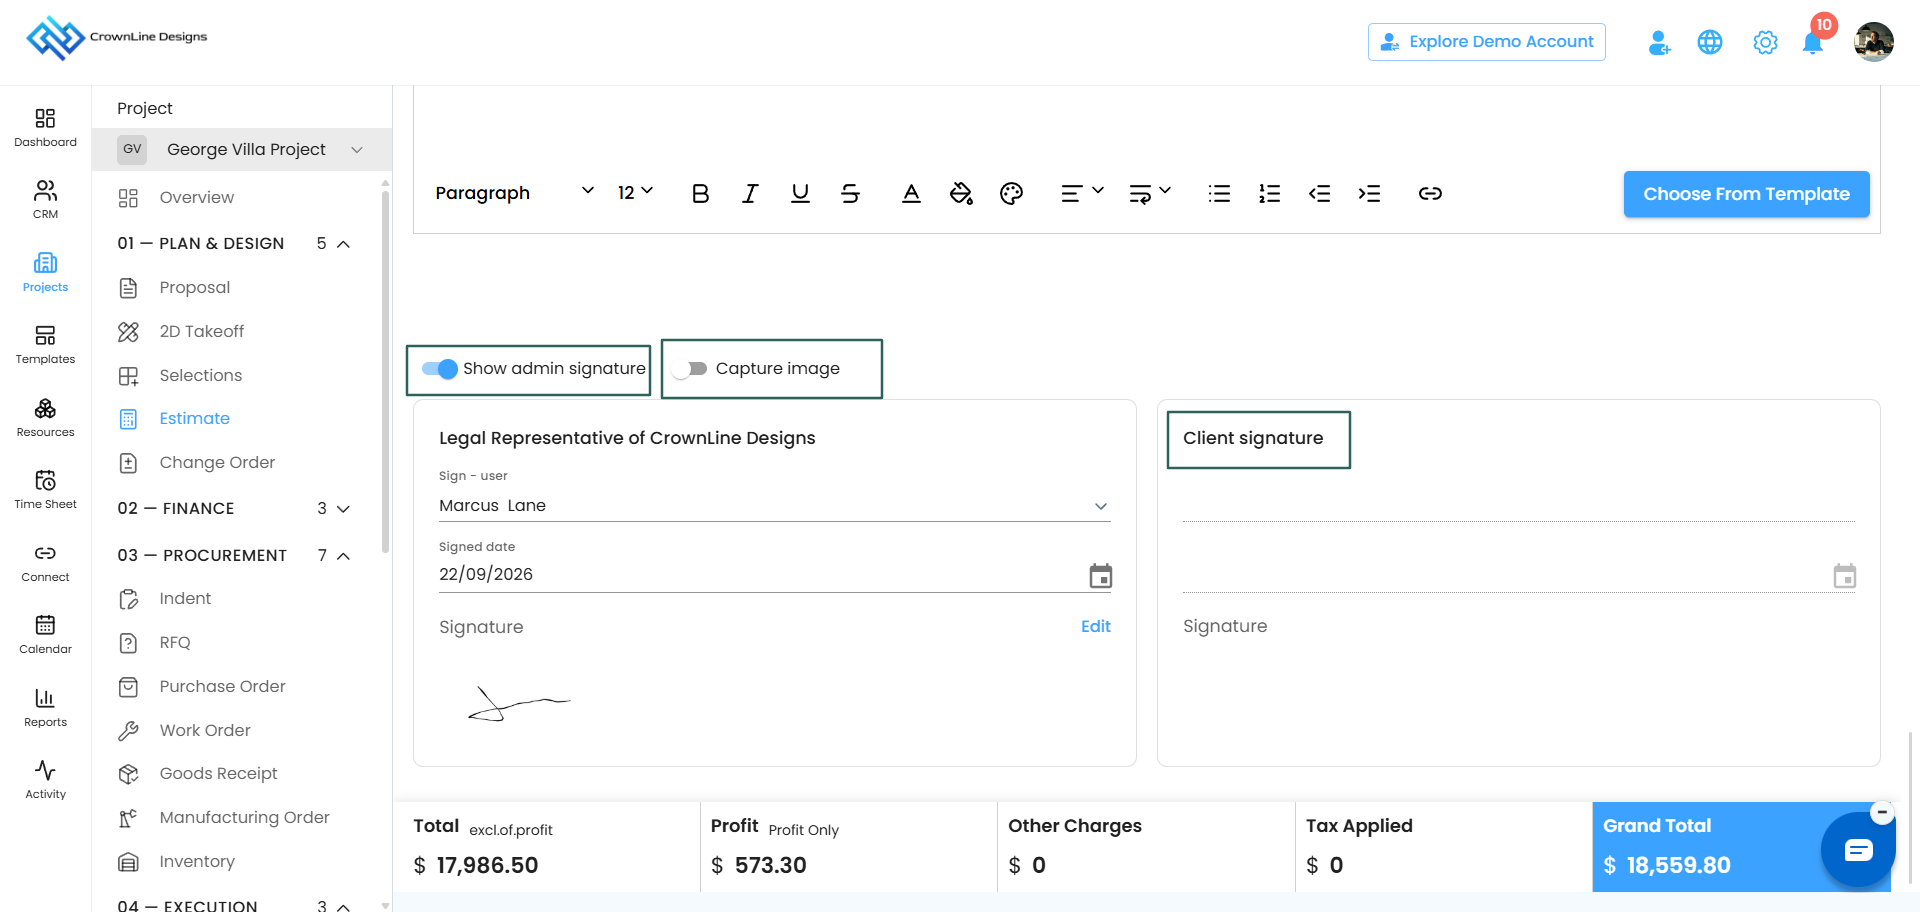
Step 14 — Preview and allow comments
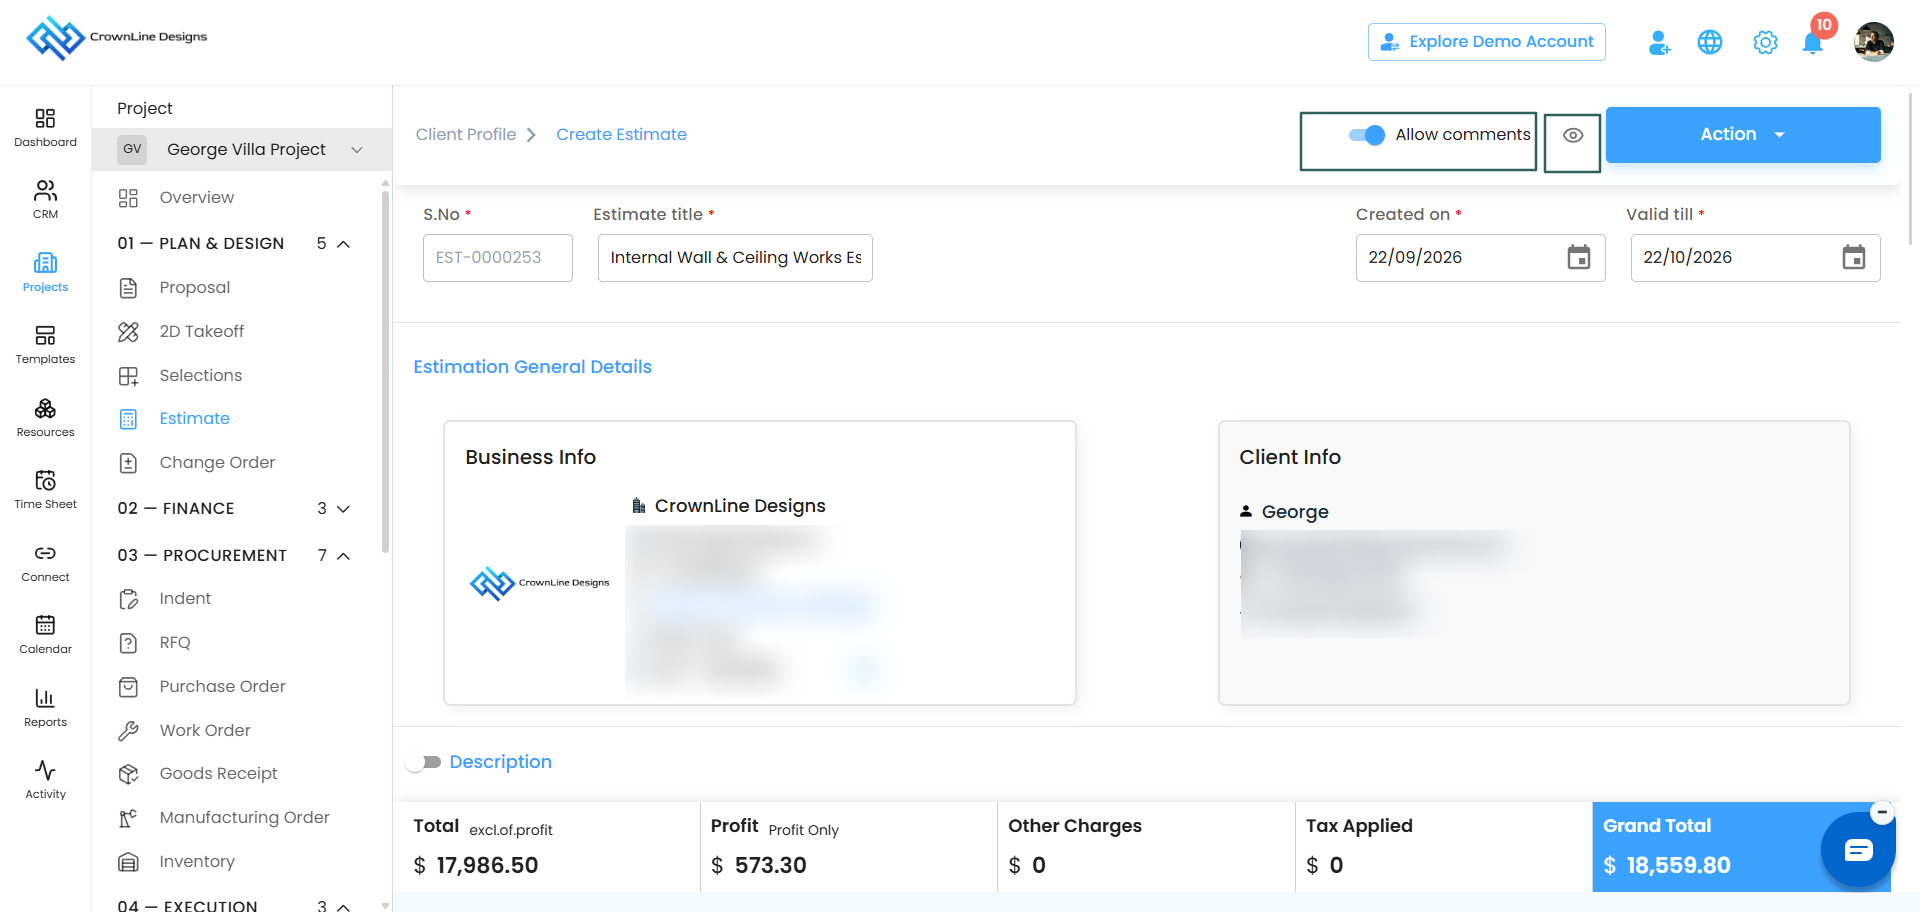
- Click the preview icon at the top of the page to see the estimate exactly as your client will.
- Switch on Allow Comments if you want your client to be able to leave comments on the estimate. Leave it off and they can only accept or reject.
Step 15 — Send it
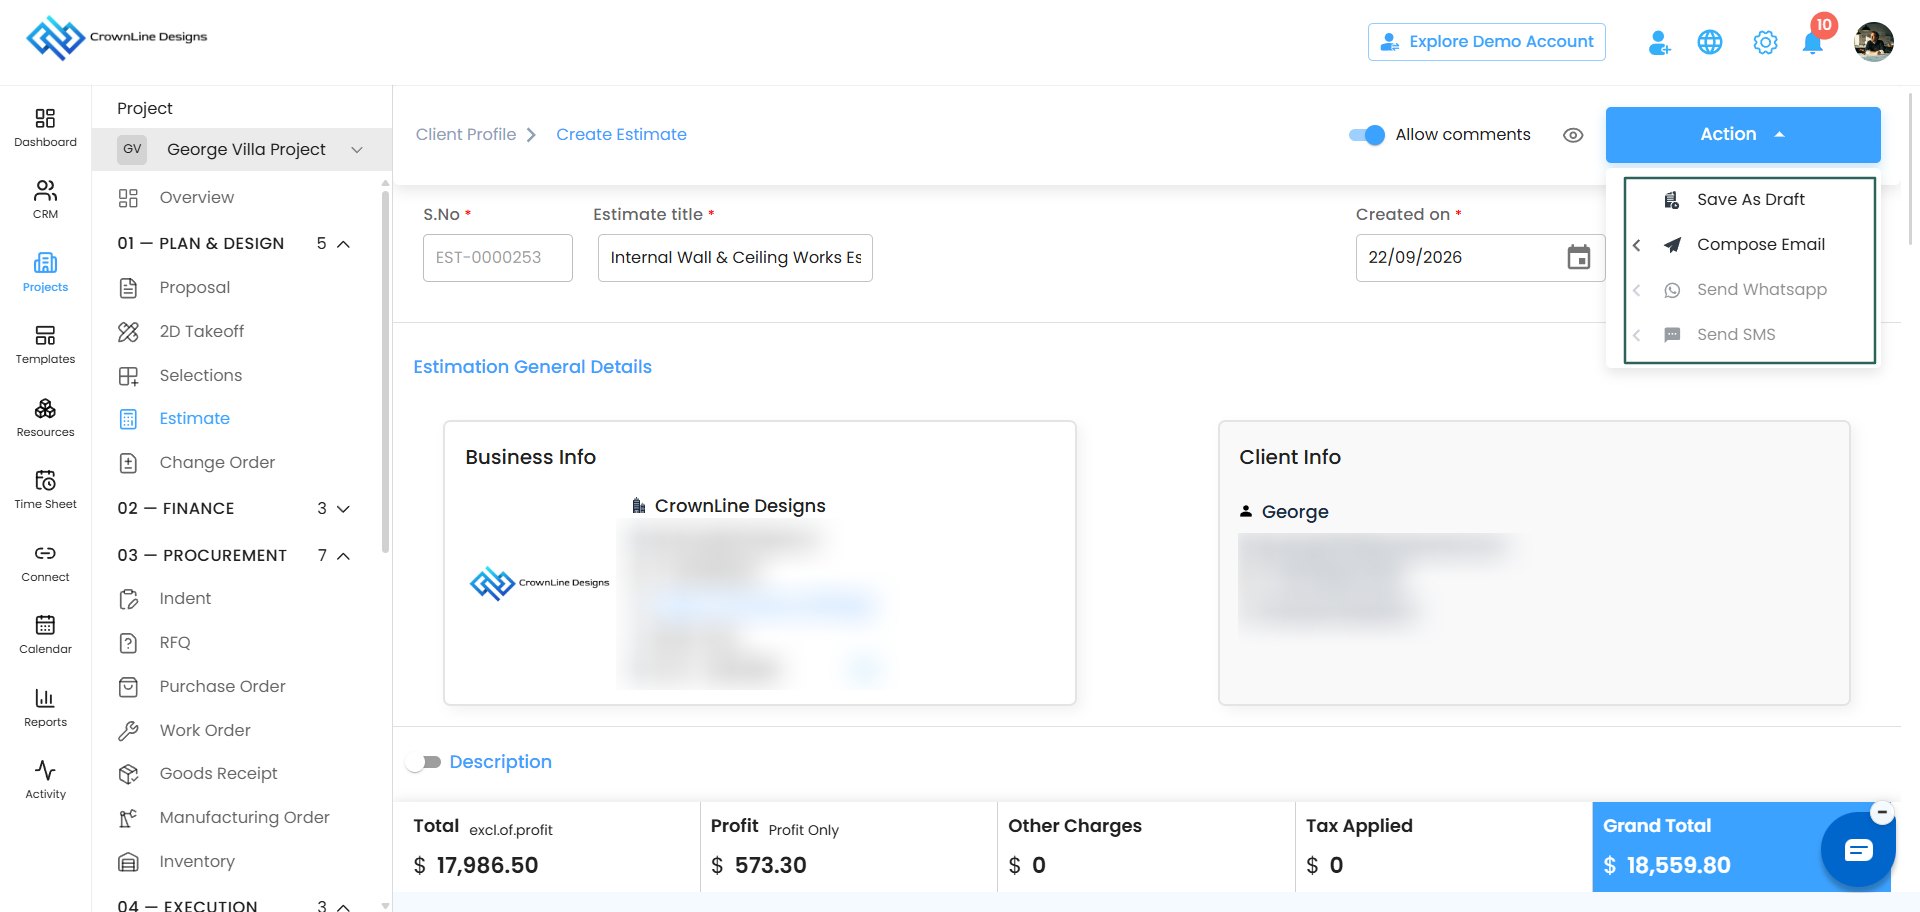
What you see in the Action button depends on your role.
If you are an approver
- Save as Draft
- Compose Email
- Send via WhatsApp
- Send via SMS
If you are a creator
- Save as Draft
- Request for Approval
A creator cannot send an estimate directly. It goes to an approver first, and only once it is approved can it be sent. See Estimate Workflow Approval for the full picture.
Sending by email
Click Compose Email and you are asked how much detail to send:
| Option | What your client receives |
|---|---|
| Send as Estimate | Line items only |
| Send as BOQ | Line items along with all their materials |
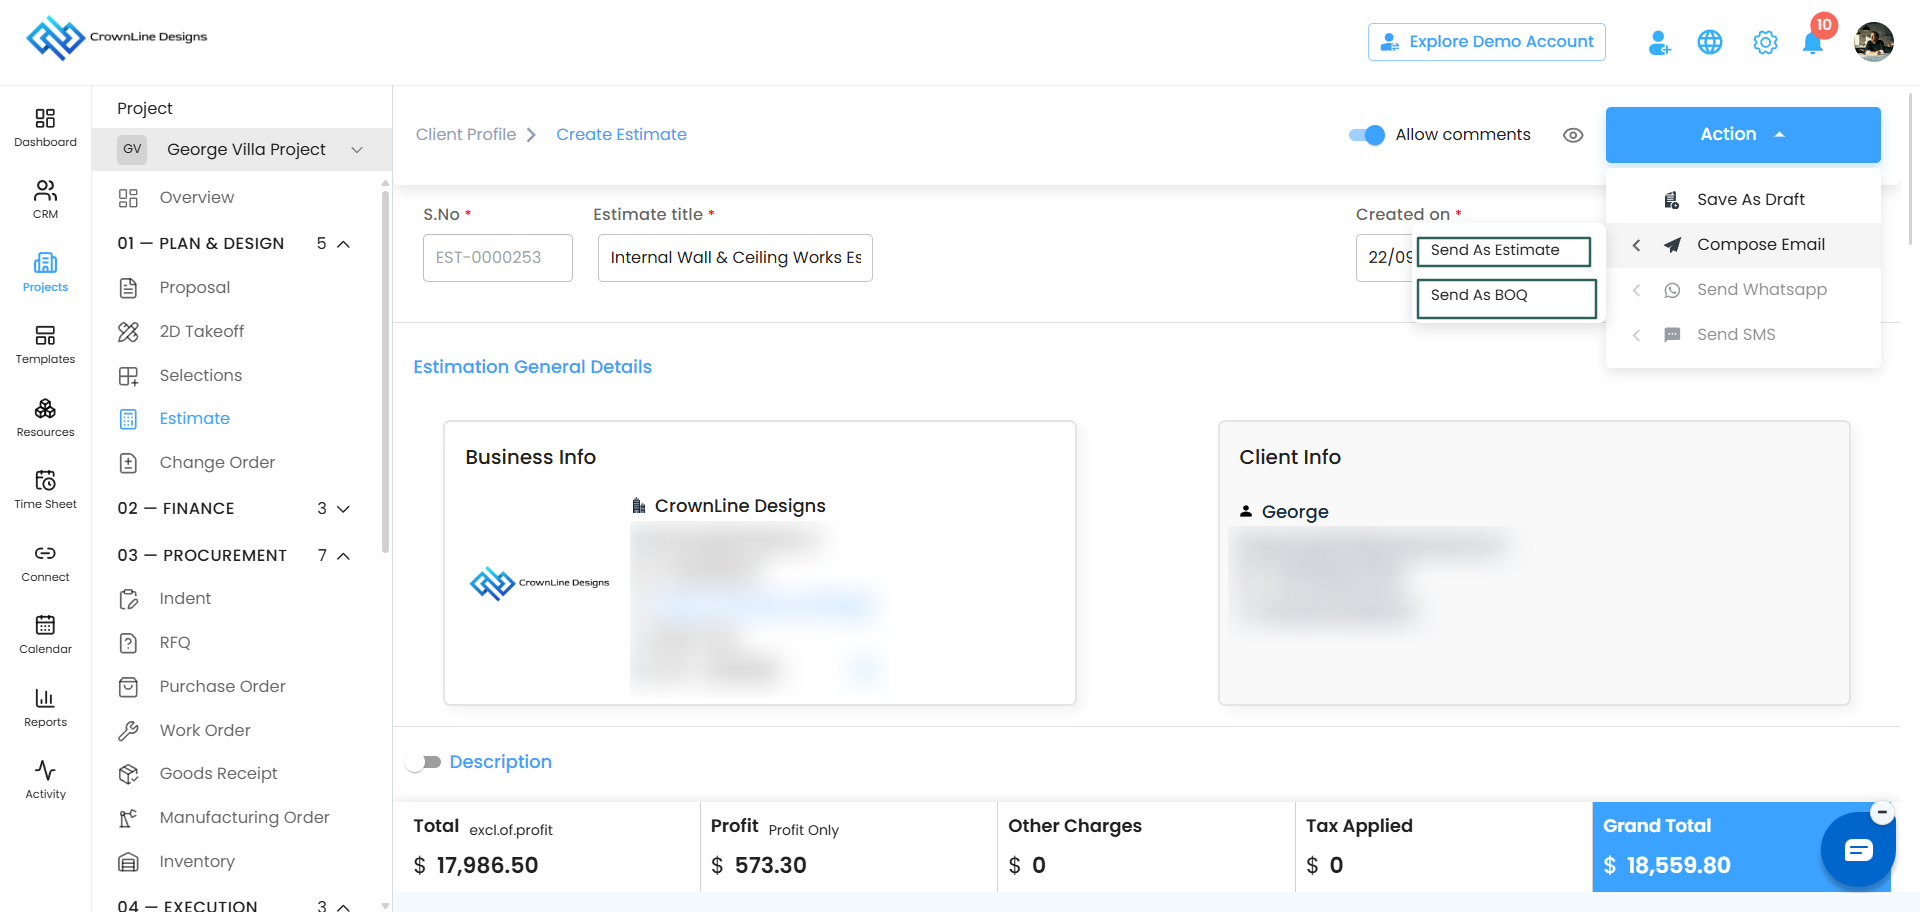
Choose based on how much breakdown you want your client to see.
Then:
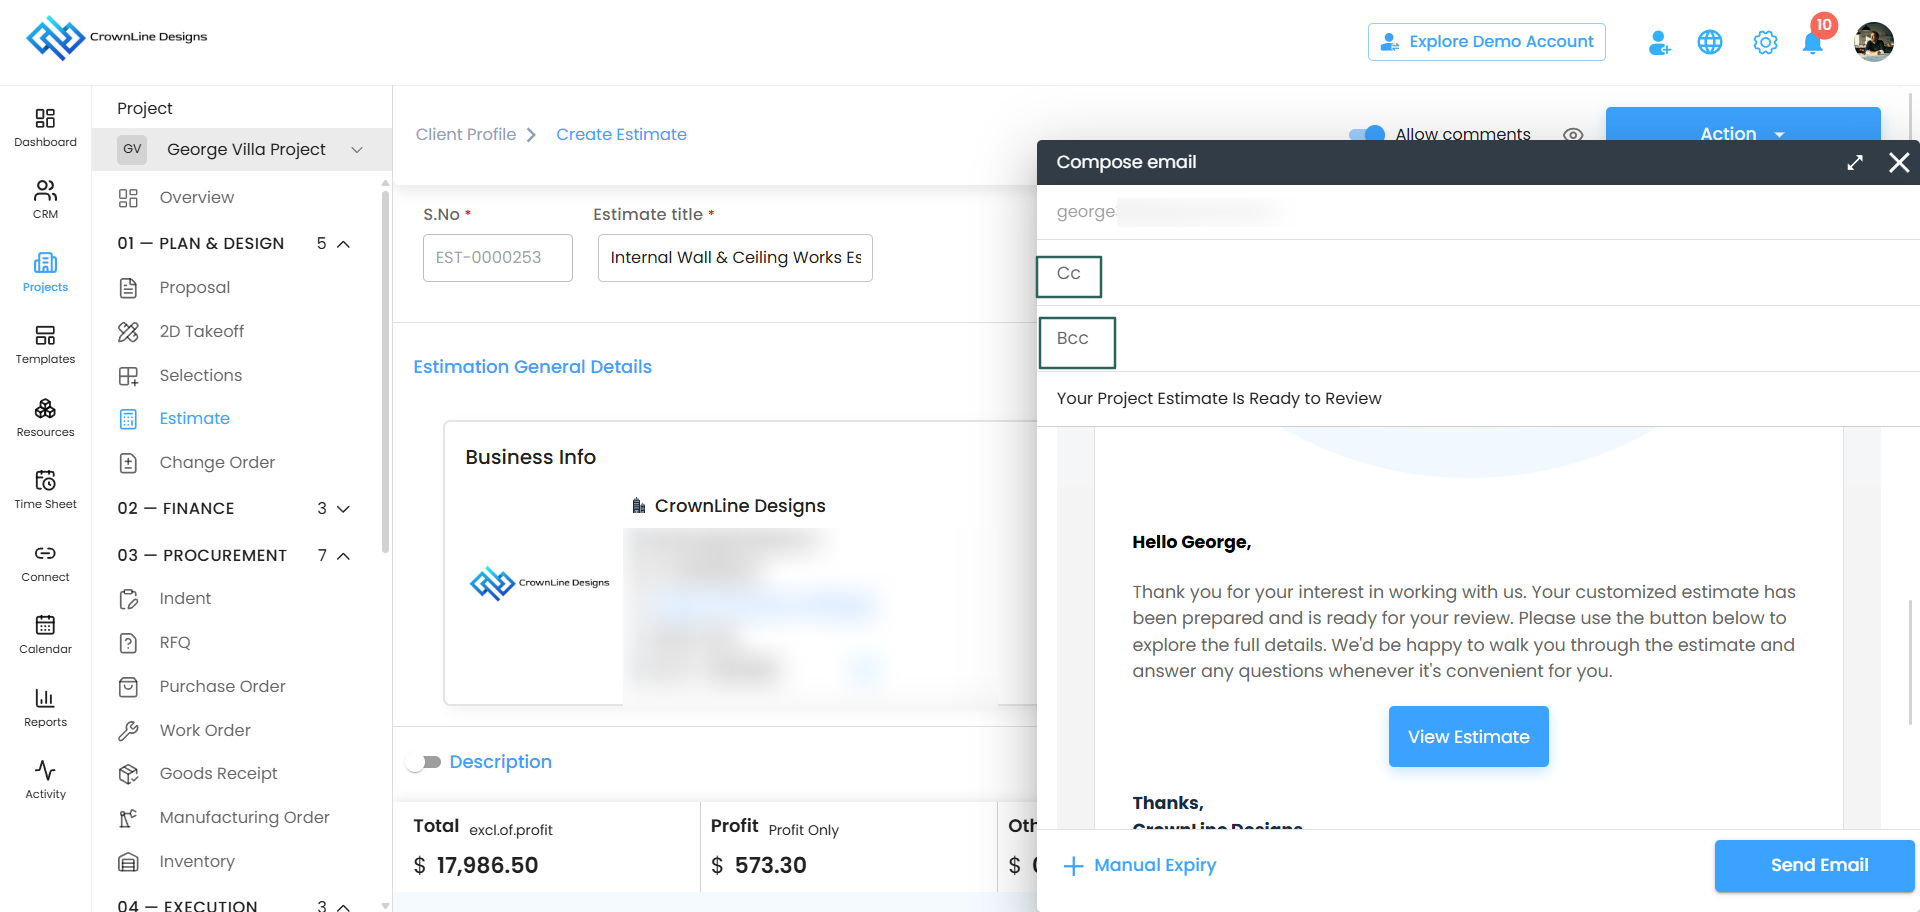
- Add CC and BCC recipients if you need to.
- Click Send Email.
You return to the Estimate page and your estimate now sits under the Sent tab.
Was this article helpful?
That’s Great!
Thank you for your feedback
Sorry! We couldn't be helpful
Thank you for your feedback
Feedback sent
We appreciate your effort and will try to fix the article