Every job is priced a little differently. Manage Column lets you decide which columns appear in your estimate table, add columns of your own, and set up formulas so a column works out its own value instead of you typing it in.
Where to find it
Open your estimate and click Manage Column above the estimate table.
The panel lists every column available to you, with Cancel and Apply at the top.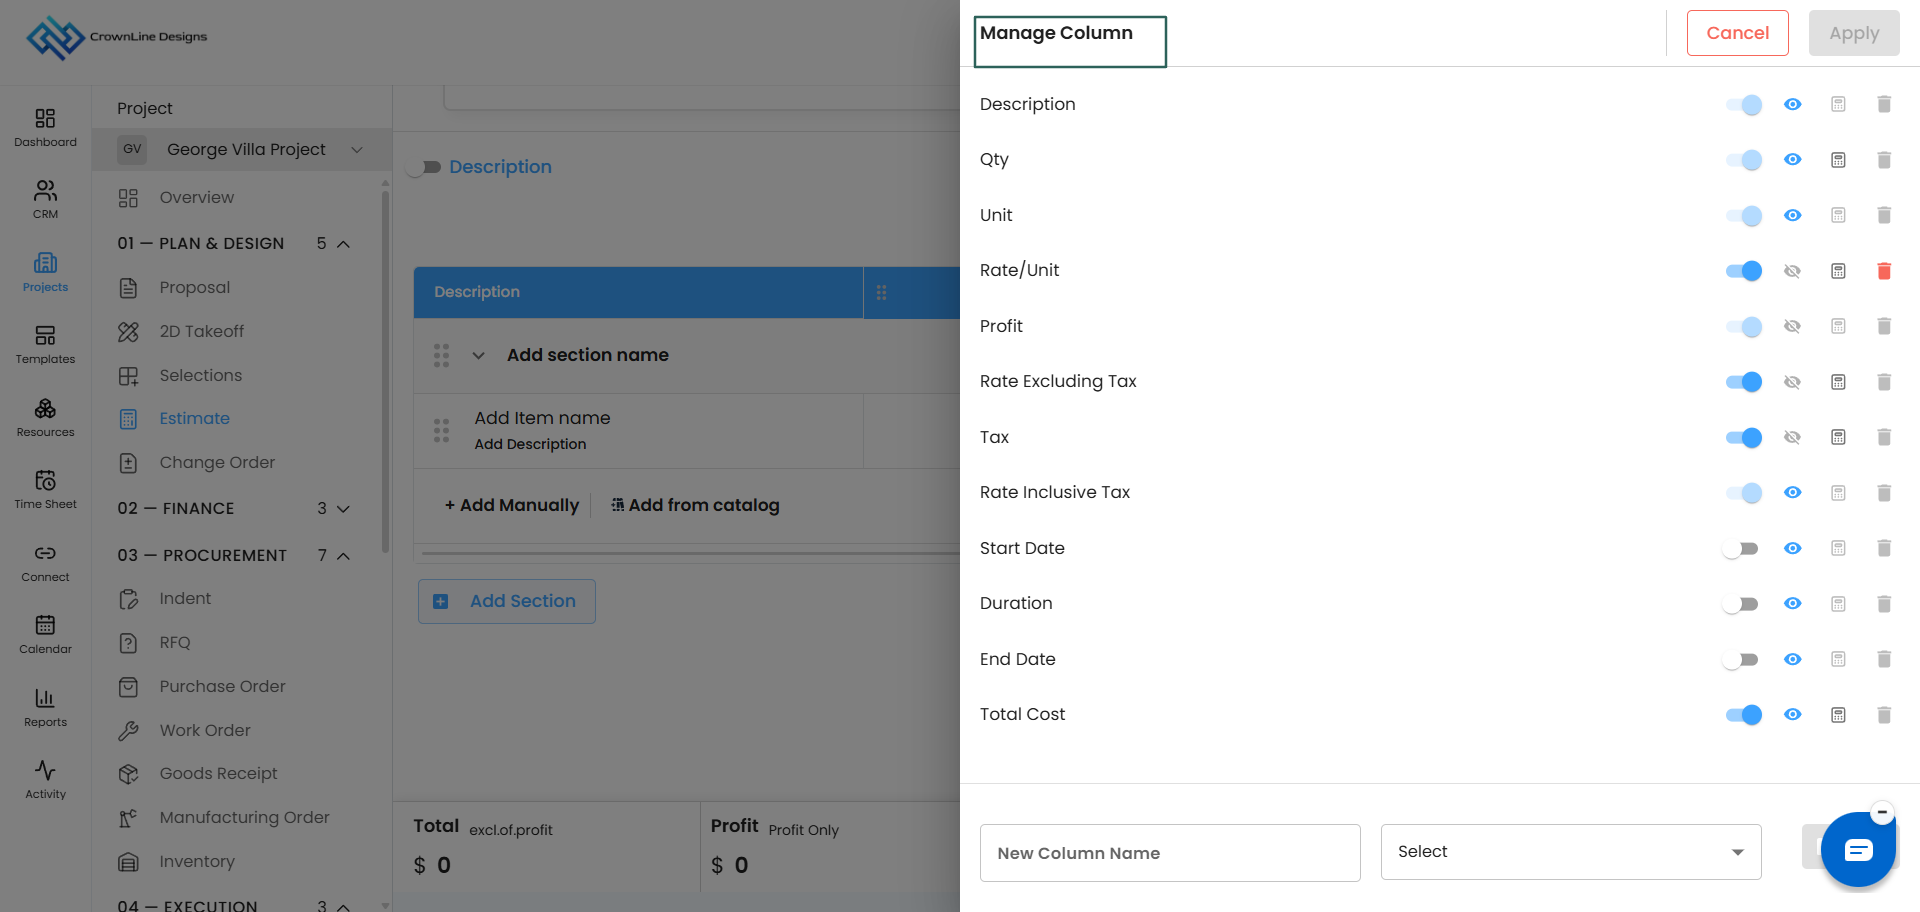
Part 1 — What each control does
Every column in the list has the same set of controls beside it:
| Control | What it does |
|---|---|
| Toggle | Shows or hides the column in your estimate table |
| Eye icon | Controls whether the column appears on the estimate your client receives |
| Calculator icon | Opens the formula setup for that column |
| Delete icon | Removes a column you added yourself |
Not every control is active on every column. Where a control is greyed out, that column does not support it.
Part 2 — Columns that are always in your table
These five columns are part of every estimate and cannot be shown or hidden:
- Description
- Qty
- Unit
- Profit
- Rate Inclusive Tax
They are the backbone of the estimate. Without them there is no line item, so they stay in the table permanently and cannot be deleted.
Part 3 — Columns you can show or hide
These four are yours to control. Switch the toggle on to bring them into the table, off to take them out:
- Rate / Unit
- Rate Excluding Tax
- Tax
- Total Cost
Use this to match the level of detail the job needs. A simple quote might only need Rate Inclusive Tax; a detailed breakdown might want the full set.
Part 4 — Schedule columns
Three more columns sit in the list:
- Start Date
- Duration
- End Date
These are for creating a schedule from your estimate. When you convert an accepted estimate into a schedule, these are the values the schedule is built from.
Switch them on when you know you will be converting this estimate to a schedule and you want the timing captured while you are still pricing the job. Leave them off and the estimate table stays focused on cost.
See Convert an Estimate to a Schedule for what happens next.
Part 5 — Adding your own column
If the standard columns do not cover something your job needs, add your own.
- Open Manage Column.
- At the bottom of the panel, type a name into the New Column field — for example, Area.
- Use the Select dropdown to choose what kind of information the column holds, such as a number.
- Add it.
- Click Apply.
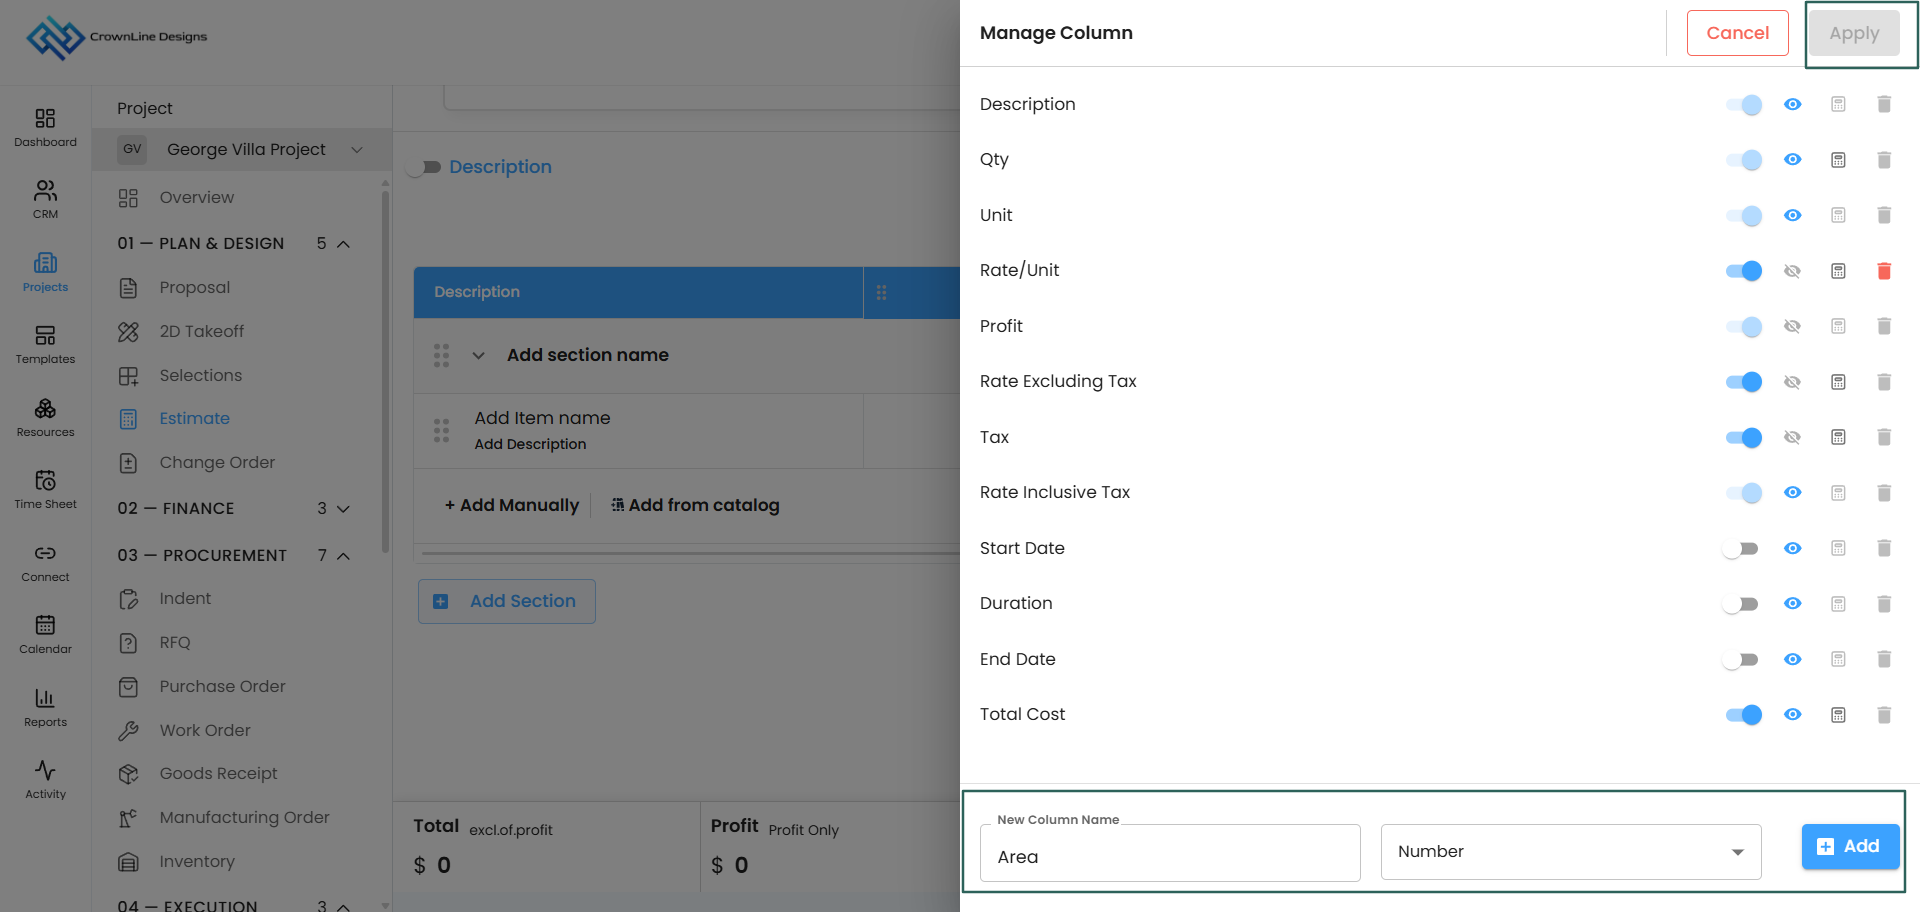
Your column appears in the estimate table straight away, ready to fill in.
Columns you have added can be removed again using the delete icon beside them.
Part 6 — Setting up a formula
A column with a formula works out its own value from the other columns in your table. You set the rule once and every line item follows it.
Click the calculator icon beside a column to open the Calculation window. The window tells you which column you are working on — for example, Configuring for: Total Cost.
The building blocks
Across the top you have the operators you can use:
+ − * / ( ) < > = >= <= AND OR
On the right, Insert from columns lists every column you can pull into your formula:
Qty, Rate/Unit, Profit (%), Rate Excluding Tax, Tax, Rate Inclusive Tax, Duration.
Use the search box to find a column quickly, then click it to drop it into your formula. This is easier and safer than typing column names by hand.
The Currency toggle
At the top right of the Calculation window, switch Currency on when the result is a money value. The column then displays in your workspace currency. Leave it off for quantities, percentages, areas and anything else that is not money.
Two ways to build a formula
The window has two tabs: Direct Formula and Conditional Formula. Pick the one that matches what you need.
Part 7 — Direct Formula
Use this when the calculation is the same for every line item, no exceptions.
- Open the Direct Formula tab.
- Click into the Expression box.
- Build your expression using the operators along the top and the columns on the right.
- Click Save.
Example: to work out Total Cost from quantity and rate:
Qty * Rate/Unit
Example: to include tax in the result:
(Qty * Rate/Unit) + Tax
Two small icons sit under the expression box — one clears the last thing you entered, the other clears the whole expression so you can start again.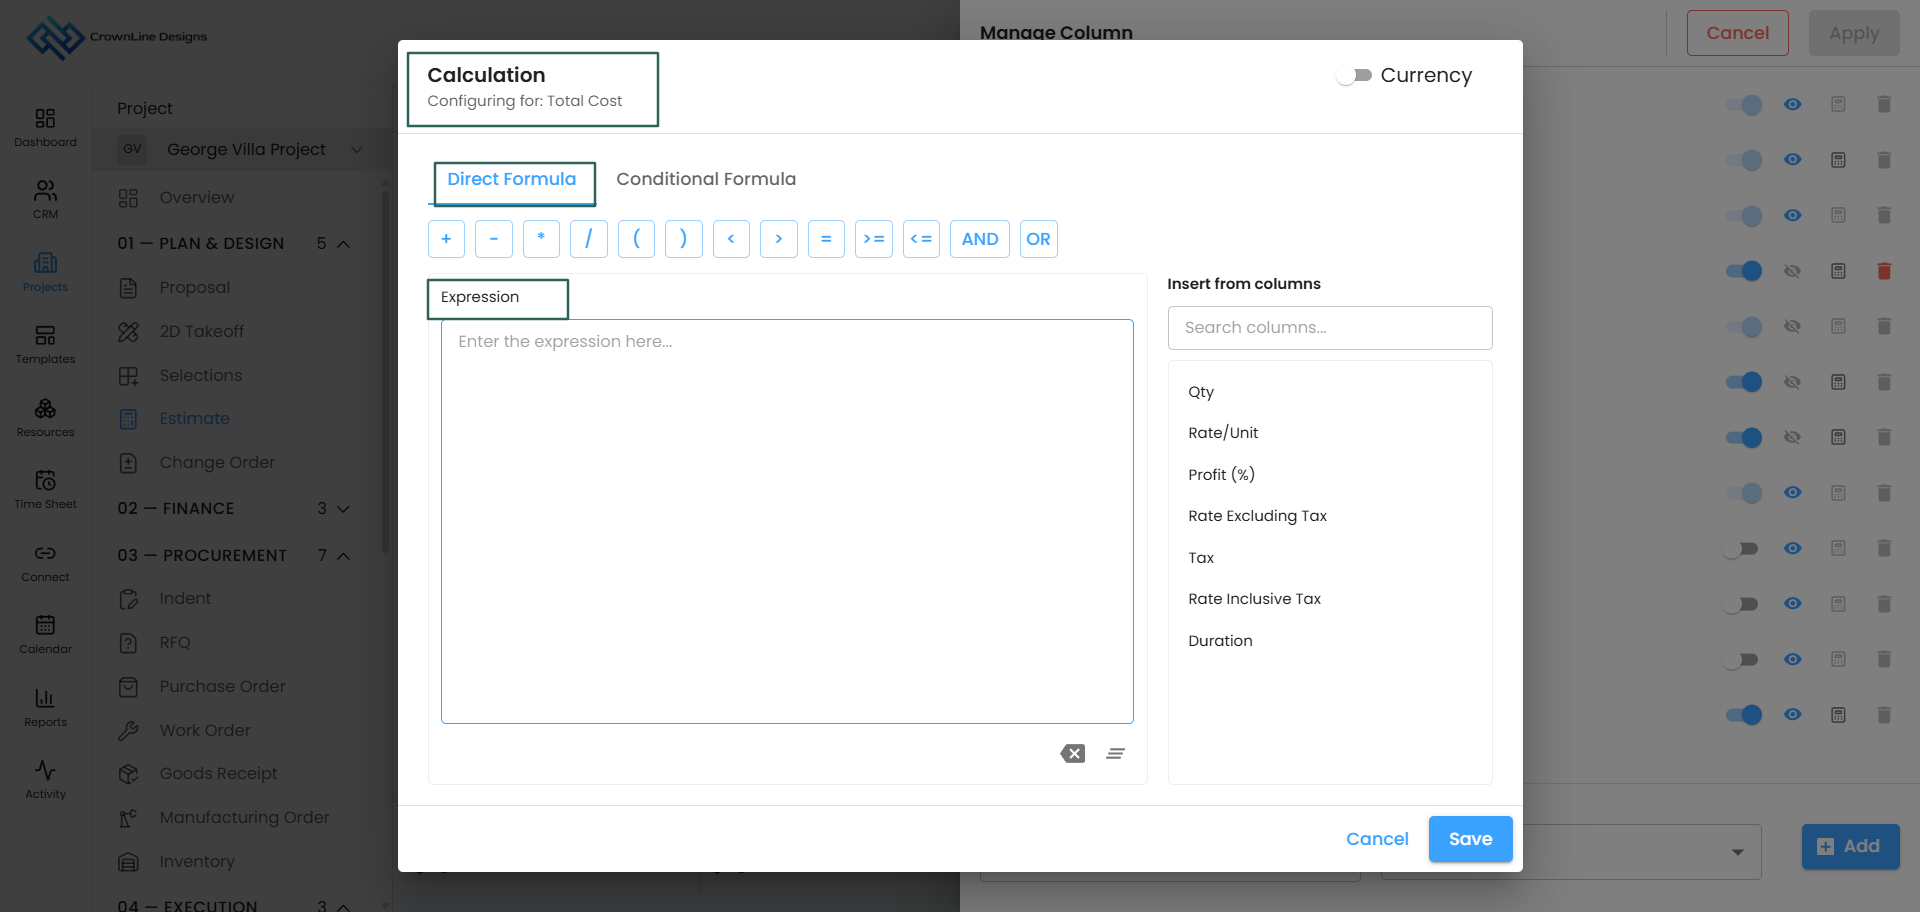
Part 8 — Conditional Formula
Use this when the calculation changes depending on the values in the line item. A bulk discount above a certain quantity, a different rate for a particular unit, a surcharge past a certain duration — all of these need a condition.
How rules work
Rules run top to bottom, and the first match wins.
The system checks Rule 1 first. If the line item matches it, that result is used and nothing else is checked. If it does not match, the system moves to Rule 2, and so on. If no rule matches at all, the Otherwise result is used.
Because of this, order matters. Put your most specific rules at the top and your general ones below.
Setting it up
- Open the Conditional Formula tab.
- In Rule 1, fill in the two fields:
- Condition — what has to be true for this rule to apply
- Result — what the column should work out when it is true
- Click + Add Rule to add Rule 2, Rule 3, and as many more as the job needs.
- Fill in the Otherwise result. This is what happens when none of your rules match, so it is worth setting properly rather than leaving empty.
- Click Save.
Use the delete icon beside any rule to remove it.
A worked example
Say you want a 10% discount on any line item where the quantity reaches 100 or more.
Rule 1
- Condition:
Qty >= 100 - Result:
Qty * Rate/Unit * 0.9
Otherwise
- Result:
Qty * Rate/Unit
Any line item with 100 or more units gets the discounted total. Everything else gets the standard total.
Adding more conditions to one rule
Use AND and OR to combine conditions in a single rule:
- AND — both conditions have to be true
- OR — either one is enough
For example, Qty >= 100 AND Tax > 0 only applies when both are true.
Reordering your thinking
If a rule never seems to fire, check what sits above it. An earlier, broader rule is probably catching those line items first. Move the more specific rule higher up.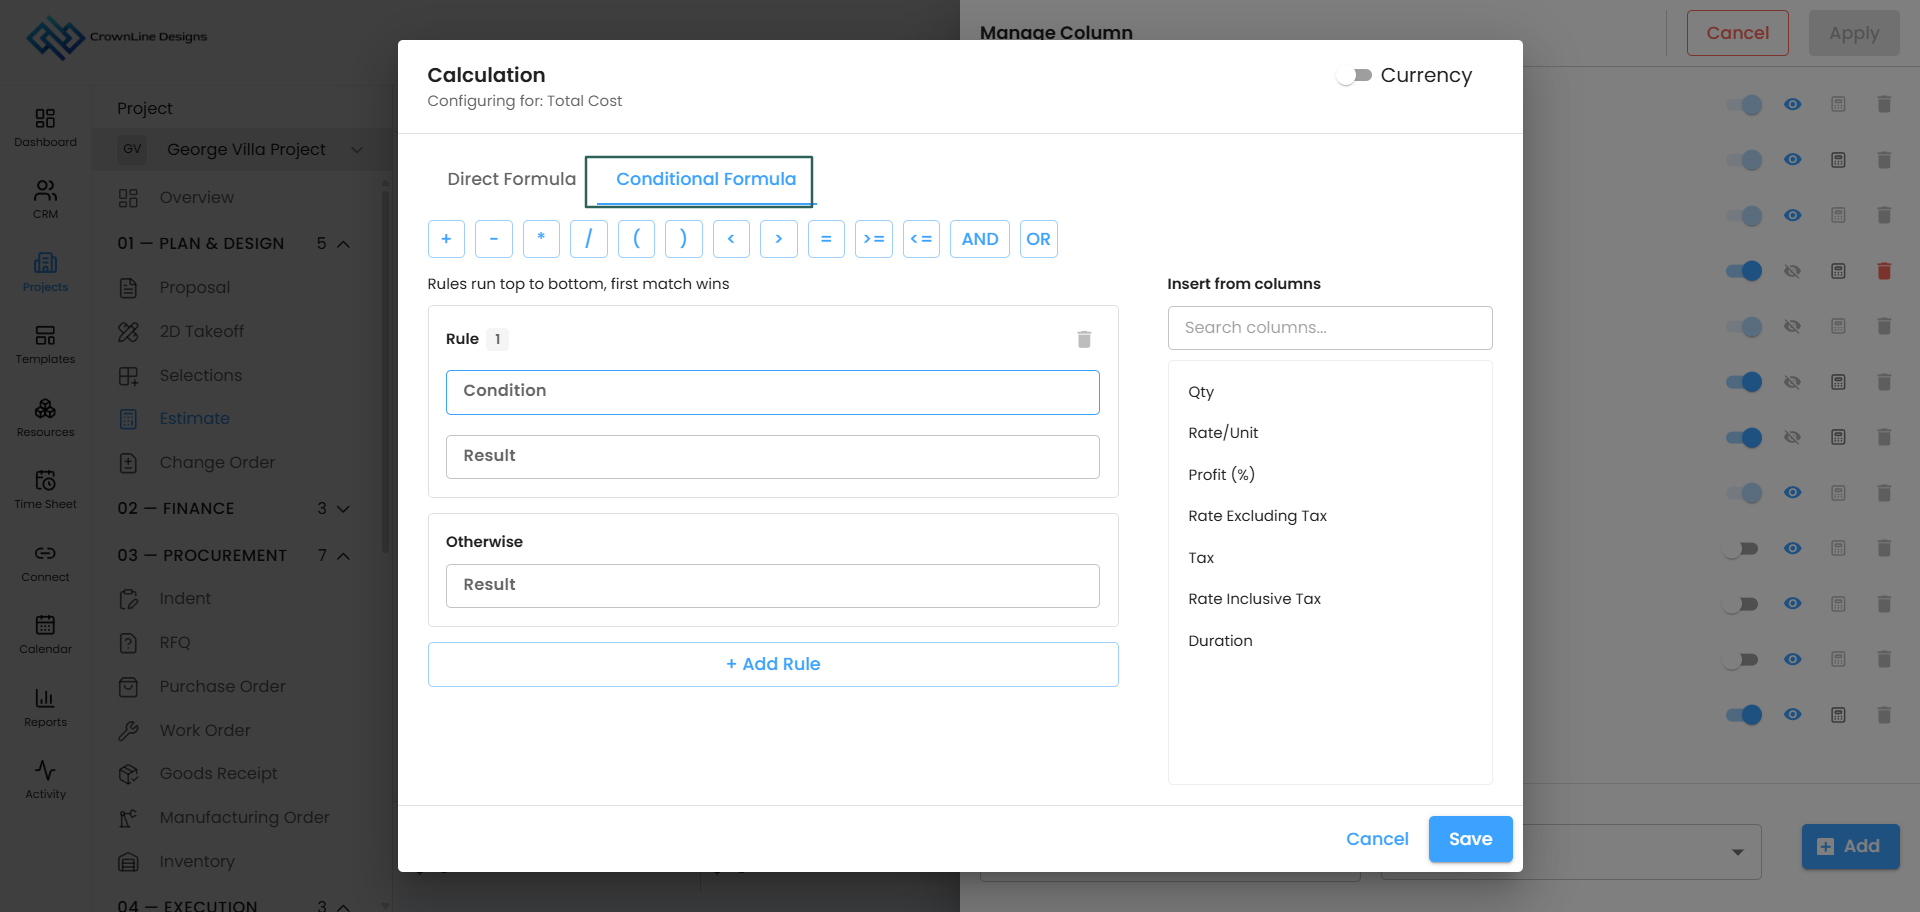
Part 9 — Applying your changes
Nothing takes effect until you click Apply at the top of the Manage Column panel.
Click Cancel and your changes are discarded, leaving the table as it was.
Tips
- Set your columns before you build the table. It is quicker than adding a column halfway through and going back to fill it in on every line item.
- Start with Direct Formula. Only move to Conditional Formula when the calculation genuinely changes from one line item to another.
- Always fill in Otherwise. It is the safety net that catches every line item your rules do not cover.
- Use Insert from columns rather than typing. It guarantees the column name matches exactly.
- Check a few line items after saving. Put your formula against a small quantity and a large one to confirm it behaves the way you expect.
Was this article helpful?
That’s Great!
Thank you for your feedback
Sorry! We couldn't be helpful
Thank you for your feedback
Feedback sent
We appreciate your effort and will try to fix the article